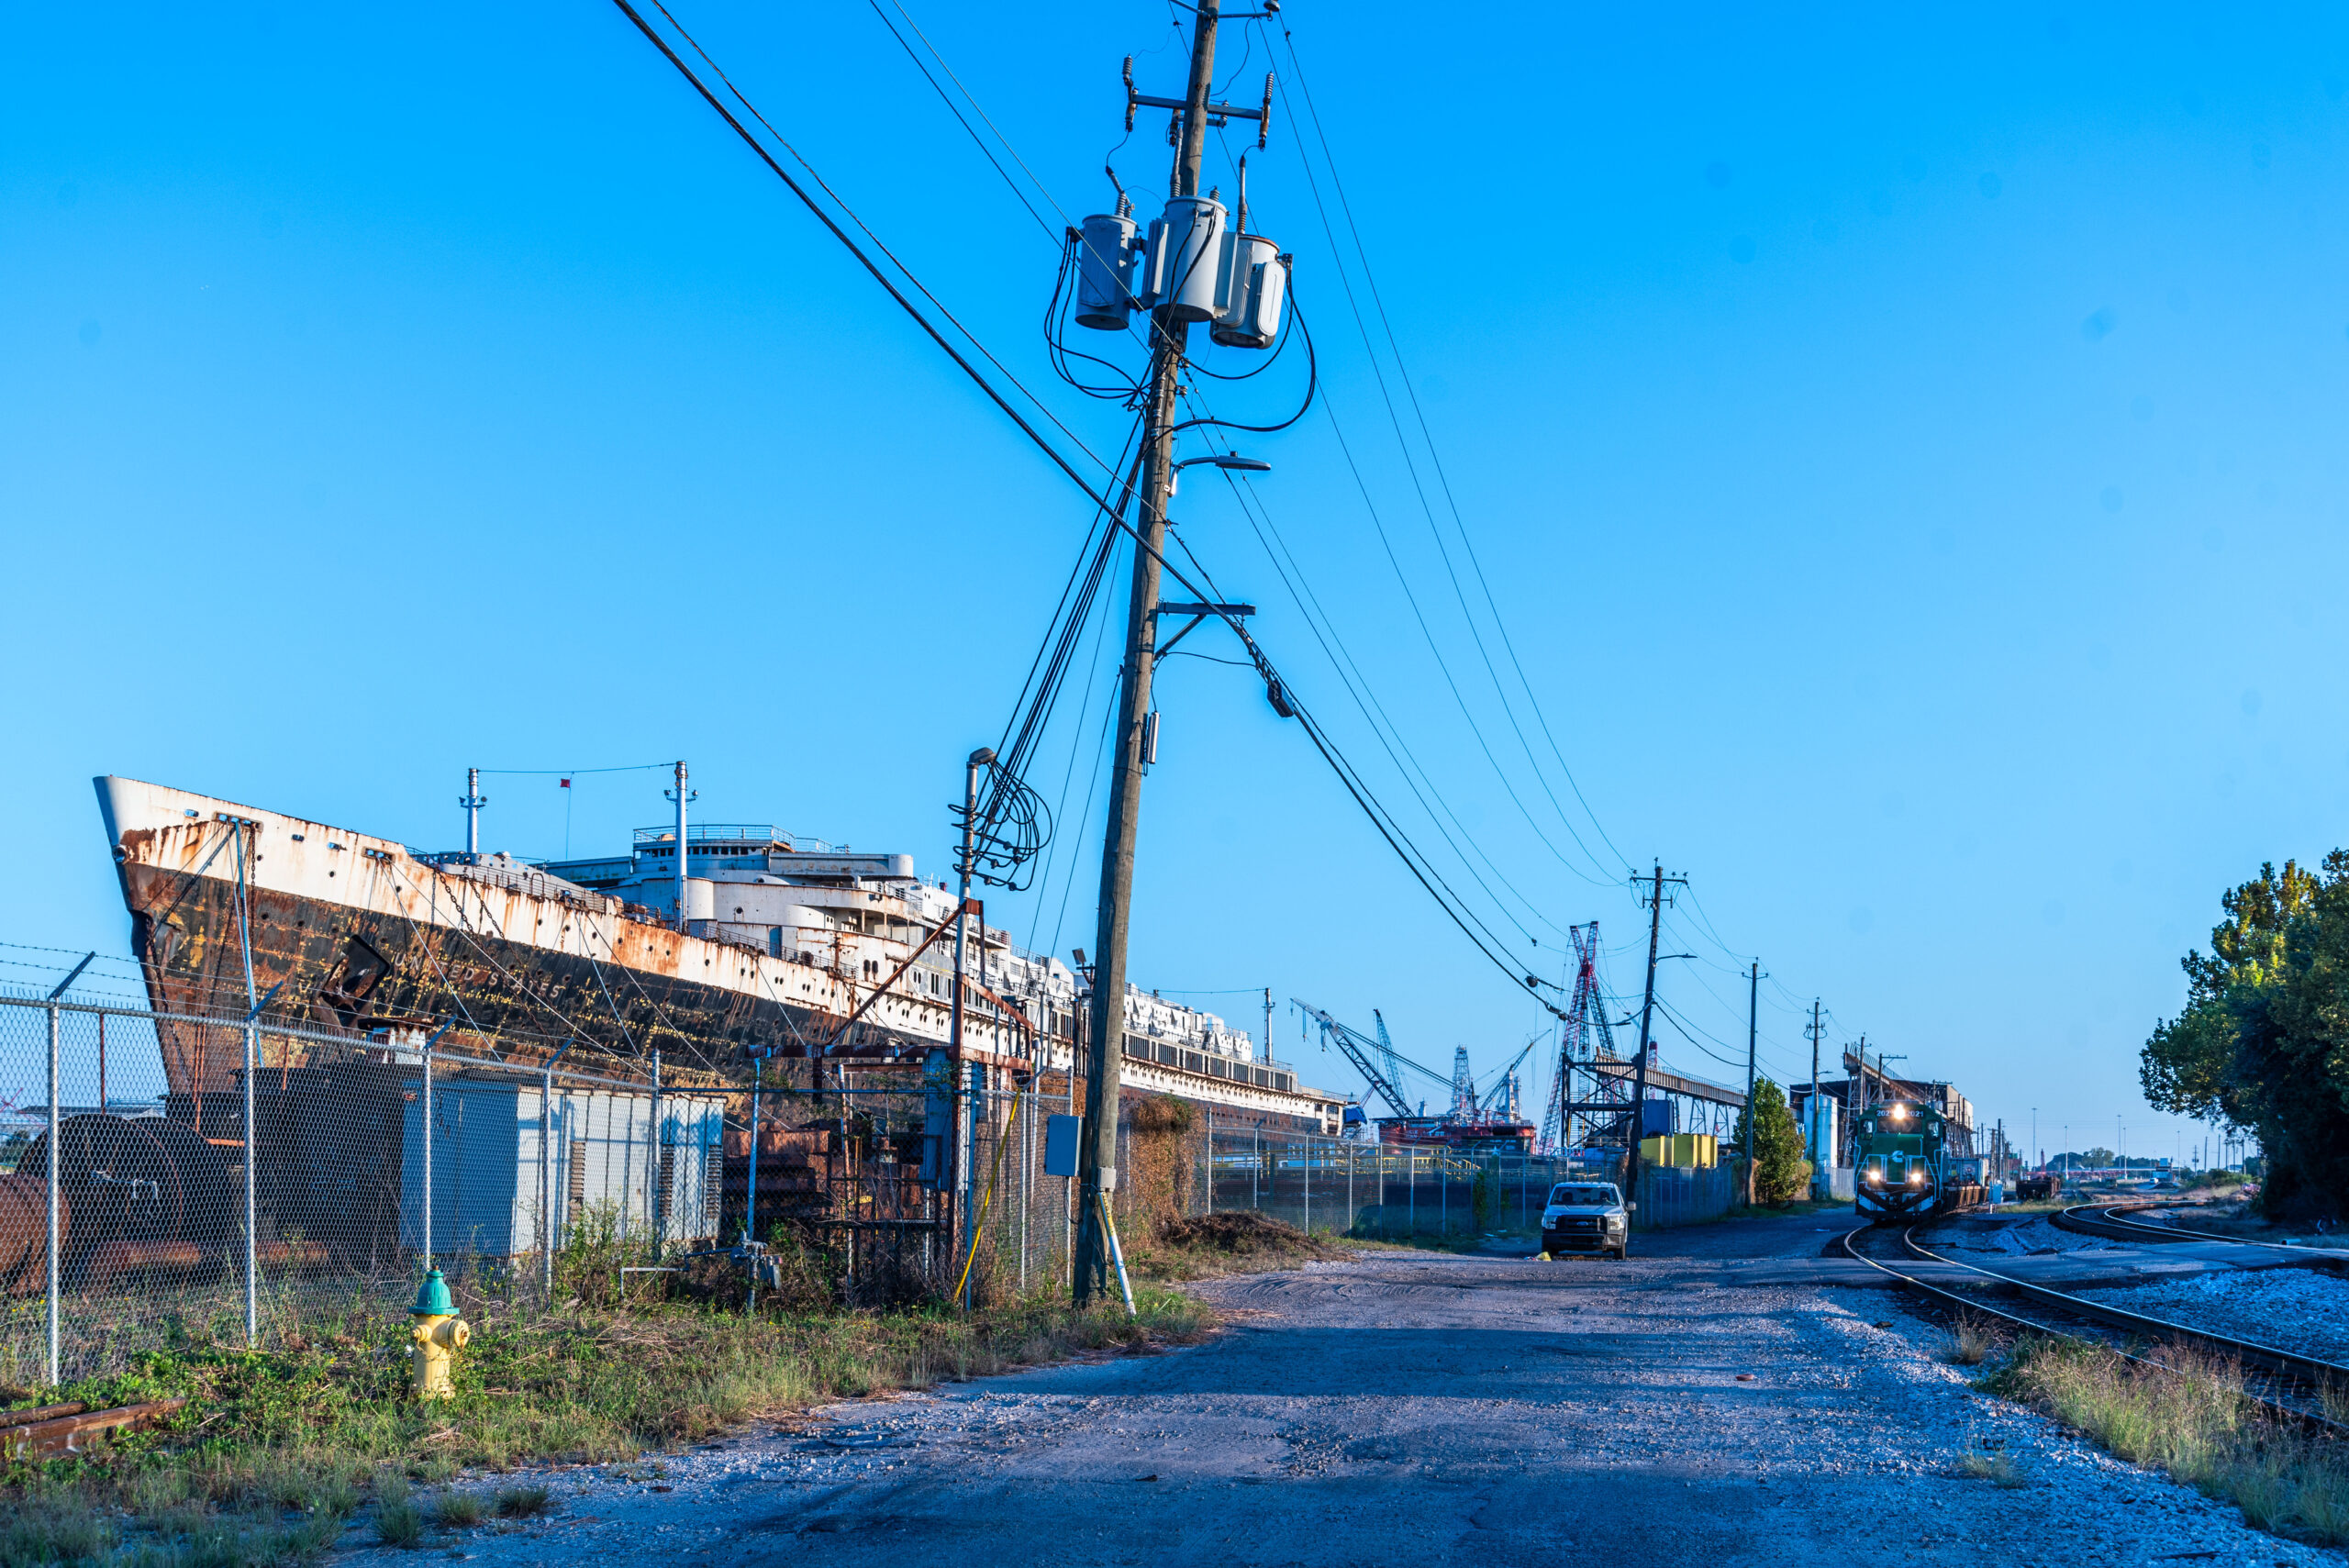
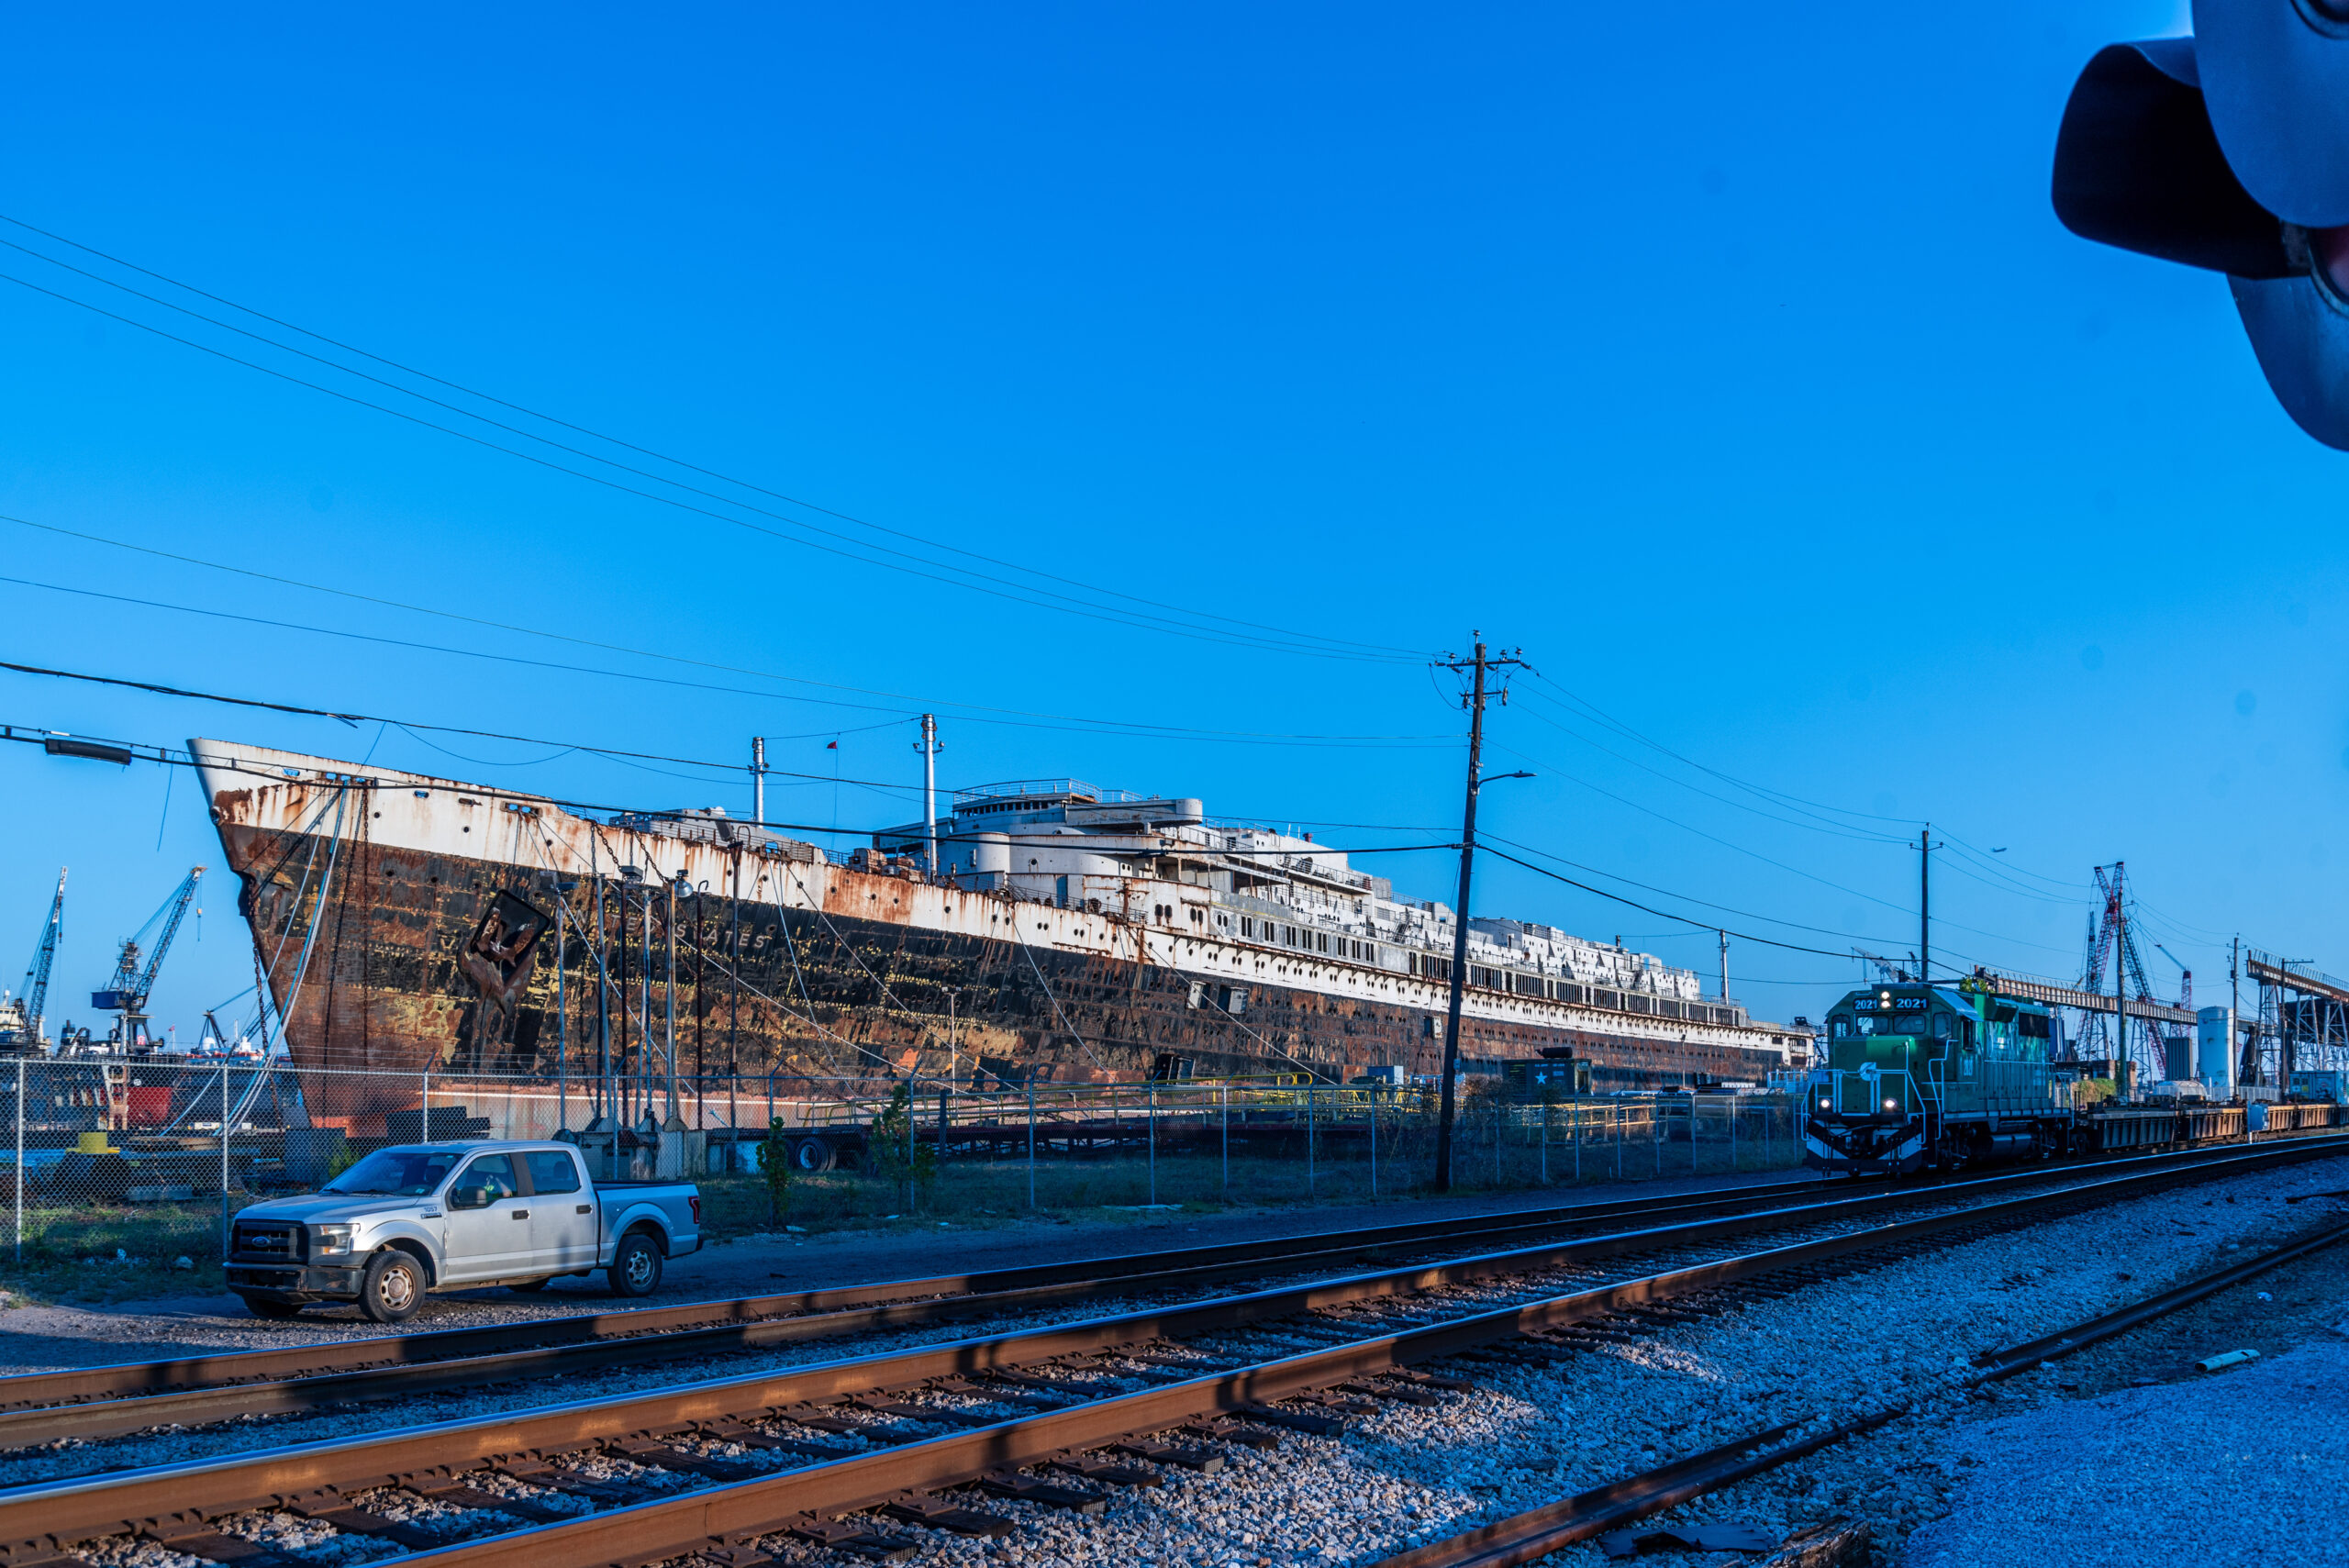
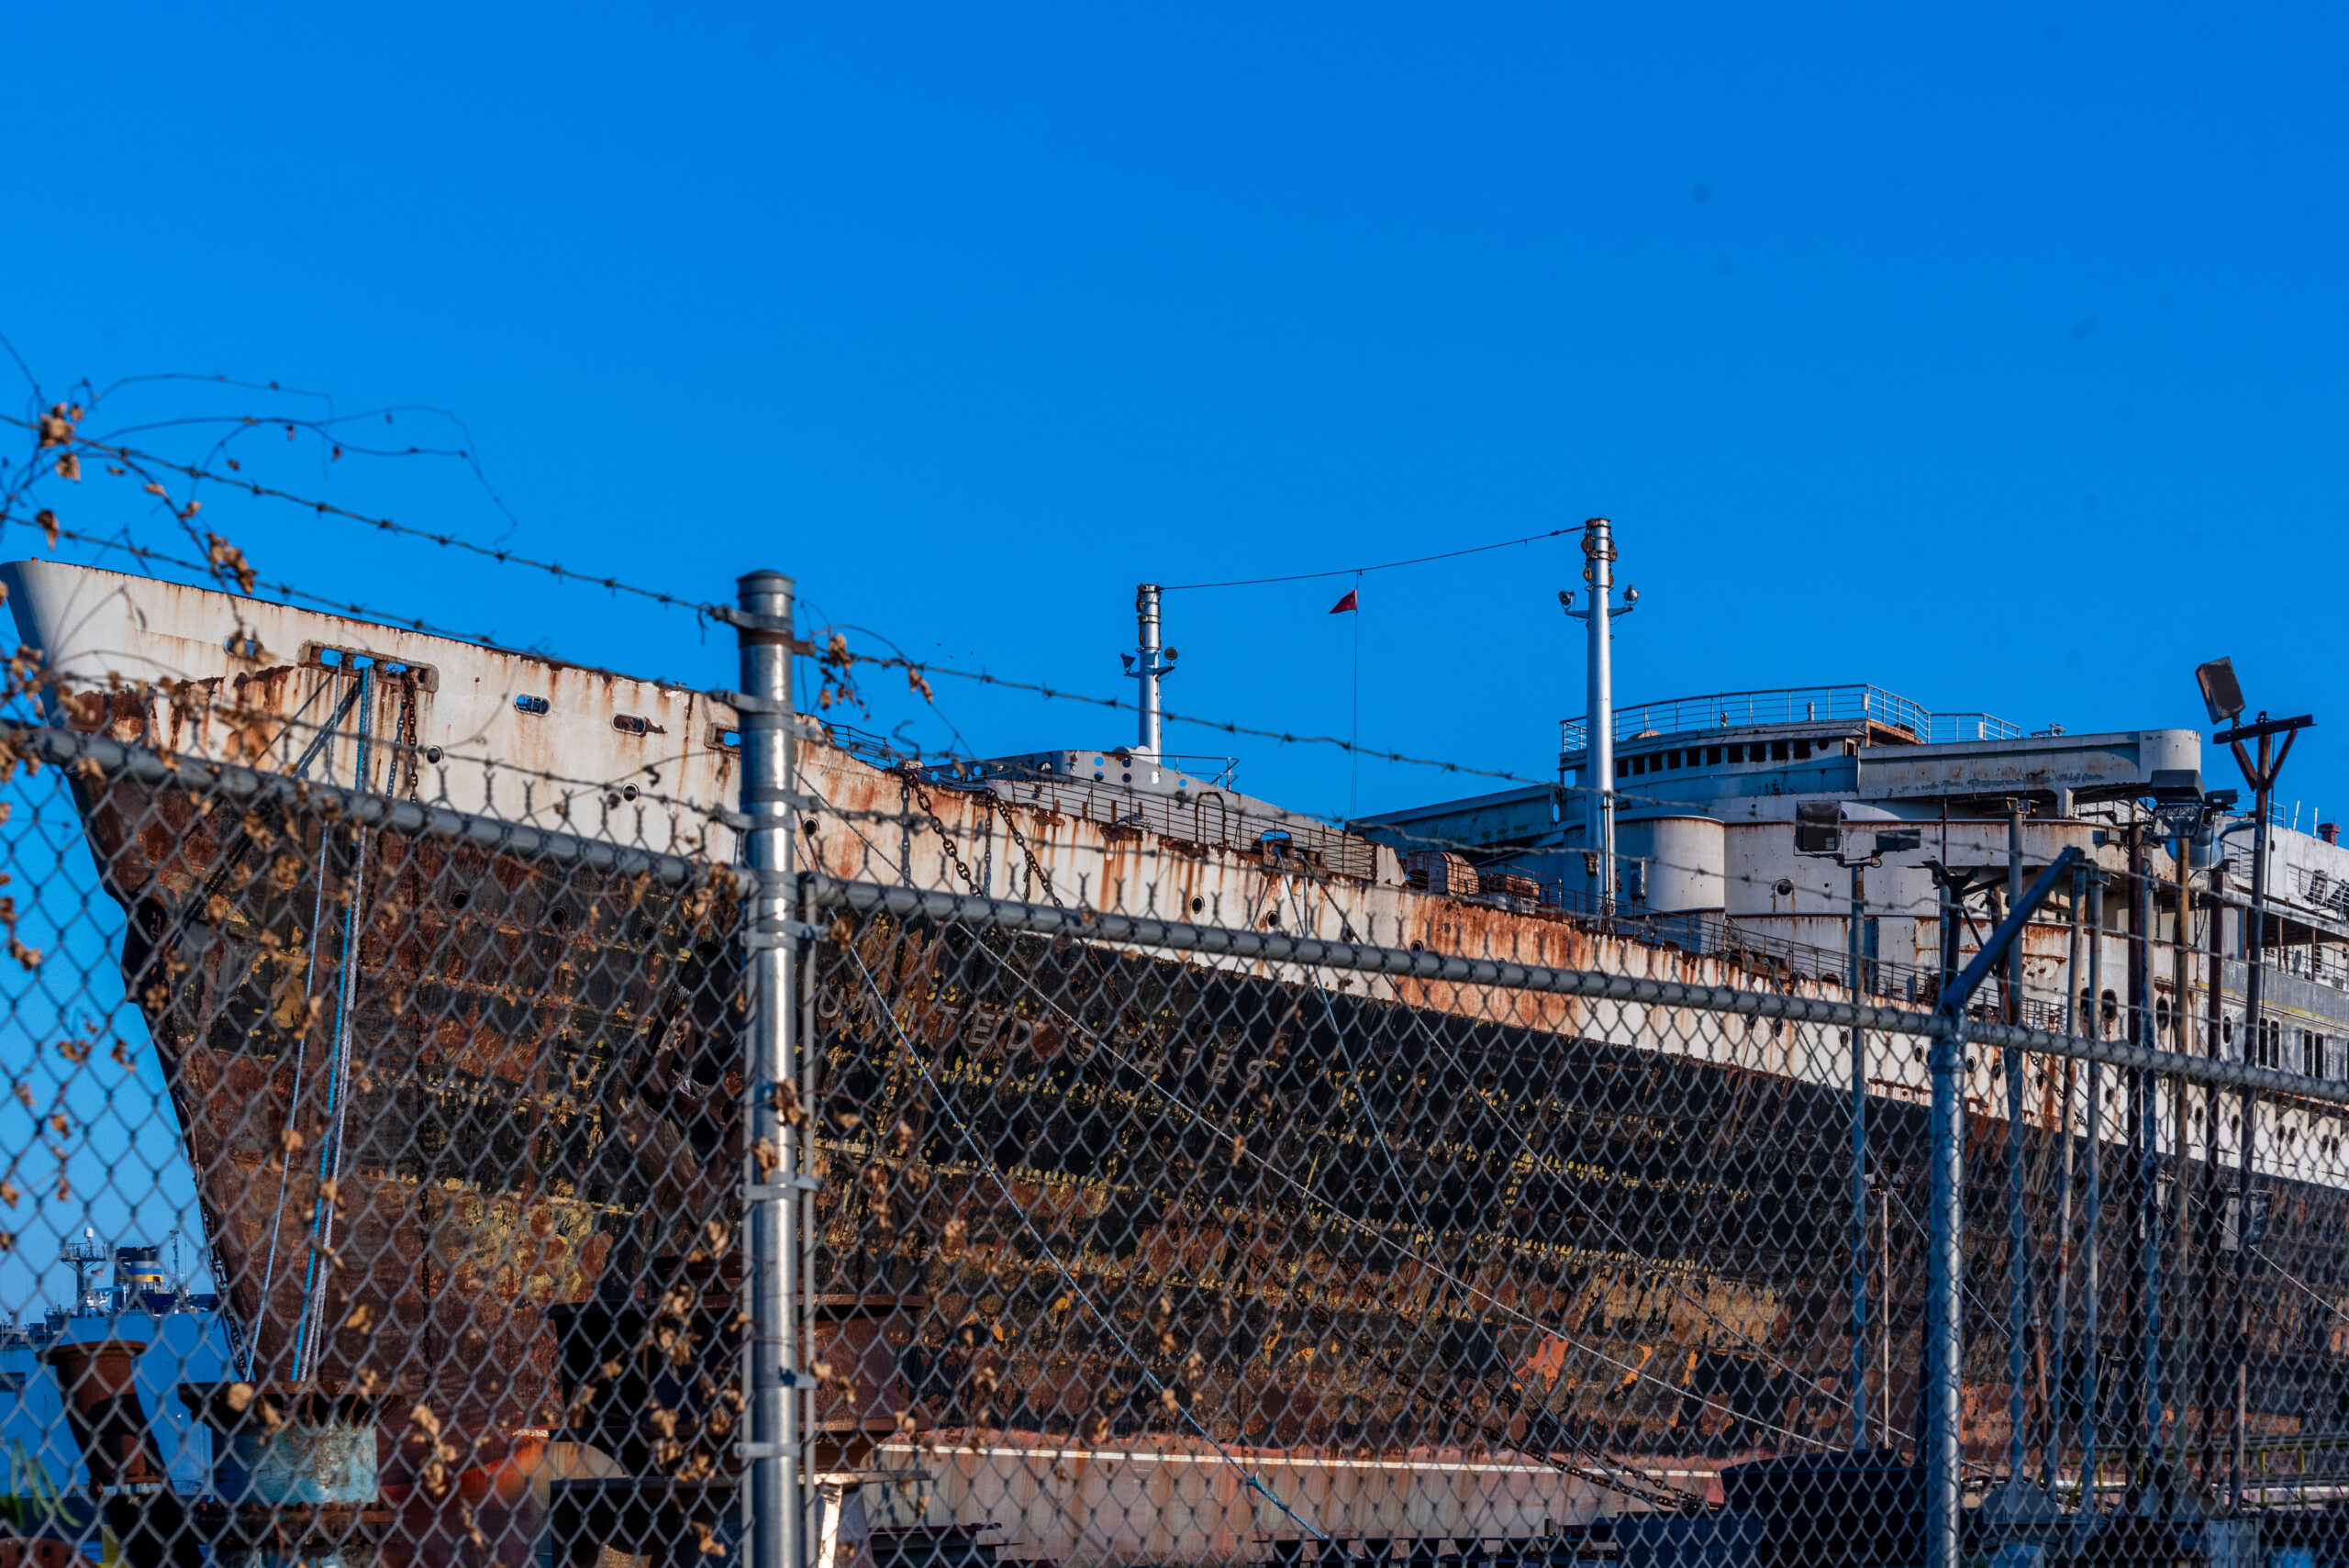
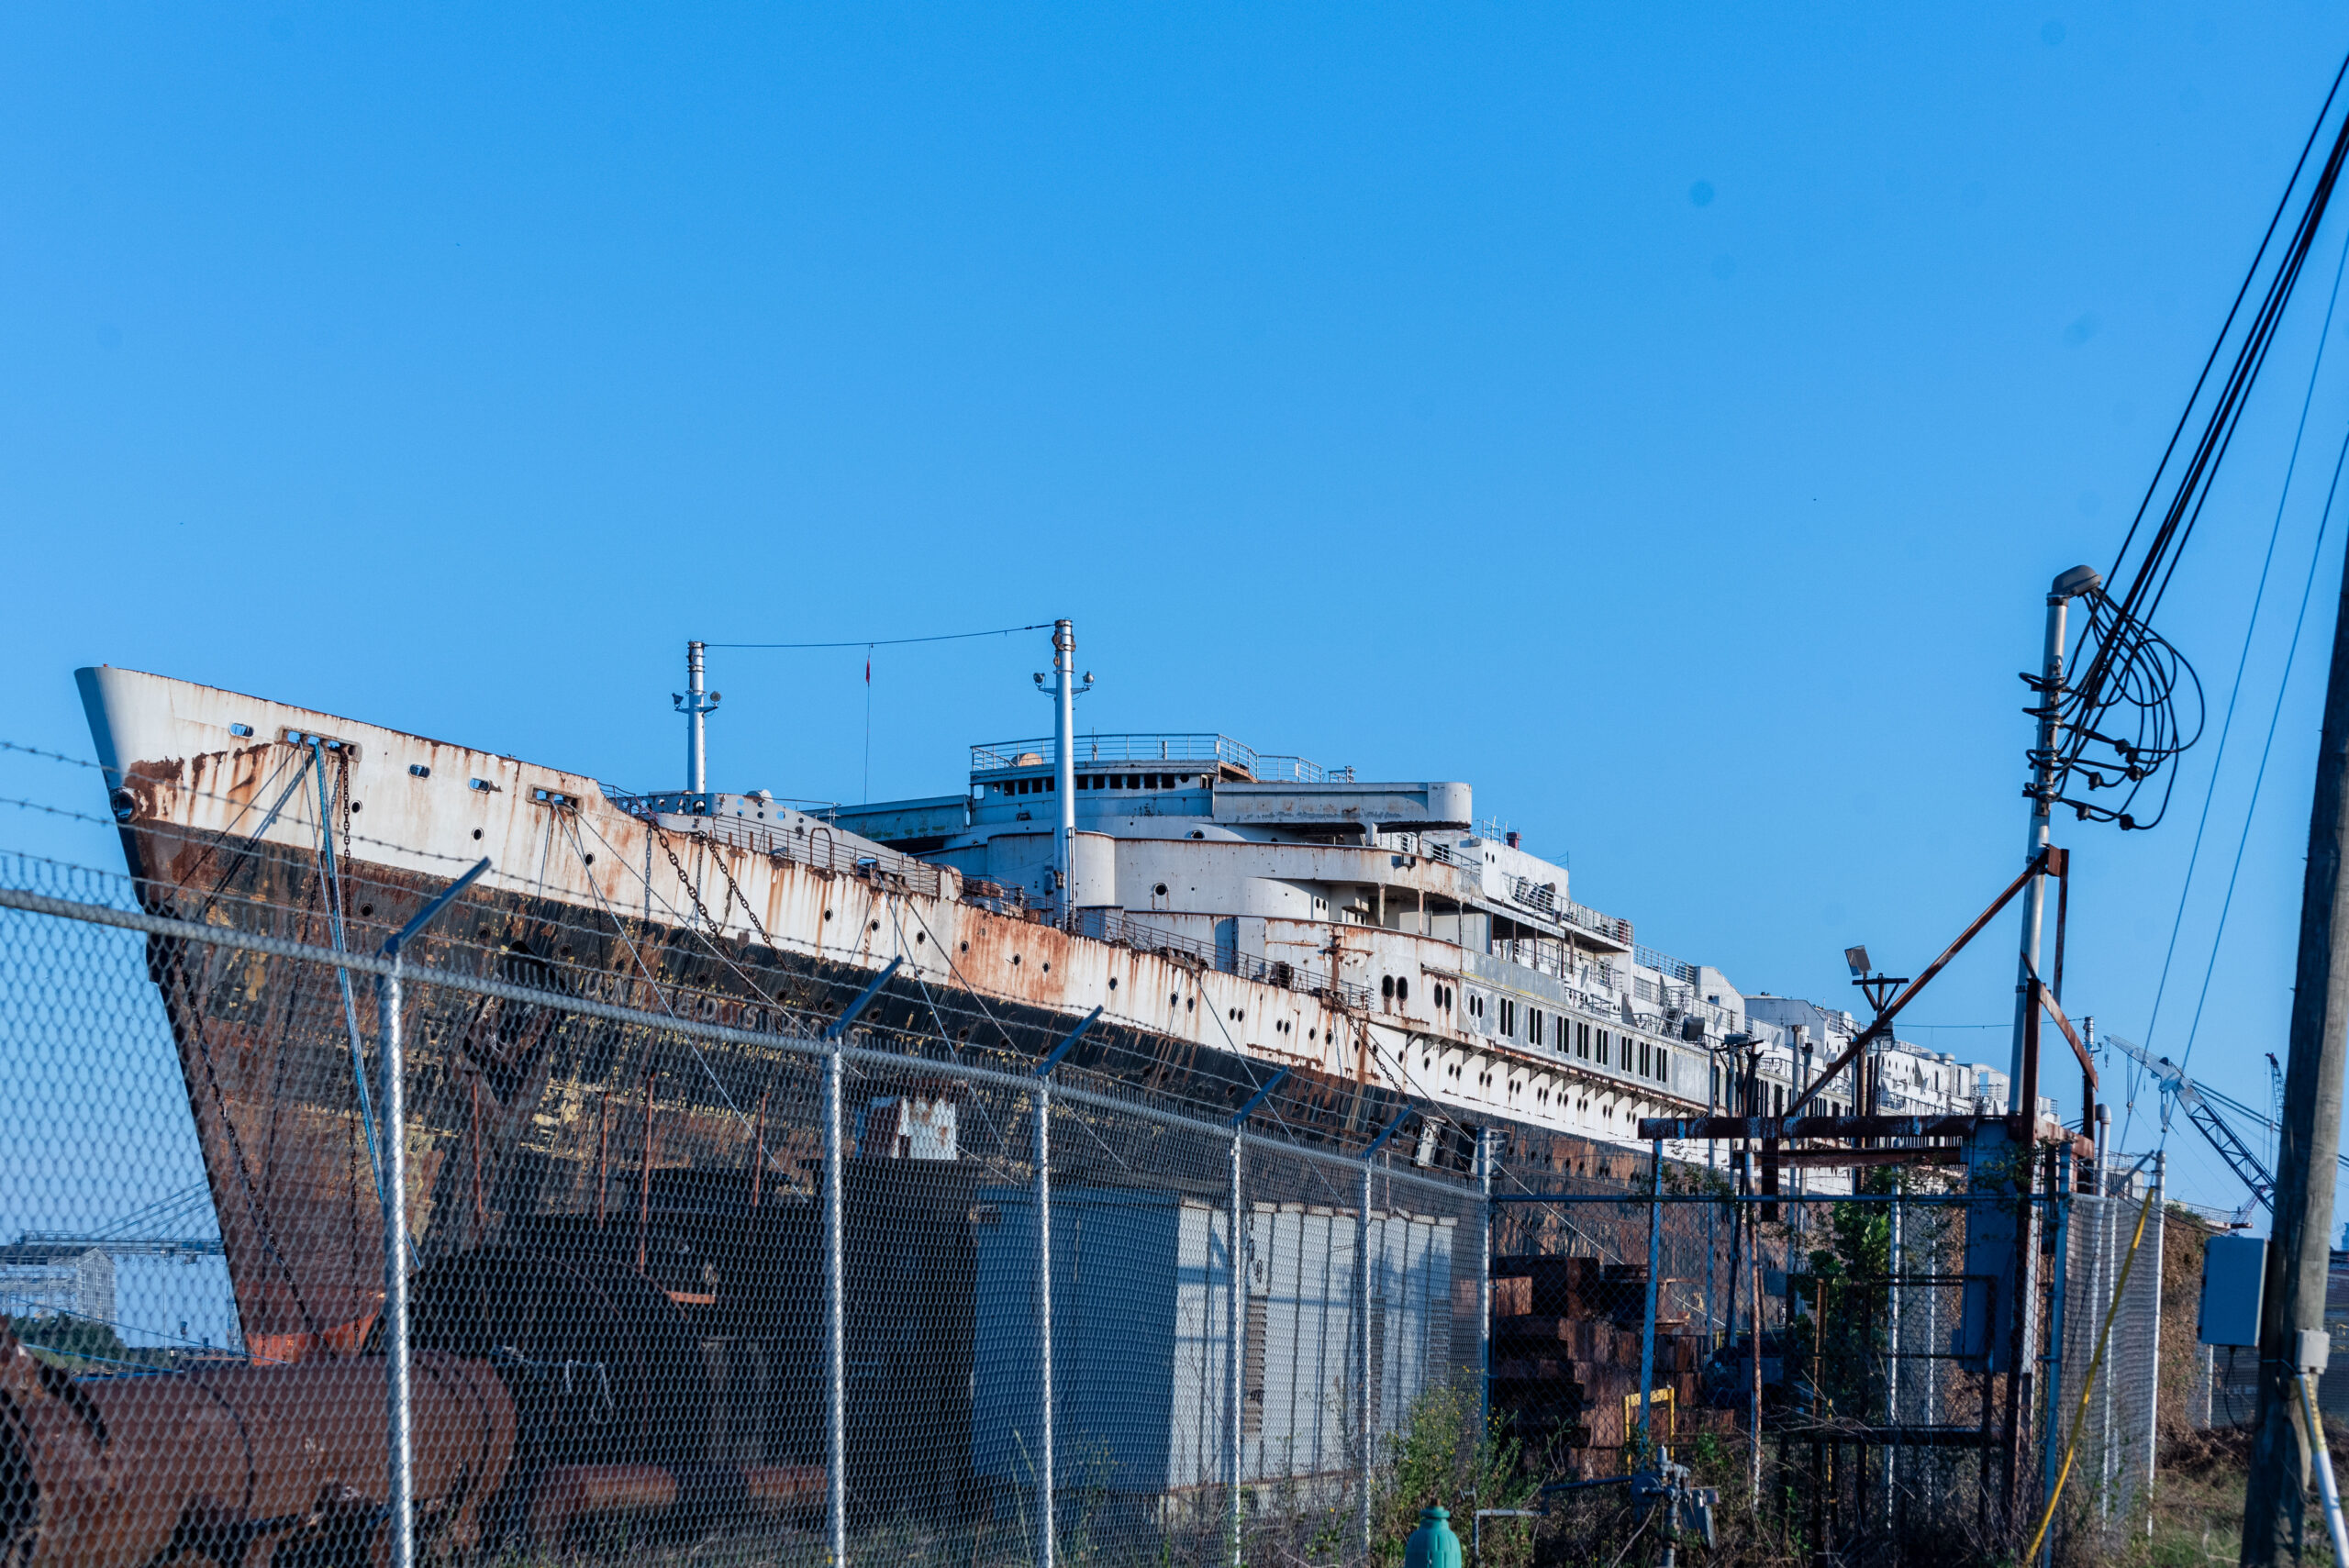
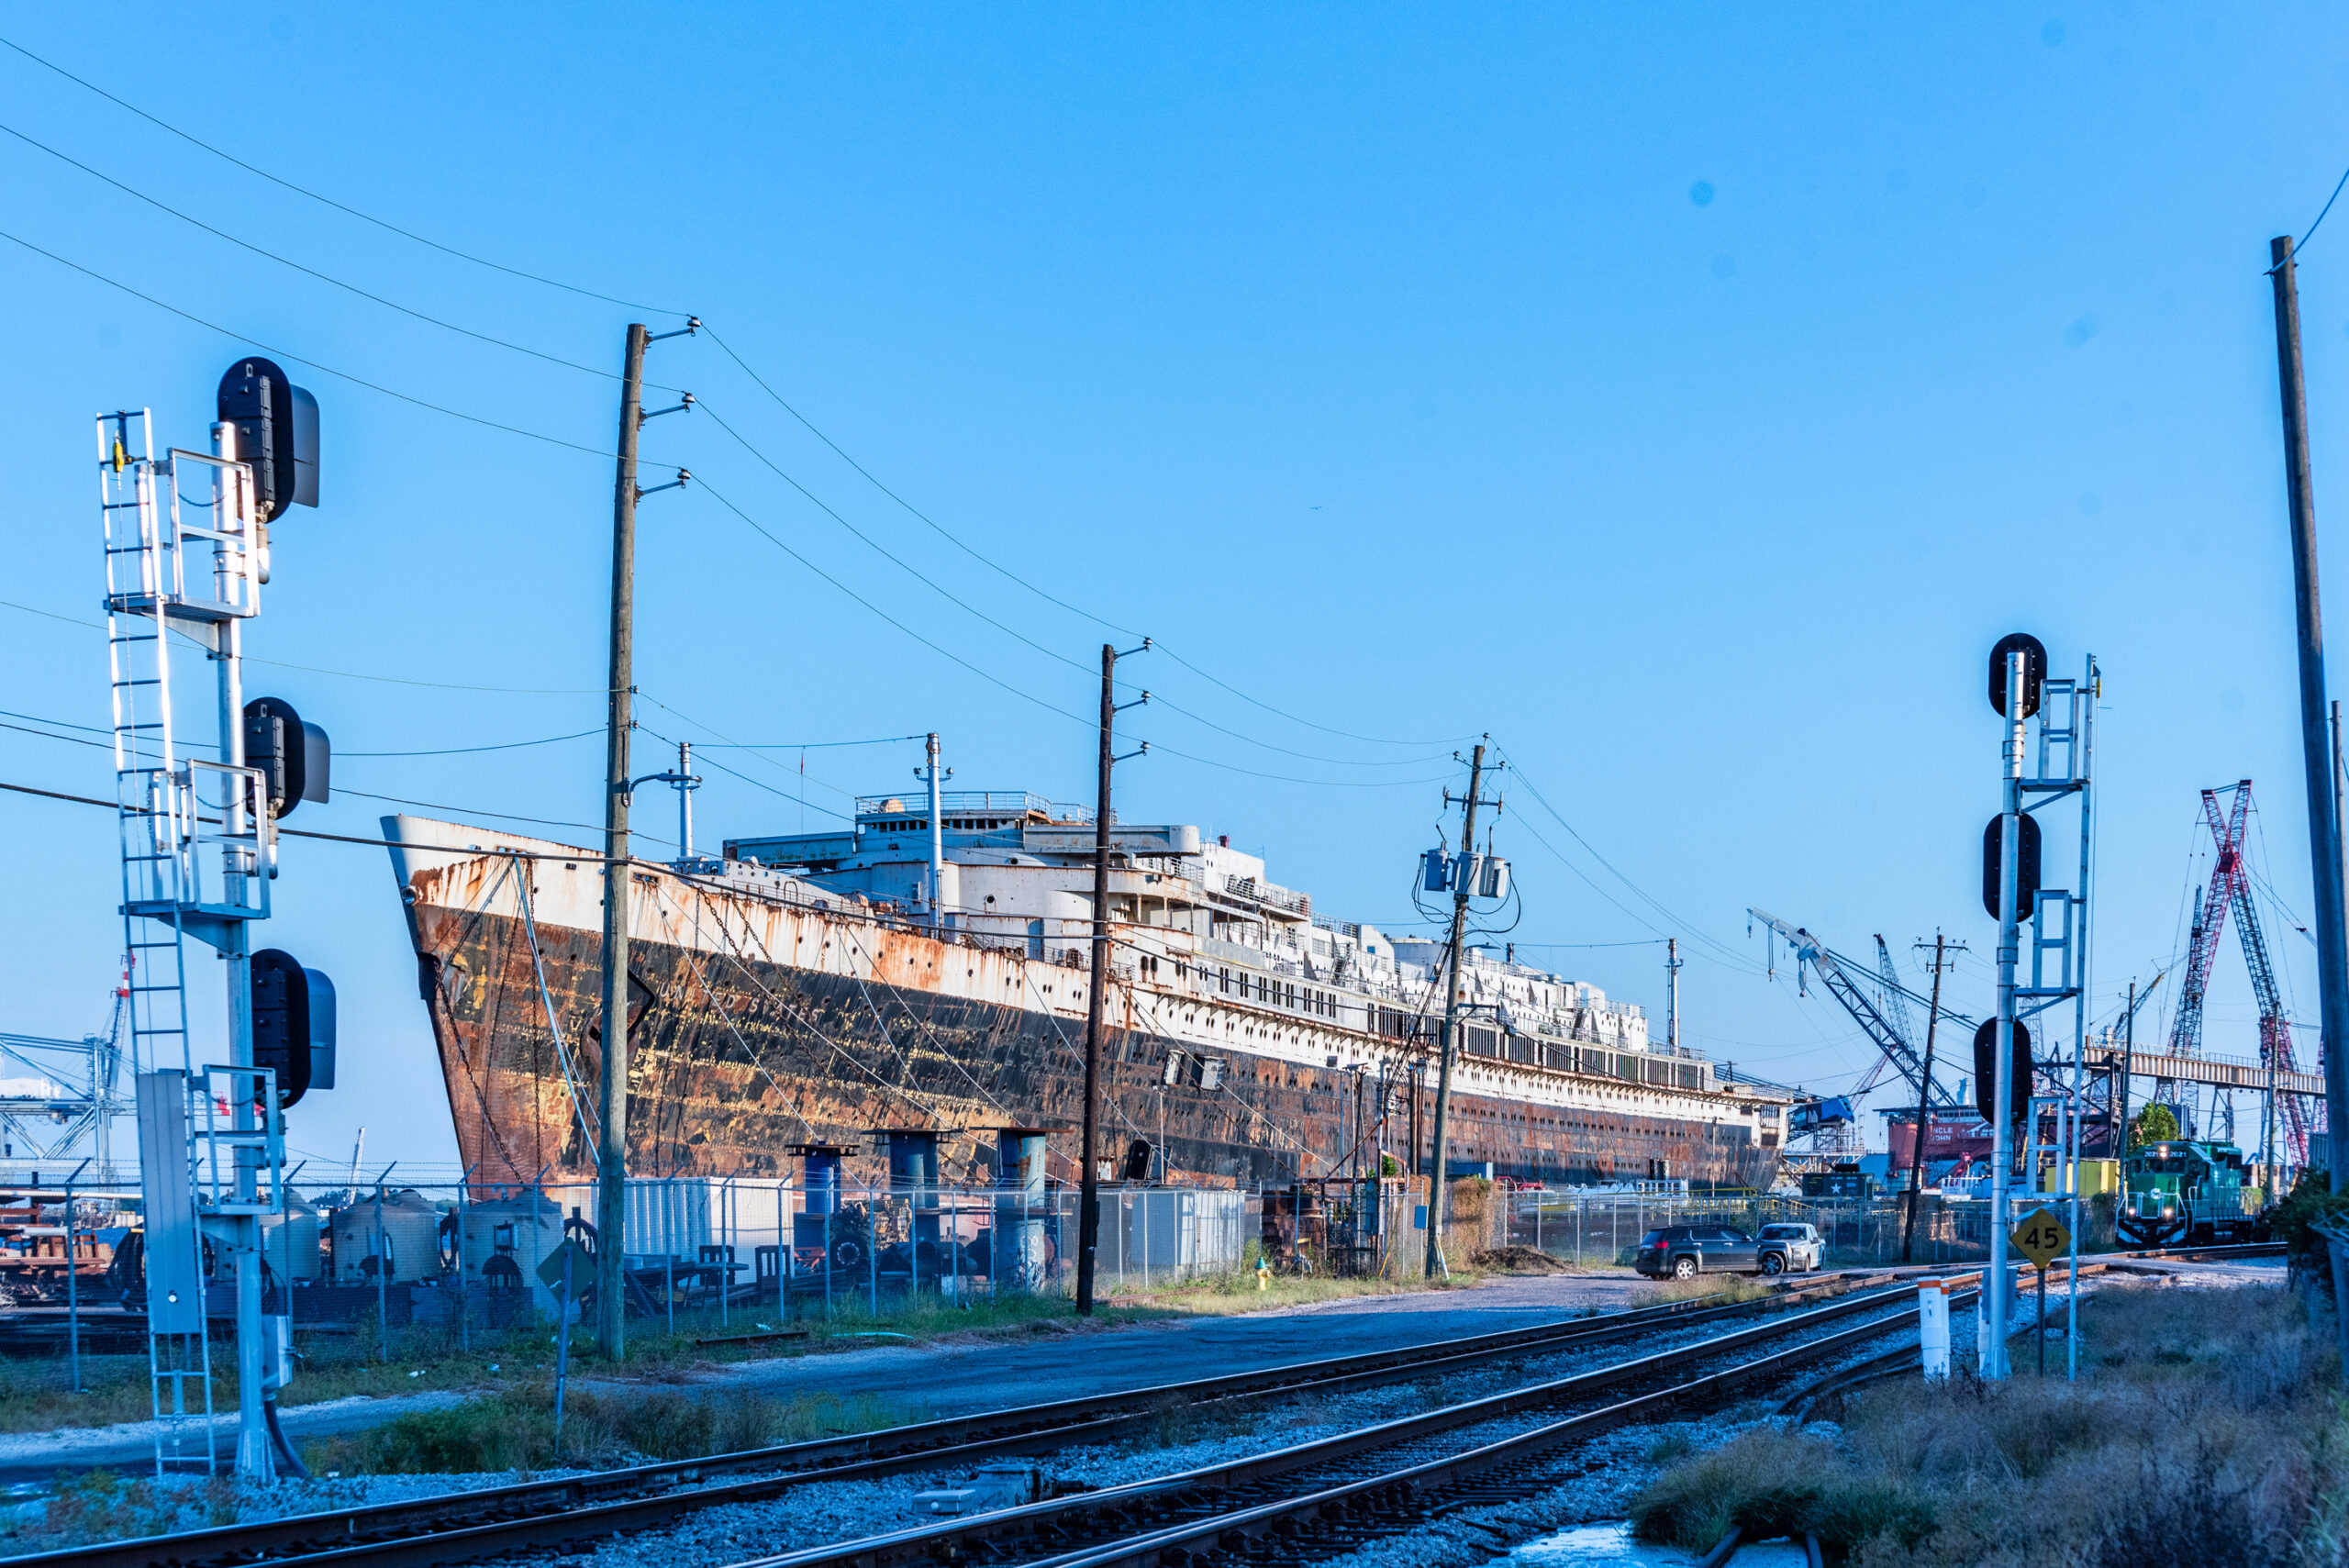
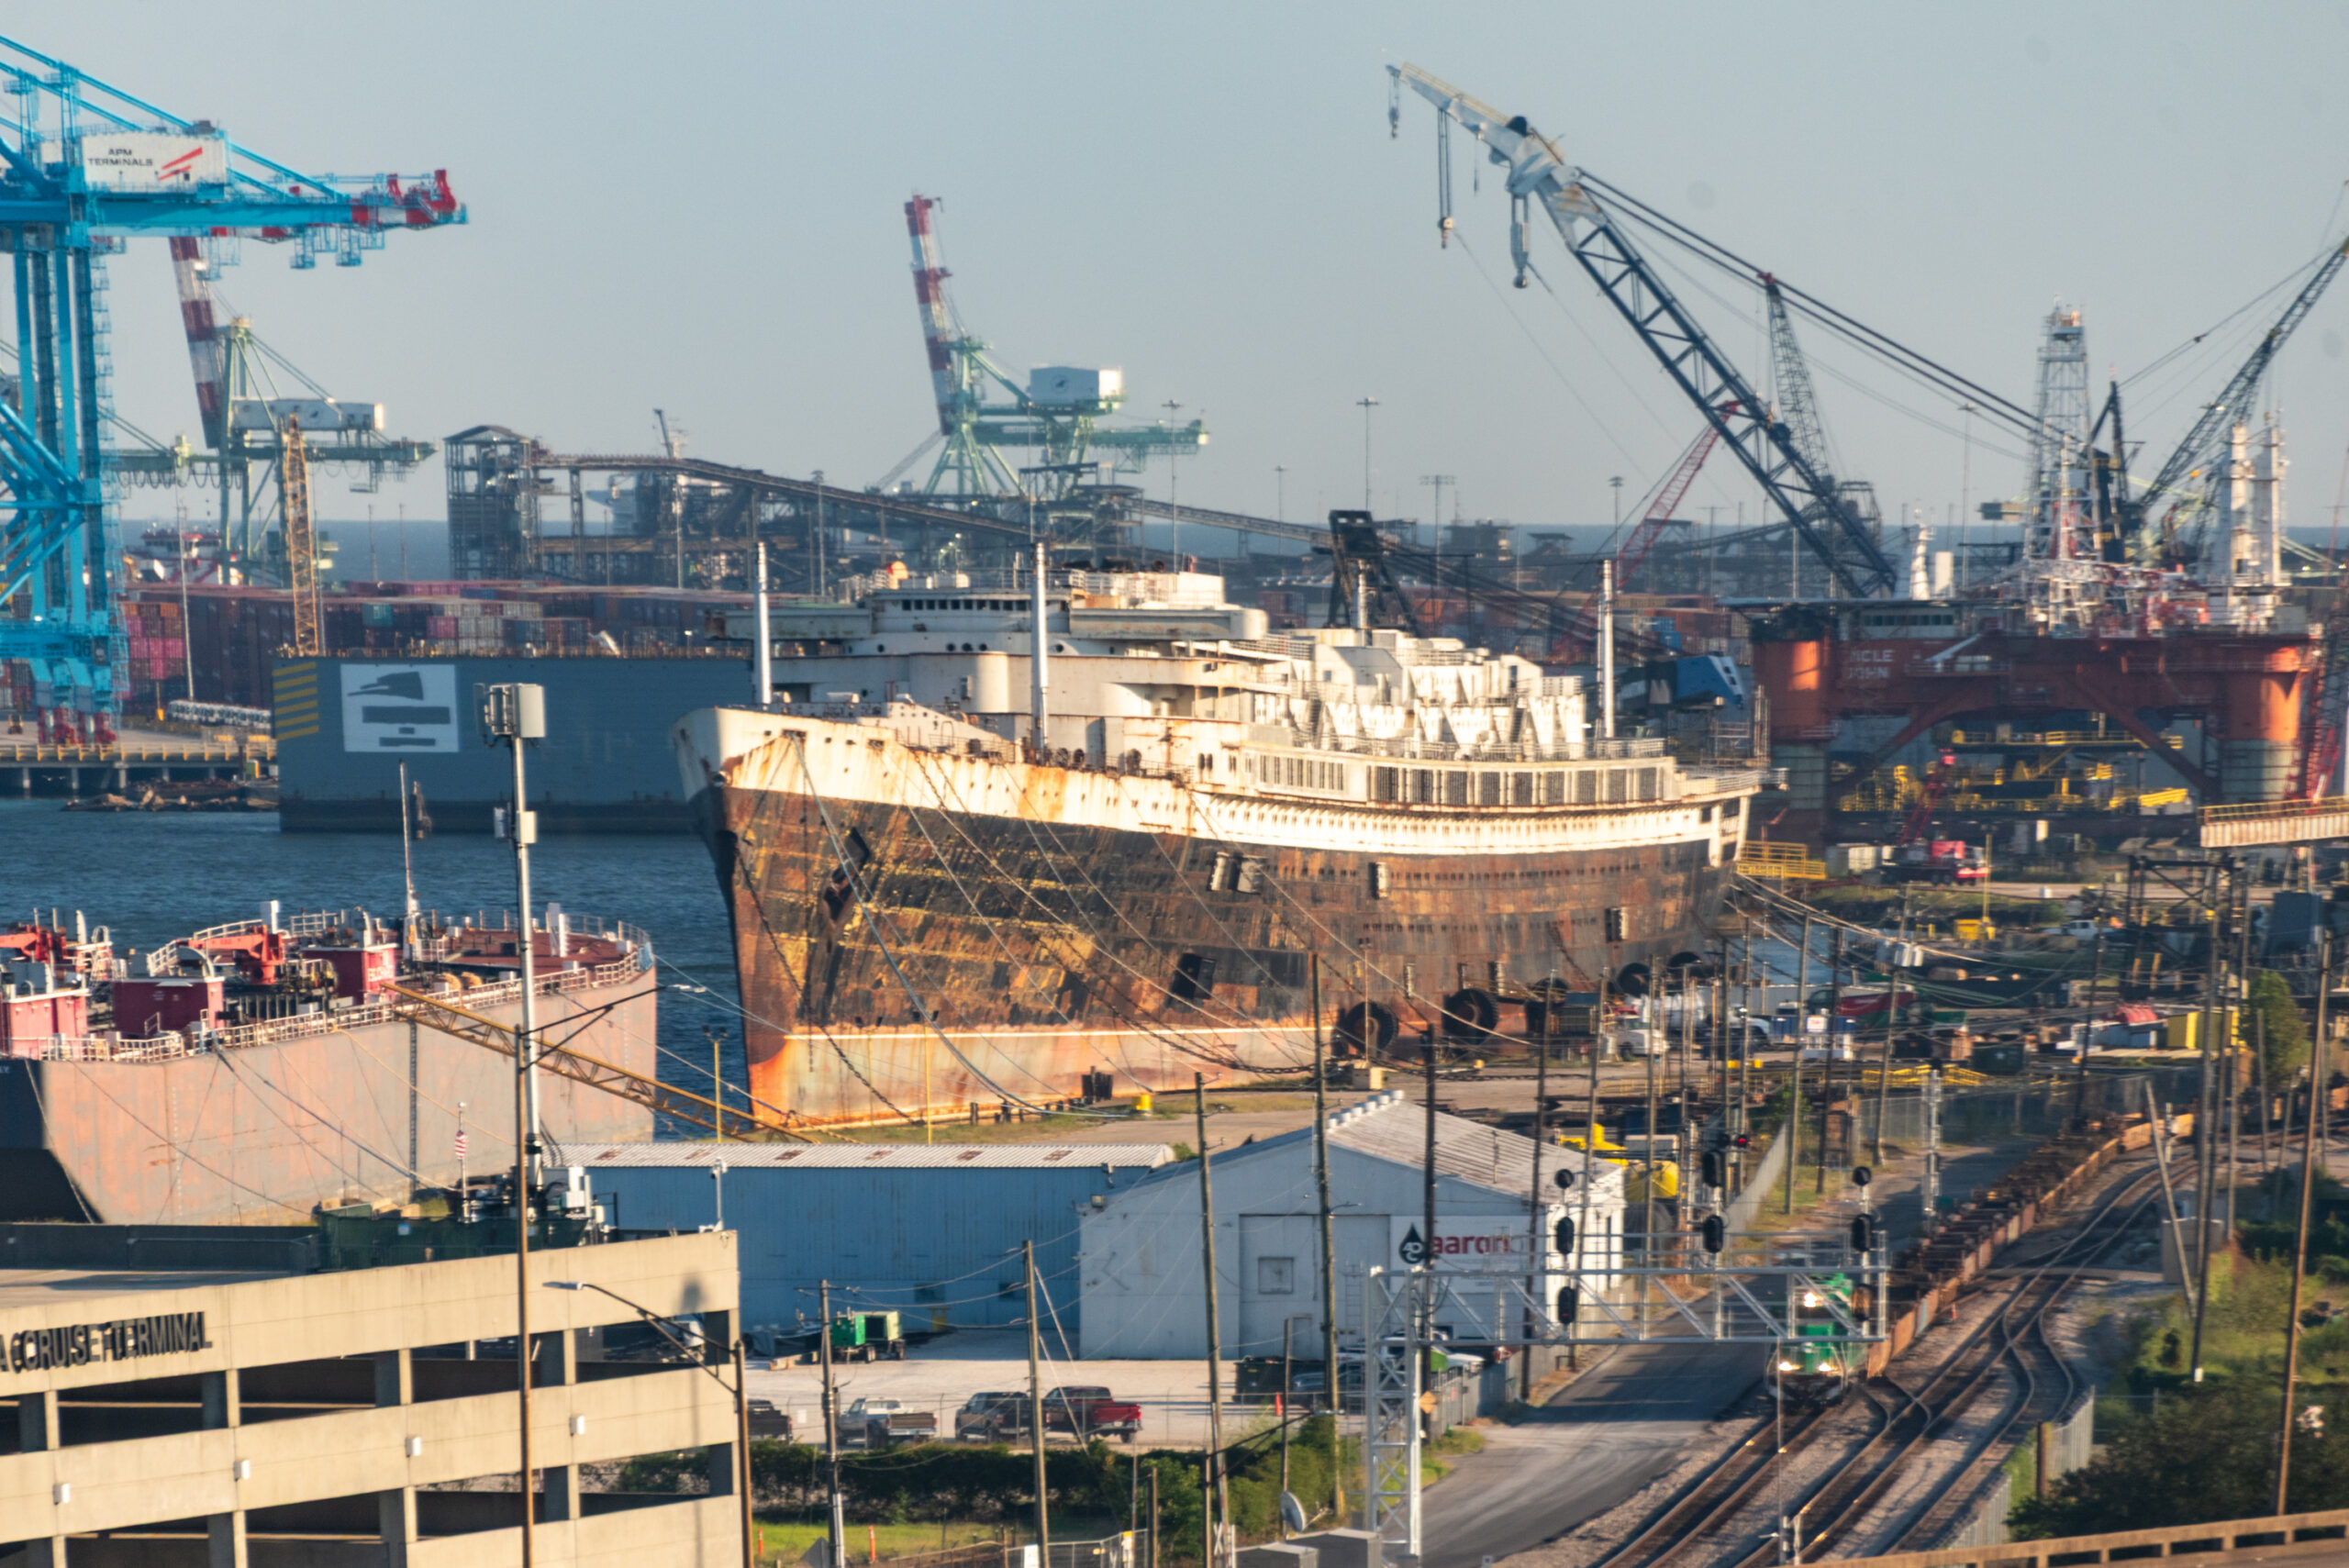
SS United States is a retired American ocean liner that was built during 1950 and 1951 for United States Lines. She is the largest ocean liner to be entirely constructed in the United States and the fastest ocean liner to cross the Atlantic Ocean in either direction, earning the Blue Riband for the highest average speed since her maiden voyage in 1952, a title that remains uncontested.
When you grow up in Bayou La Batre, there are certain things long gone that you hear about from the older residents.
The railroad. The fine hotels destroyed by the 1906 and 1916 storms, never to return. The old bridge. (Twist: I remember that one, and the old Dauphin Island bridge too!)
When we would drive around the shore on Shell Belt Road, my Pawpaw would point out a location where the “Old Factory” used to be. There was not even a trace of anything that looked like a building remaining.
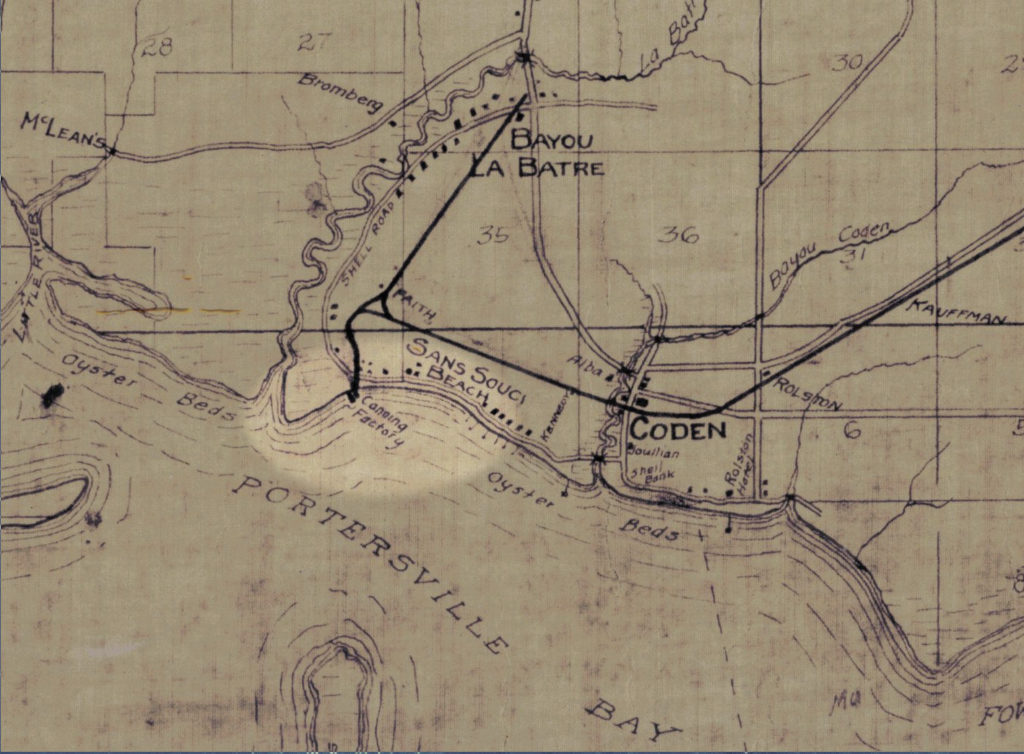
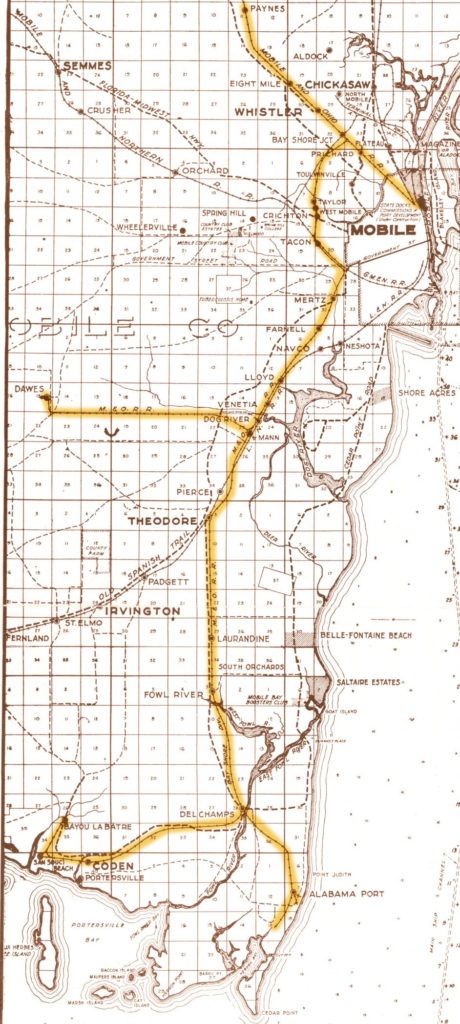
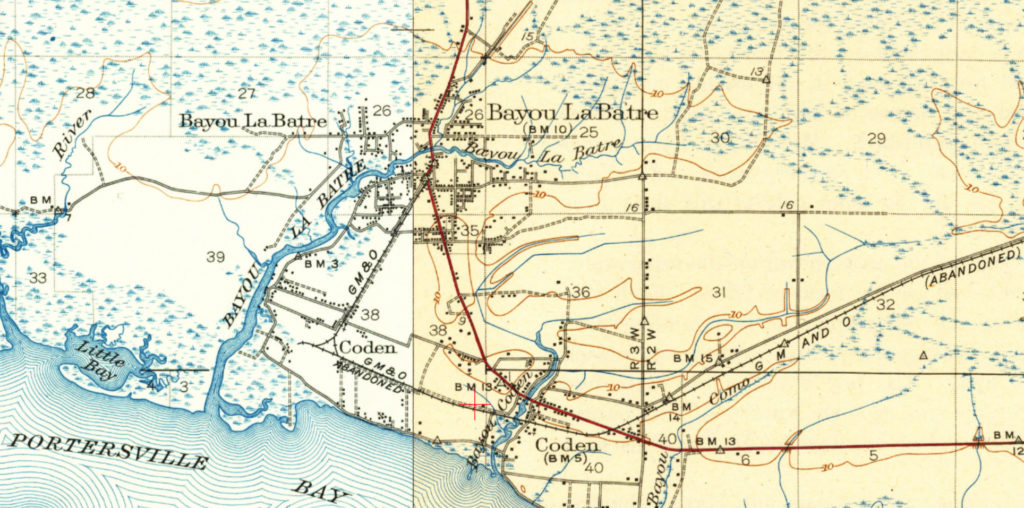
This map, dated 1918, shows a “Canning Factory” at the end of a railroad spur, located conveniently near to the “Oyster Beds”. I don’t remember anyone specifically saying that oysters were what was processed at the factory, but it would certainly make a lot of sense if it was.
The railroad here was the “Bay Shore” branch of the Mobile & Ohio Railroad, which operated from approximately 1899 to 1940. There is little to show of this line today, the rails having been physically removed soon after abandonment. It is memorialized by Railroad Street in the Bayou and Bay Shore Avenue in Mobile.
This (1926) map highlights the route from Mobile to Bayou La Batre:
At the far western end of the wye at San Souci was the lead to the Alabama Canning Company, also known as the American Canning Company. Alabama Canning Company was located on the north end of Coffee Island, about a mile south of the junction at San Souci. It was on this track that the trains would head down first, then back up through the wye toward Bayou la Batre.
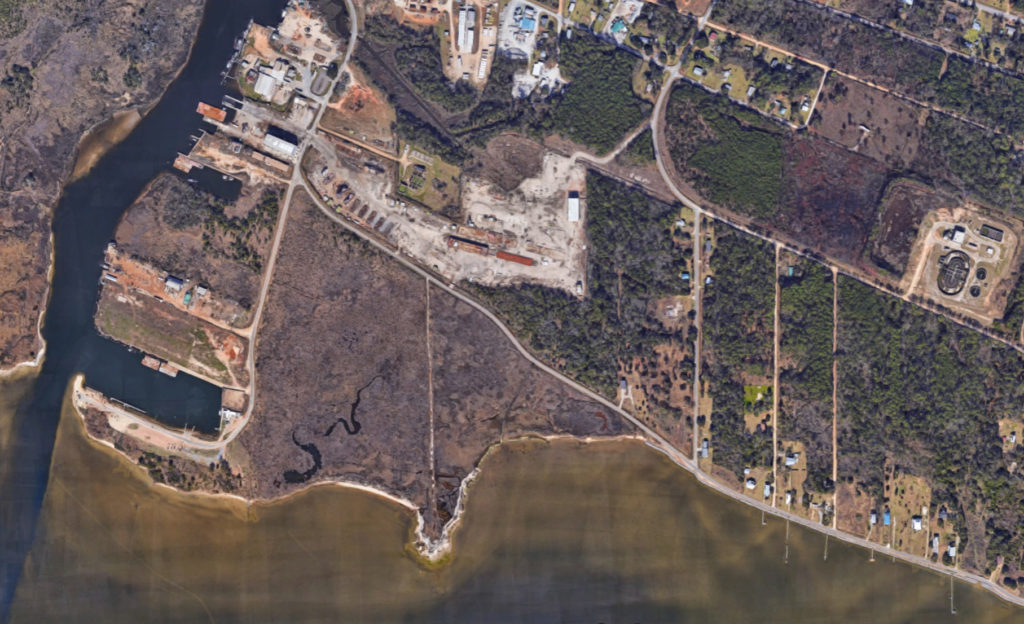
The 1918 map disagrees about the factory being on Coffee Island, and I’m inclined to side with the map. An island location would have required the railroad to build a mile-long trestle over the bay. This does not fit with any description of this railroad that I’ve ever heard of before, and would have been a literal “bridge to nowhere”.
It seems more reasonable that the factory was located on the mainland.
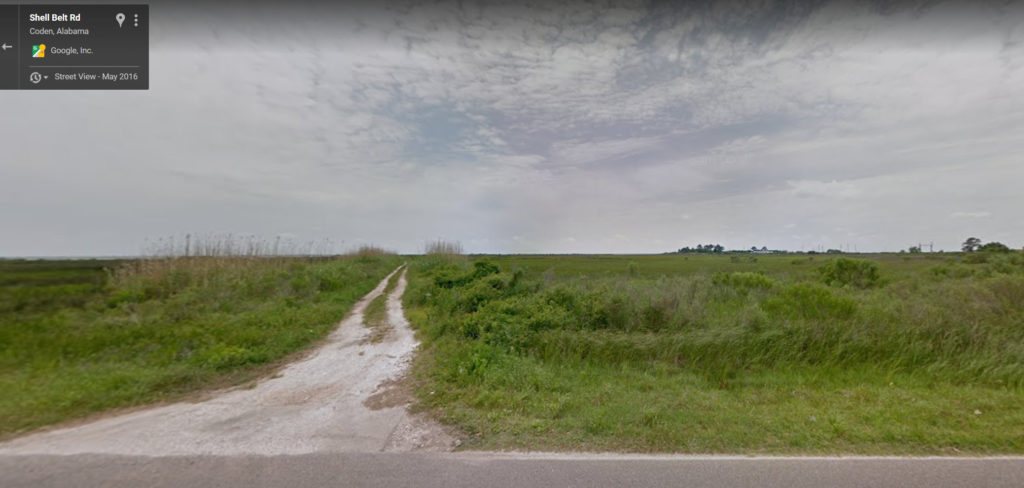
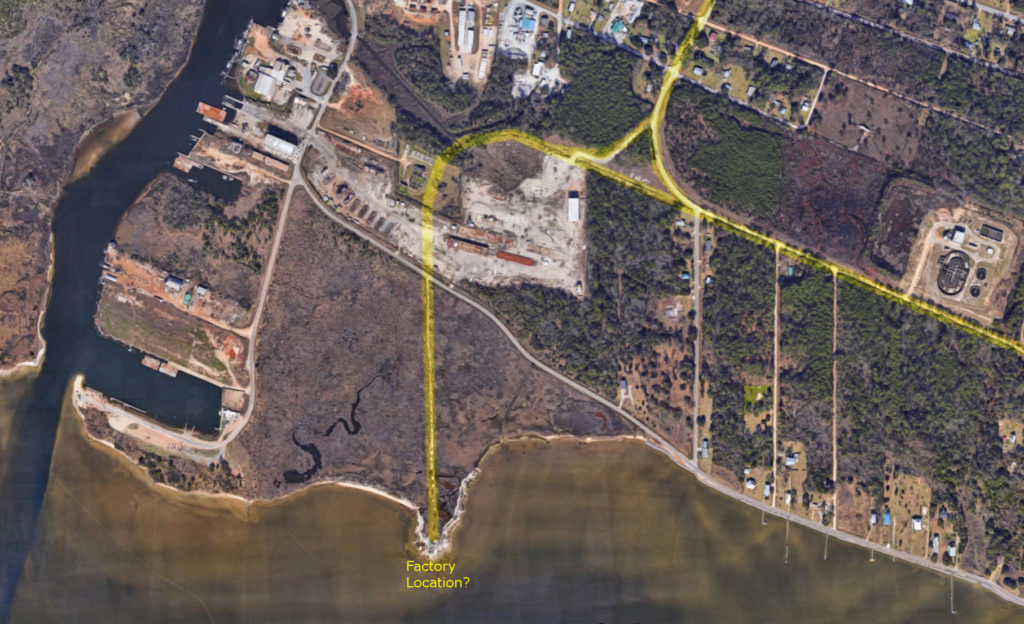
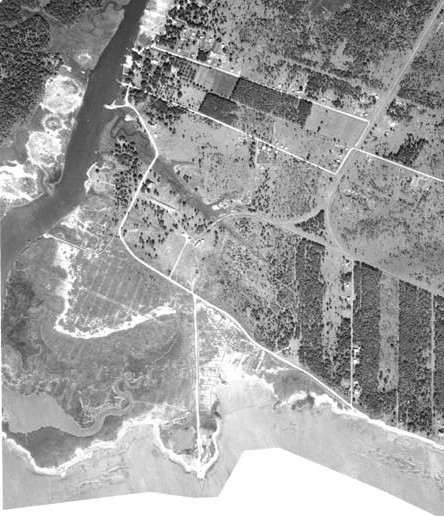
At the approximate location of where the “Old Factory” was said to be, there is still a dirt “road” off from Shell Belt Rd through the salt marsh, leading towards the shore of Portersville Bay. It goes to a point that naturally sticks out into the bay. It can clearly be seen on modern satellite images:
This is what it looks like in Google Street View (and in real life too!):
It is most consistent with the old map if this “road” is actually the railroad right-of-way. Here is the satellite image with the guessed route of the railroad tracks highlighted in yellow:
The real revelation happened when I began searching for more info on the “Alabama Canning Company”.
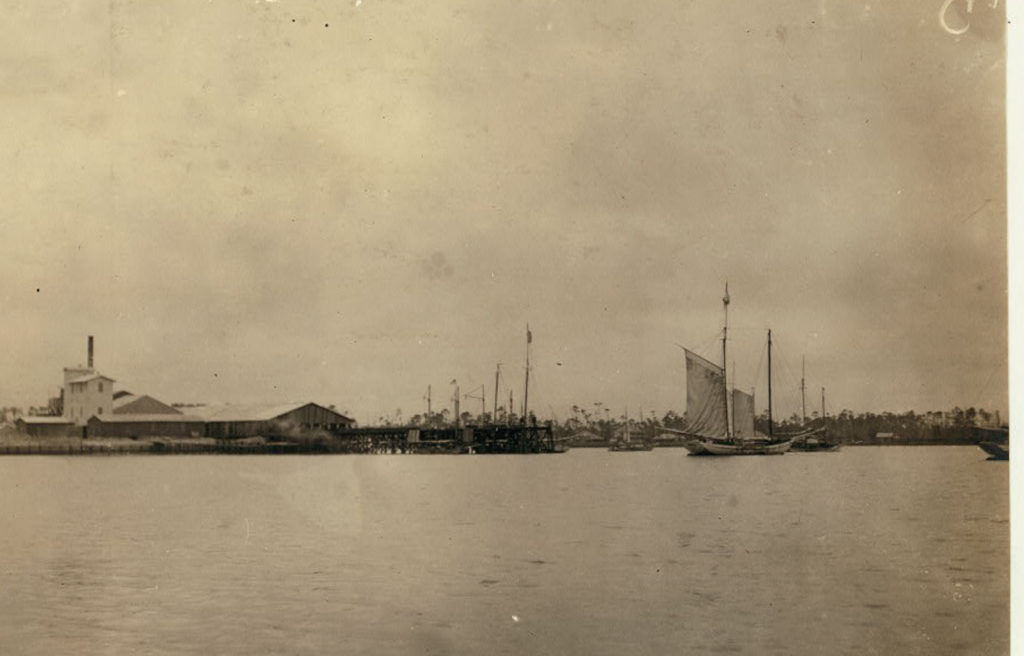
It turns out there are a lot of pictures of this place, located in the National Archives and the Library of Congress!
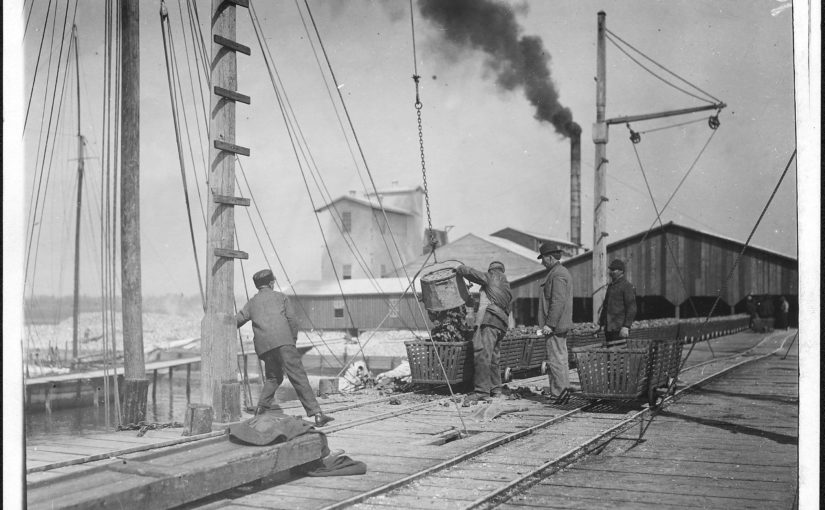
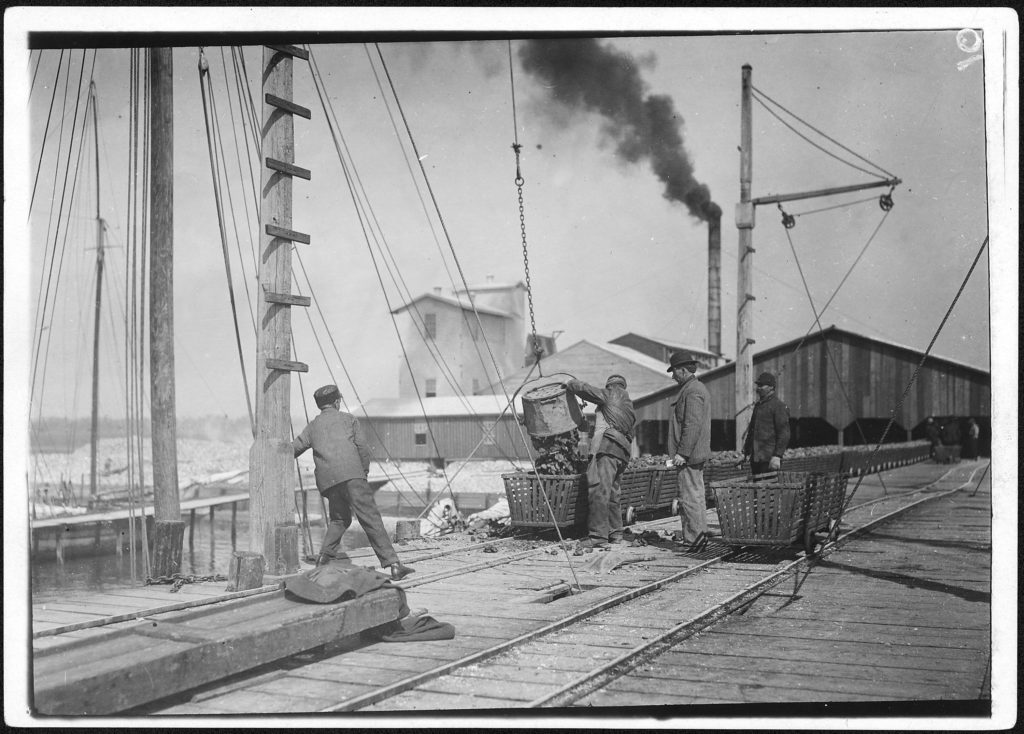
This photo shows oysters being unloaded onto the dock. It looks like they had a large pier running out into the bay, with railroad tracks utilized for wheeled oyster baskets. The factory in the background looks like a sizeable operation. It must have been the biggest industry in town at the time.
Many of the photos show very young workers in the factory and on the boats. This was the early 20th century, the era of child labor.
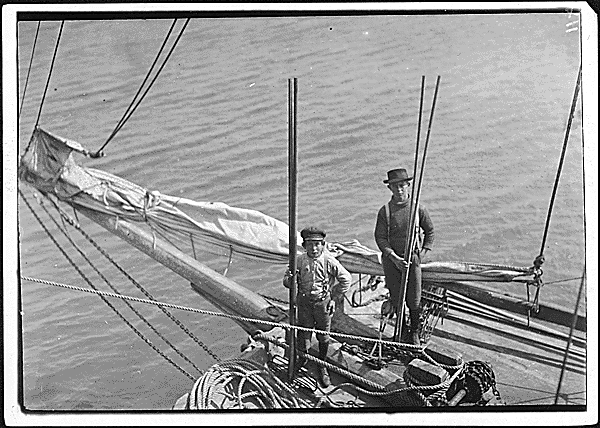
Original caption: “Alfred and Willie, two young oyster fishers in Mobile Bay. A few, but not many of these youngsters are found on the oyster boats. Bayou La Batre, Ala.” (National Archives)
“Fred, a young oyster fisher; working on an oyster boat in Mobile Bay, the Reef, near Bayou La Batre, said he was fourteen, but not likely. ” (Library of Congress)
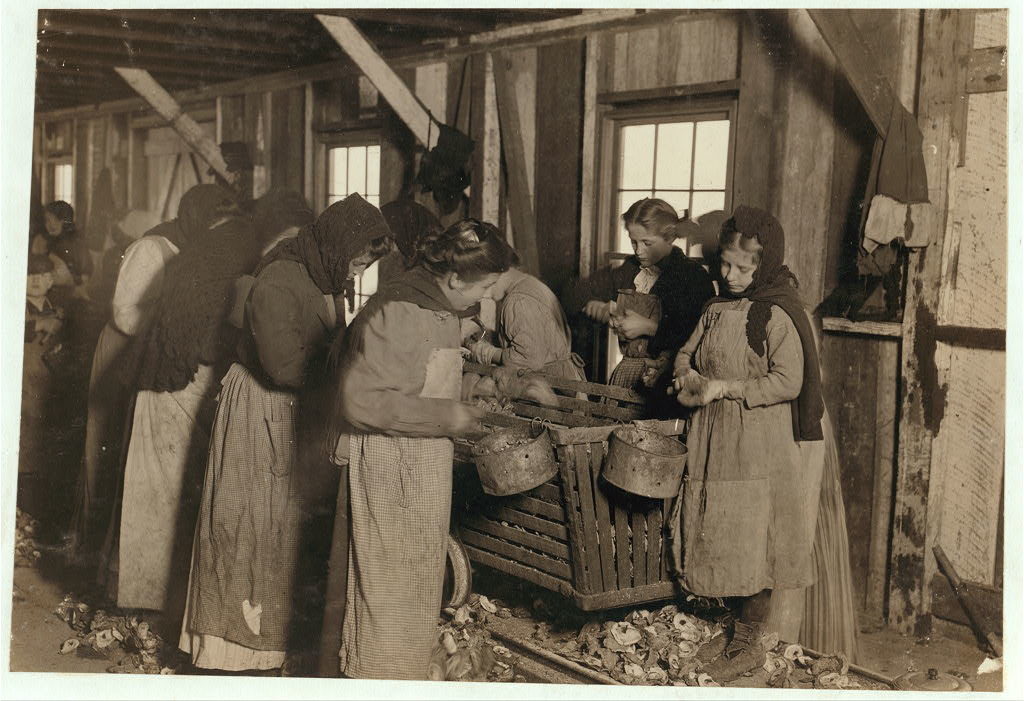
“Shucking oysters in the Alabama Canning Company (Dunbar Lopez, Dukate Co.) Small boy on left end is Mike Murphy, ten years old, and from Baltimore” (LOC)
“On right-hand end is Marie —, eight years old, who shucks 6 or 7 pots of oysters a day (30 or 35 cents) at a canning company. At left end of photo is Johnnie —, eight years old, who earns 45 cents a day. Been shucking for three years. ” (LOC)
“Little Nettie [?], a regular oyster-shucker in Alabama Canning Co. She speaks no English. Note the condition of her shoes, caused by standing on the rough shells so much, a common sight”. (Other versions identify the subject as “Lottie”)These photos were taken about 1912-1913. The children would have been born in the first decade of the 20th century. This is about the age of my great-grandparents. If you are from Bayou La Batre, some of them could be your great-grandparents, if not great-great-grandparents.
The work was seasonal, with many families coming to town only during the cooler months when oysters were in season. You can see in the photos almost everyone is dressed for cooler weather. Many of the workers were also immigrants, as the captions mention some children being unable to speak English. From the Mississippi Gulf Coast Museum of Museum of Historical Photography website:
The [labor shortage] problem was resolved initially by bringing in Eastern European immigrants known as ‘Bohemians’ from the Baltimore, Maryland canneries. The Baltimore people traveled in special railroad cars from their homes in Baltimore to work the canneries during the winter oyster season along the coast. They lived in factory-owned camps near the canneries, and the children rarely attended local schools. Some of the Baltimore families stayed on after the oyster season.
We can assume the hiring practices established in Biloxi were also followed in Bayou La Batre.
It turns out the reason all of these 100-year old pictures from Bayou La Batre are part of the national historical record, is because they were part of a famous series taken by Lewis Wickes Hine. Lewis Hine is an unsung hero of American labor relations, risking his own safety to end the practice of child labor in this country.
Lewis W. Hine
In 1908 Hine became the photographer for the National Child Labor Committee (NCLC), leaving his teaching position. Over the next decade, Hine documented child labor, with focus on the use of child labor in the Carolina Piedmont,[3] to aid the NCLC’s lobbying efforts to end the practice.[4] In 1913, he documented child laborers among cotton mill workers with a series of Francis Galton‘s composite portraits.
Hine’s work for the NCLC was often dangerous. As a photographer, he was frequently threatened with violence or even death by factory police and foremen. At the time, the immorality of child labor was meant to be hidden from the public. Photography was not only prohibited but also posed a serious threat to the industry. To gain entry to the mills, mines and factories, Hine was forced to assume many guises. At times he was a fire inspector, postcard vendor, bible salesman, or even an industrial photographer making a record of factory machinery.[5]
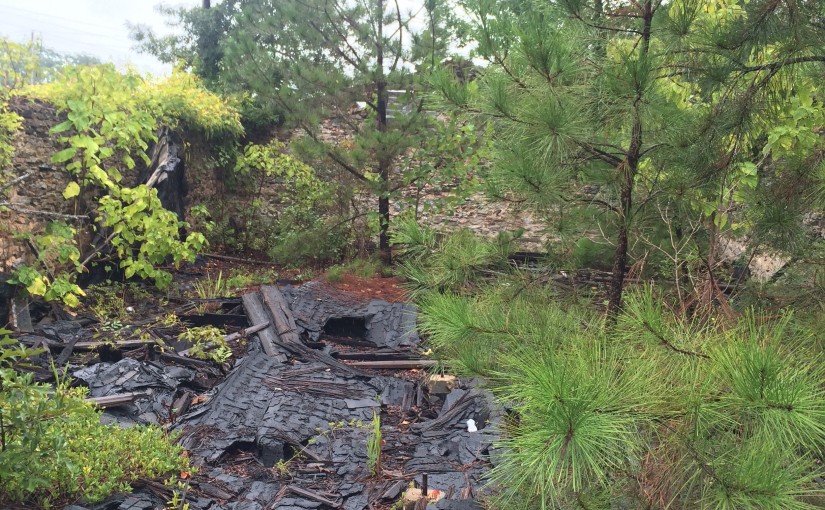
So here we have a connection to historical events of national importance, right there in Bayou La Batre, and all that’s left of it is a dirt path through the marsh grass and scattered recollections of an “Old Factory”.
Hine is also the photographer of a very well known series on the construction of the Empire State Building.
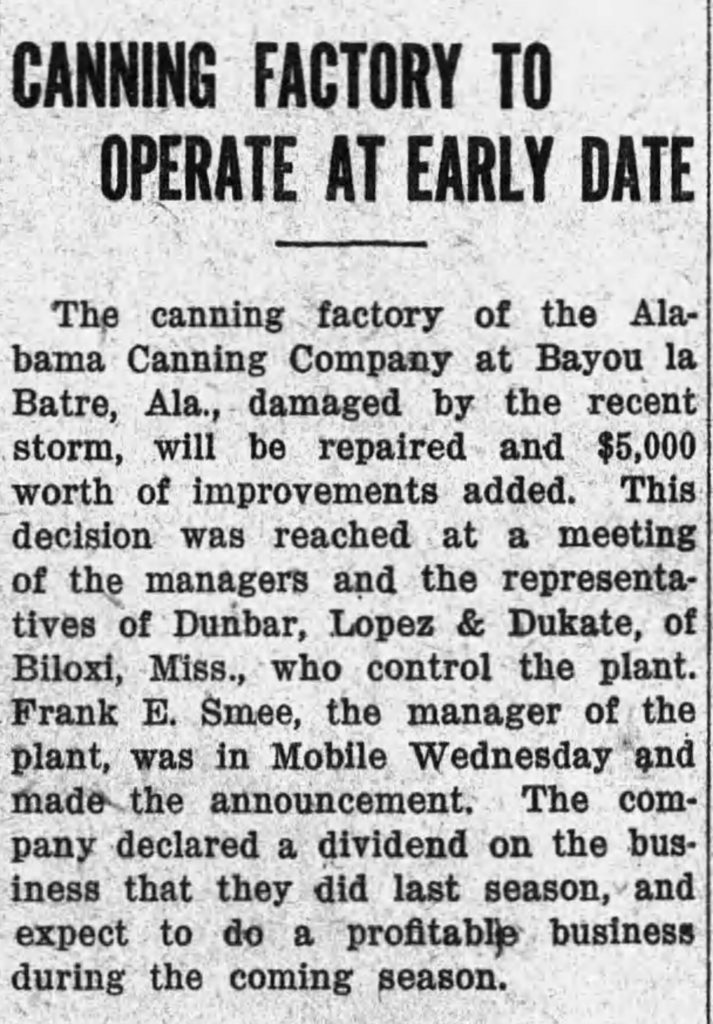
So when was this factory built, and whatever happened to it? The Bay Shore website says:
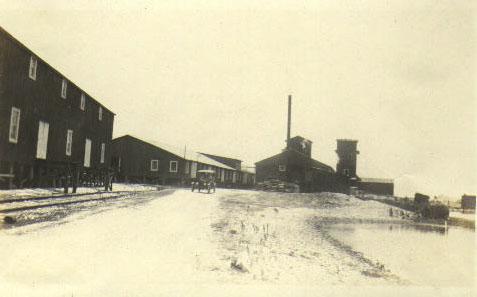
Below is a photograph taken before the hurricane of 1906, showing the company tracks on the west side of the building. The photographer is facing south, toward Portersville Bay.
The buildings seen in this image were either heavily damaged, or destroyed, in the 1906 hurricane, and the company either elected not to rebuild, or was financially unable to. At a later date (unknown) this location became the Dunbar & Ducate Factory. Dunbar & Ducate was later destroyed by a boiler explosion which claimed the lives of several employees.
“Dunbar & Ducate”, (or DuKate) had already taken over by the time of Hines’ photos in 1912-1913 (and indeed some of his captions refer to it as such).
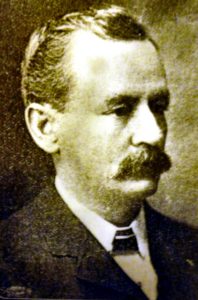
W.K.M. DuKate
The Biloxi Historical Society lists a number factories owned by several firms involving the DuKate family, including “Dunbars, Lopez, & Dukate Company“, in Alabama, Mississippi, and Louisiana. It appears that it was often called the “Alabama Canning Company” even when it was owned by DuKate.
Julian Lee Rayford, writing in 1956, describes a world already long gone, including a “Big Factory” owned by “Dunn, Barr, and Ducate”.
GEORGE BRYANT told me about the factories
in Bayou la Batre.
The factories fall into two classes. First, the
factories of 1915, and a few years later. And,
second, the factories of today. There is little con-
nection between the two. True, the factories have
always canned shrimp and oysters, but there is a
distinct contrast between the periods.
Pure Food Laws have cleaned them up, and
now, everything is peaceful and quiet in the fac-
tories. Government inspectors stand on constant vi-
gil making the pickers maintain purity and quality
in the products.
After 1906, the factories lined the Bayou.
There was the Union factory, operated by the
Union. There was the finest and largest, the one
run by Daughdrille. On the coast, was the “Big Factory,” controlled by Dun, Barr and Ducate. And
there was the “Green Factory,” so called because of
the color used on the outside of the building. All
along the Bayou were the picking sheds, which sent
their products to the larger establishments to be
packed, or, canned.
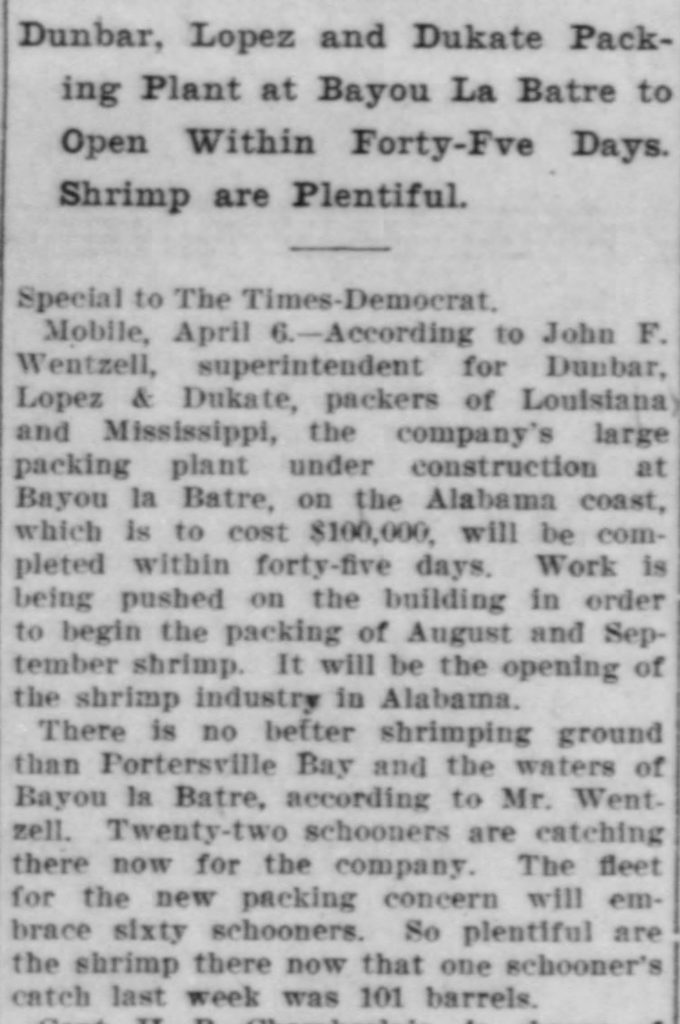
An article in the New Orleans Times-Democrat, April 7 1910, mentions a factory being constructed by this company in Bayou La Batre:
The John F. Wentzell mentioned here is probably related to Wintzell’s Oyster House founder J. Oliver Wintzell, as well as the Wintzell family of Bayou La Batre.
The factory is described as packing shrimp. It is not clear if this was the same facility as the oyster plant shown in the photos, or a different plant also located in Bayou La Batre.
I cannot find any information about the existence of the Alabama Canning Company earlier than this. It is possible it operated under a different name before DuKate took it over, if it actually existed before 1910.
The plant survived and was repaired after the 1916 storm:
I can only find one other page about an explosion, the Find-A-Grave page for Robert Walter Cox who died on August 16, 1923 when an ammonia tank exploded in the ice plant of the cannery. It reads like a newspaper article, but there’s no citation and I cannot find the same story anywhere else.
EXPLOSION KILLS ONE AND INJURES TWO AT ICE PLANT
Ammonia Tank Blows Up At Bayou La Batre, Killing Robert Cox and Wrecking Plant
Death injury and heavy property damage resulted form a violent explosion at the ice pant of the Alabama Canning Company at Bayou la Batre Thursday night. Robert Cox, 40 years old, frieman at the plant was almost instantly killed and two other persons, Willie and Aime Castello, father and son, recieved serious injuries. The disaster occurred when an ammonia generator exploded, wrecking the one-story structure. The loud noise which accompanied the explosion attracted the attention of people throughout the community, many of whom hurried to the scene.
Cox was discovered in a dying condition outside the boiler room a few minutes after the generator exploded. The younger Castello was huried to the roof of the building from which he was rescued by persons who rushed to the plant. Willie Castello, the father, is an engineer at the plant according to information received in Mobile. His son is tankman at the ice plant.
Shortly after the accident a Mobile physicain was summoned to treat the injured. The small casualty list was apprently attributable to the fact that only a few employees were on duty whe the explosion occurred.
Perhaps this explosion was too much for the Big Factory to come back from, and put them out of business. Perhaps the Pure Food and Child Labor laws had made the business unprofitable. Or maybe decreasing supply due to overfishing. Or a combination of all these things.
By the time of this 1943 map, the railroad is abandoned, the spur track for the factory is already just a dirt road, and the there is no indication building where the factory would have been.
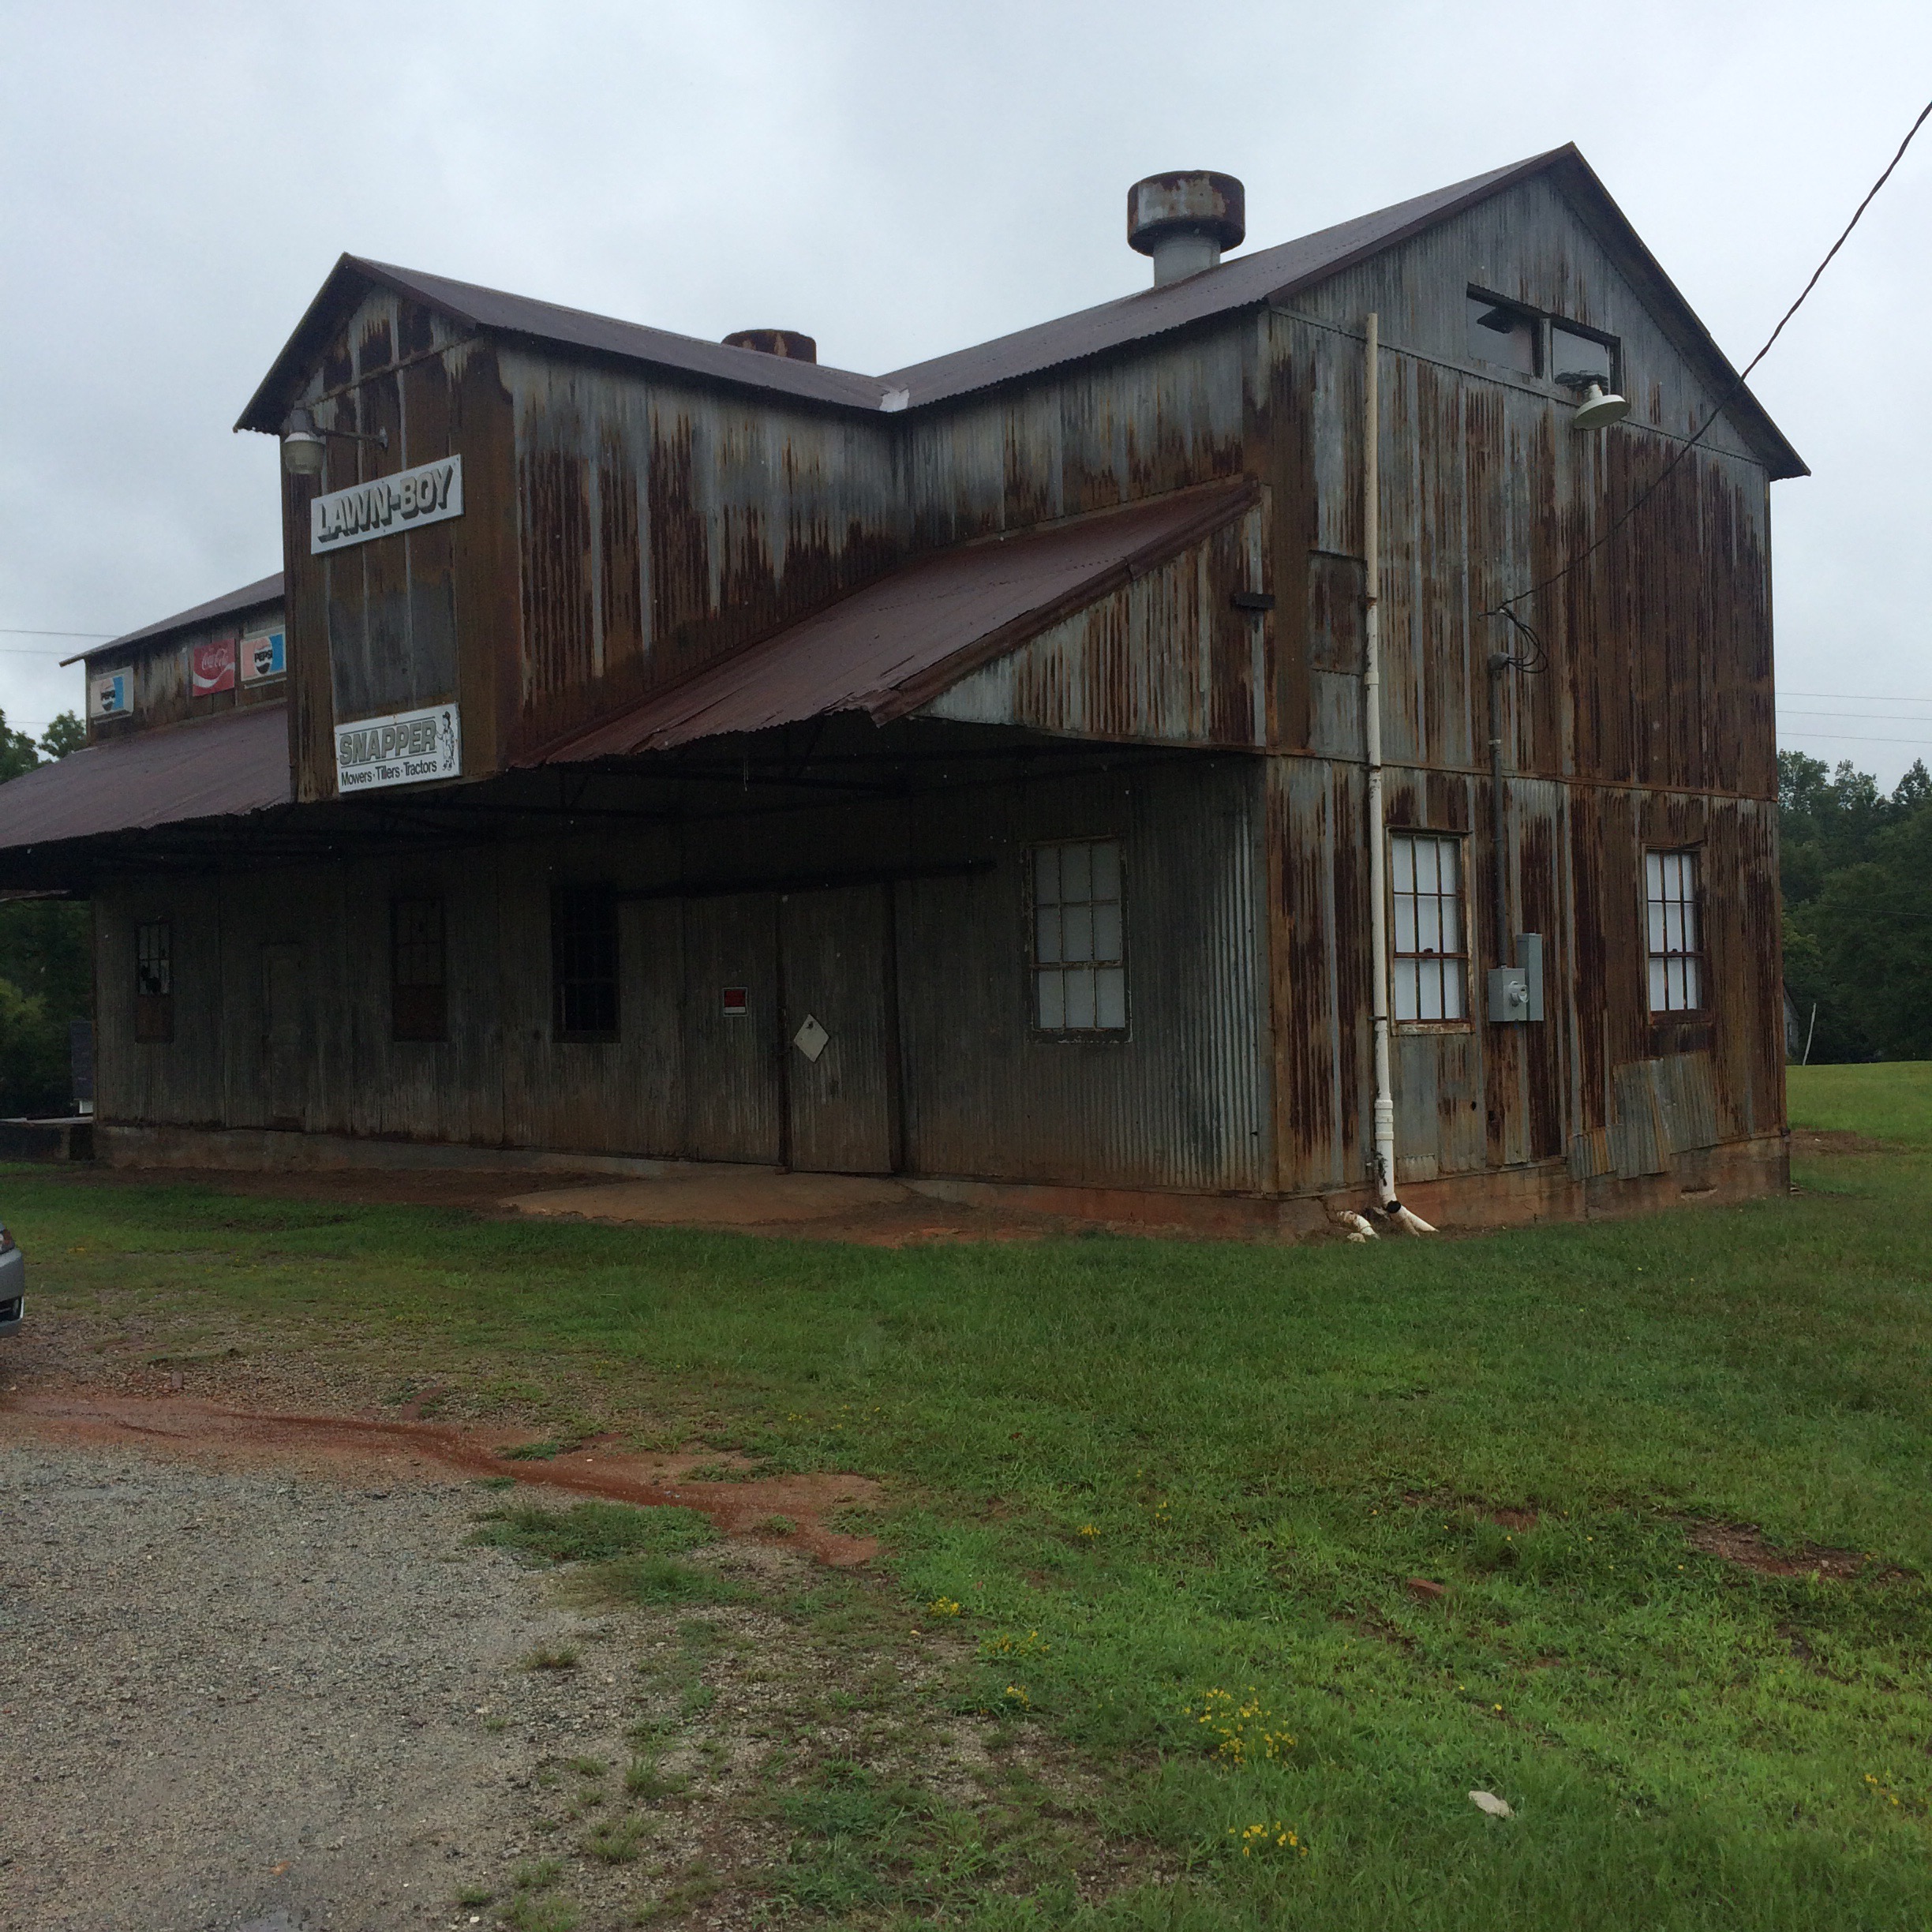
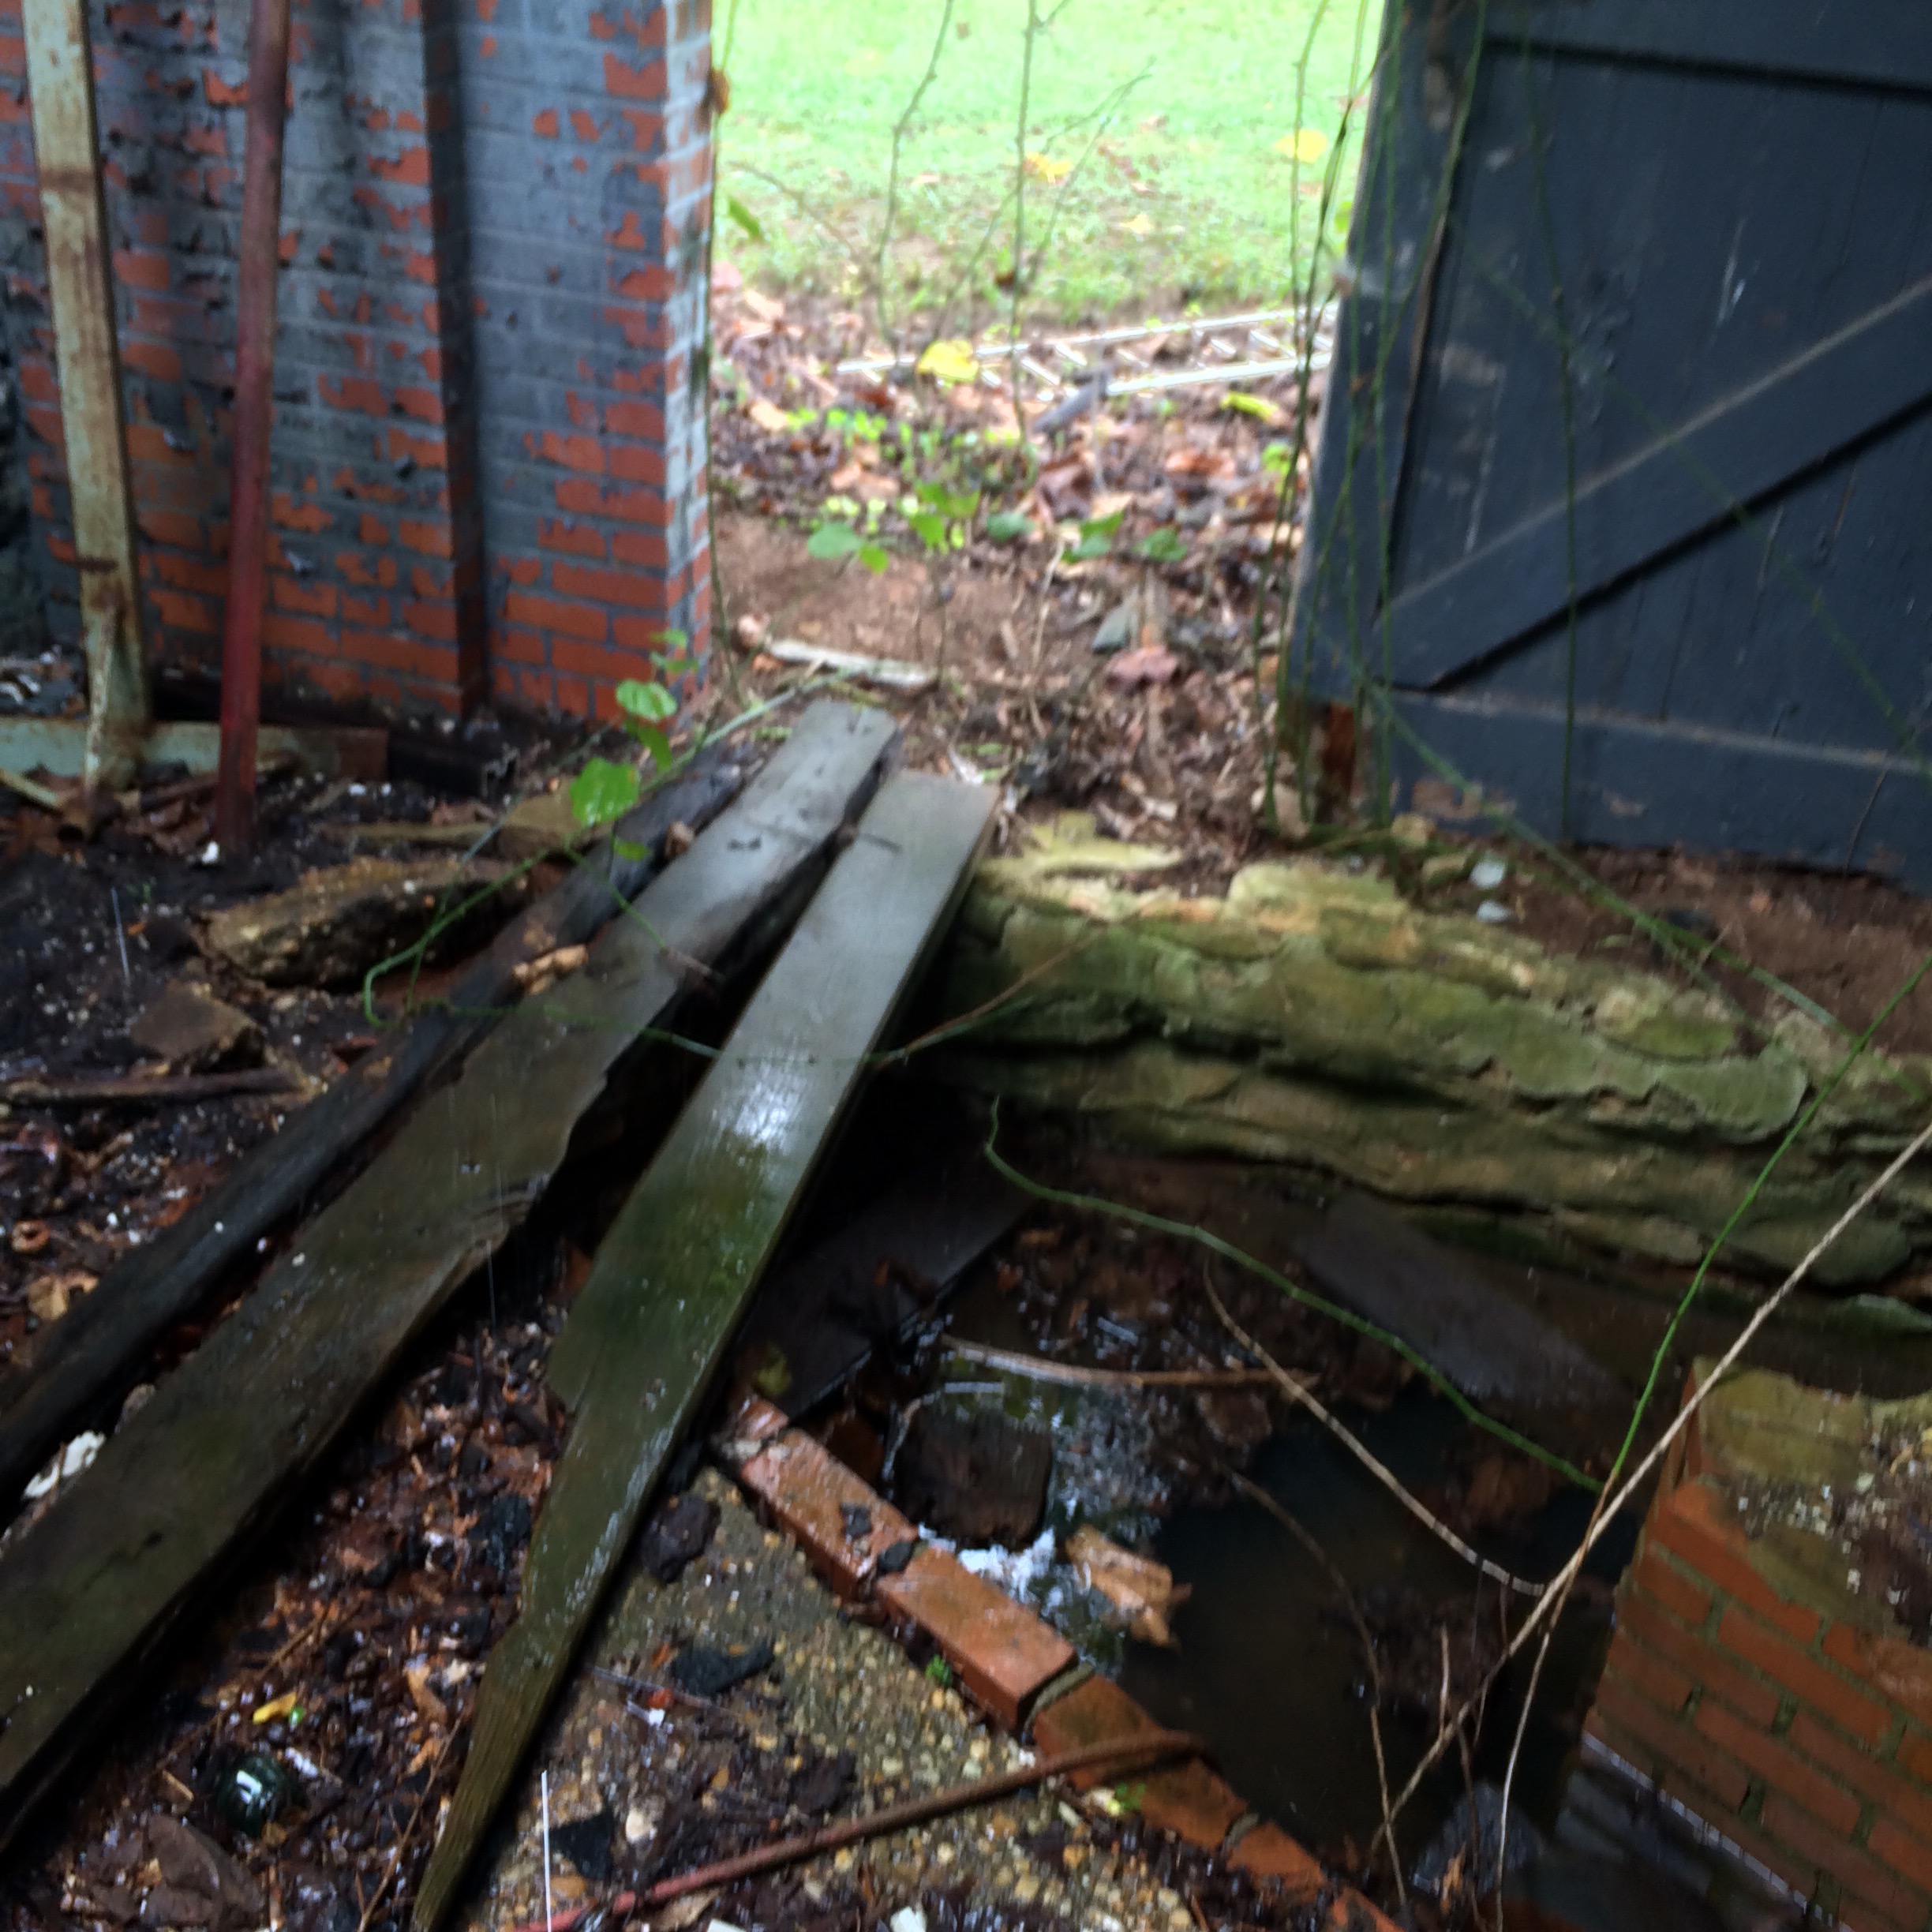
“Never go in there again!” – a longtime Newnan resident after being shown these pictures and recognizing the location.
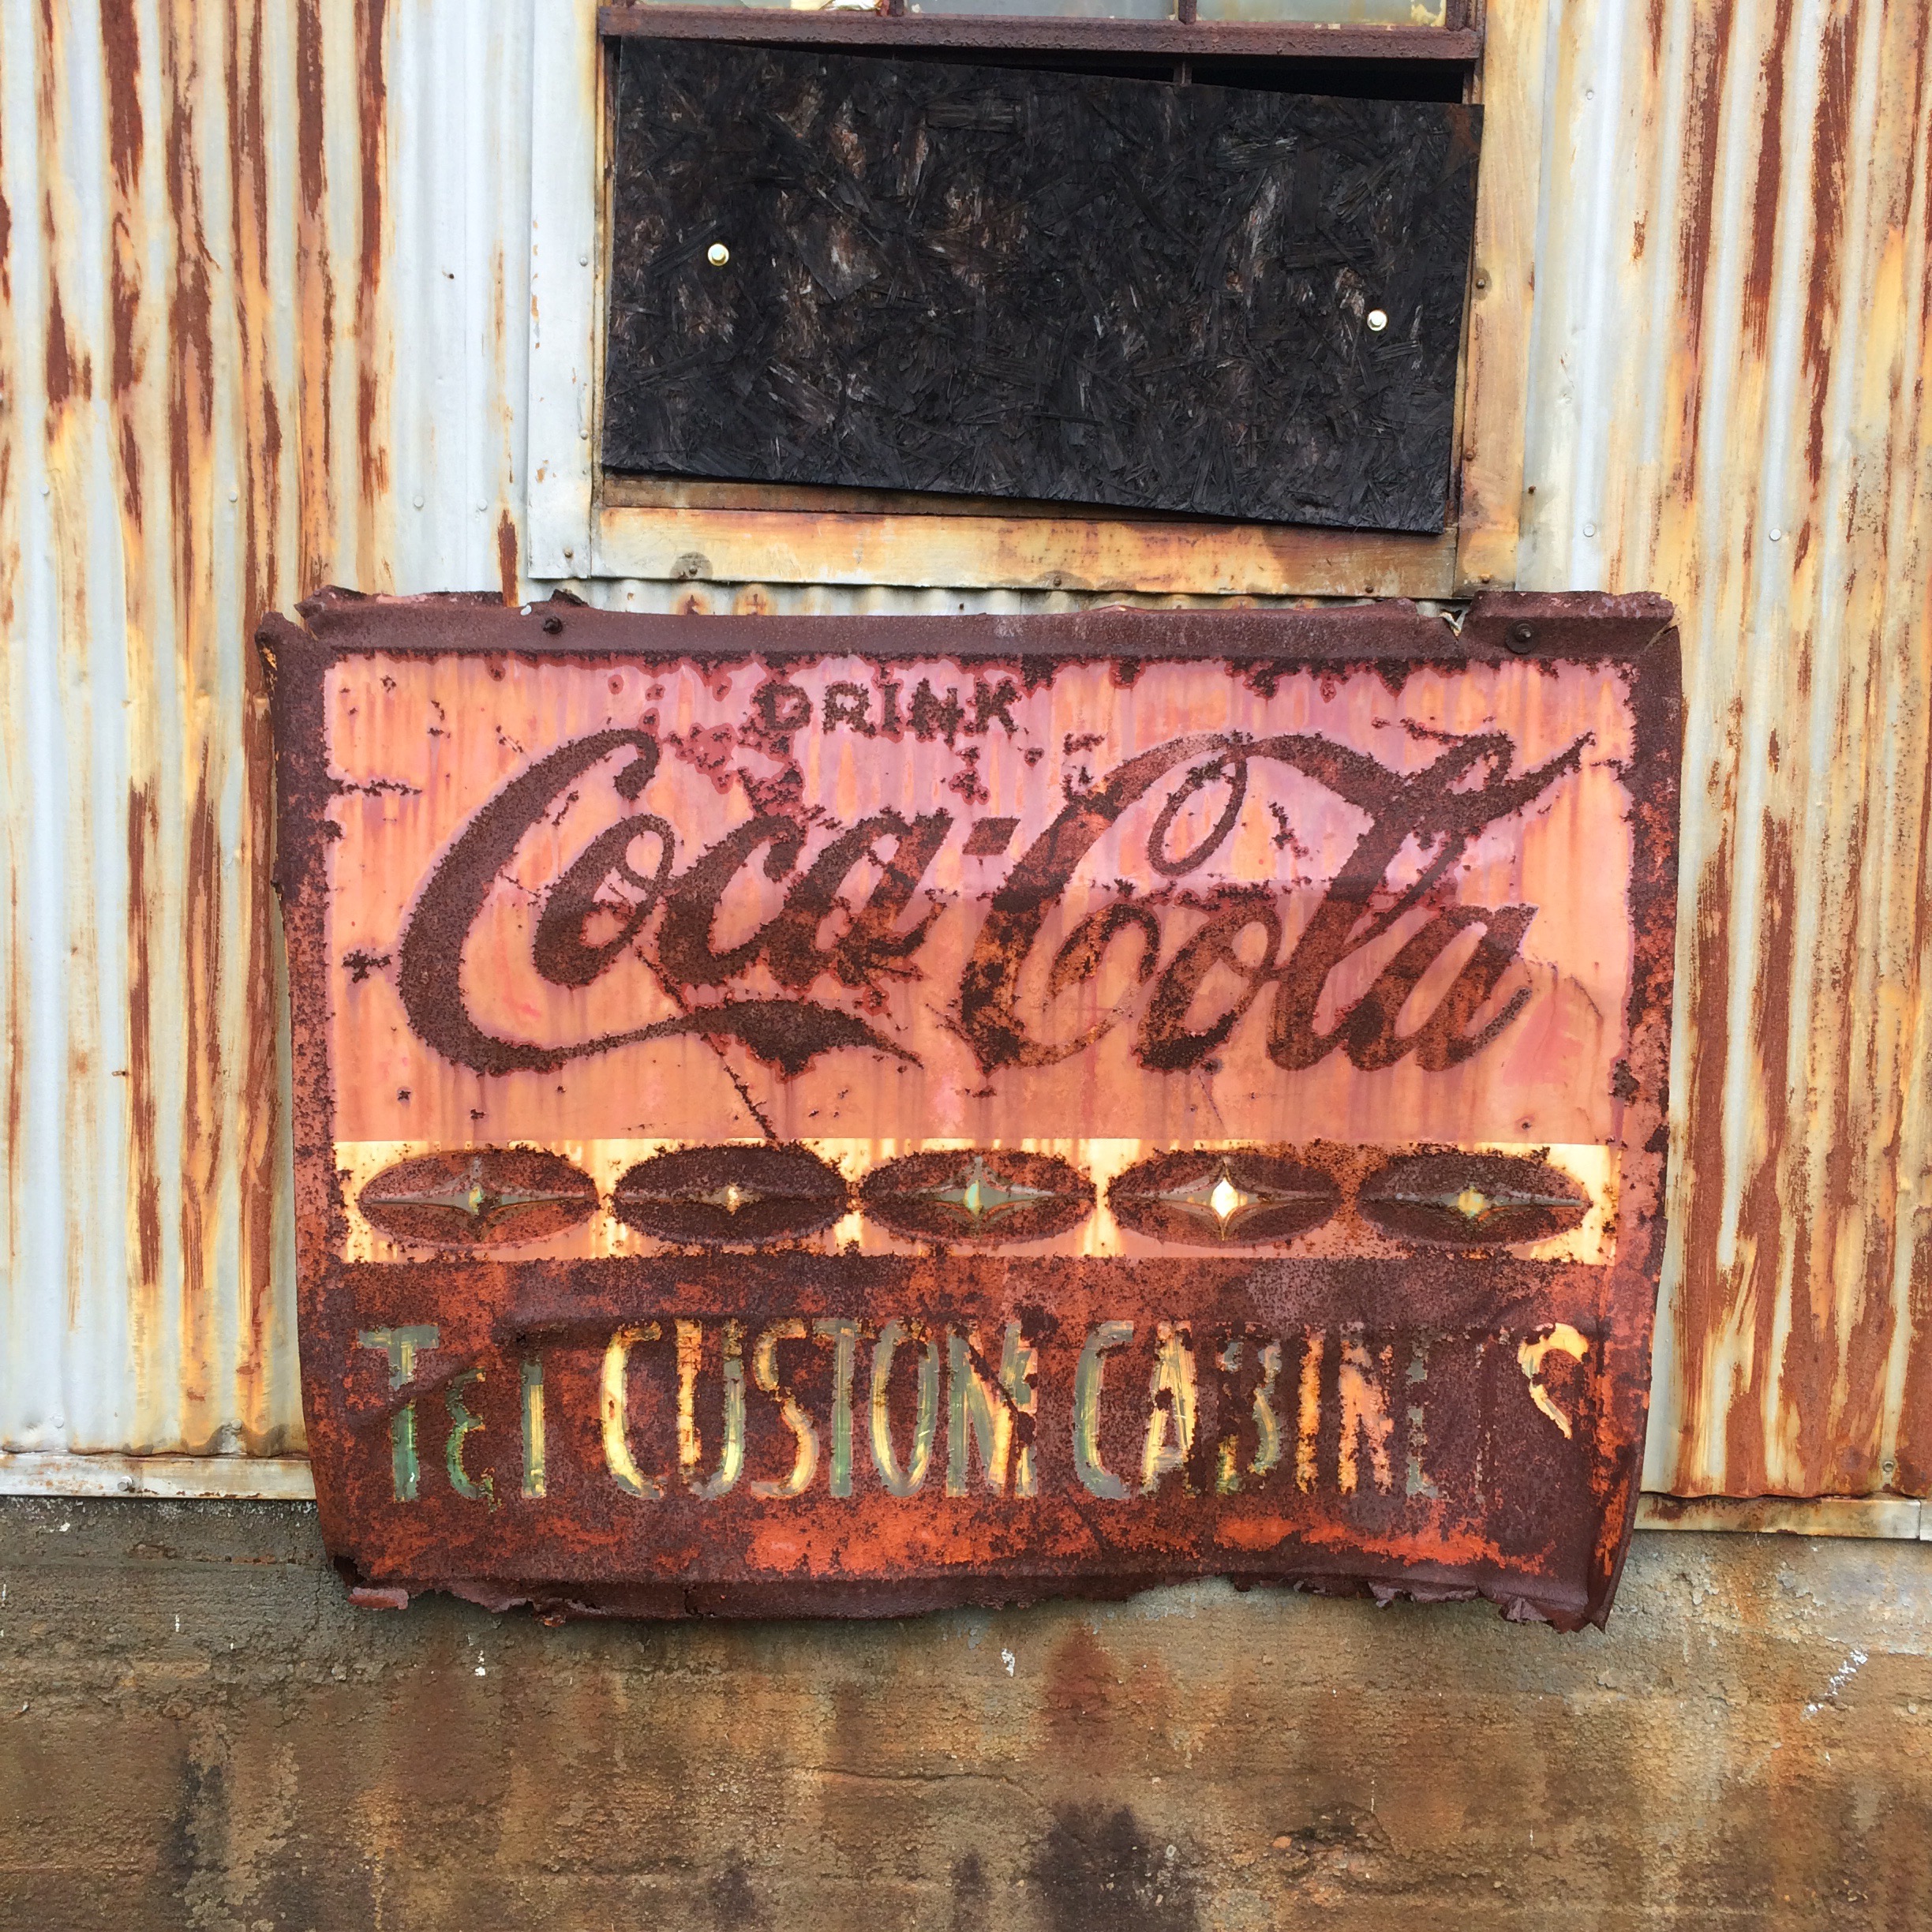
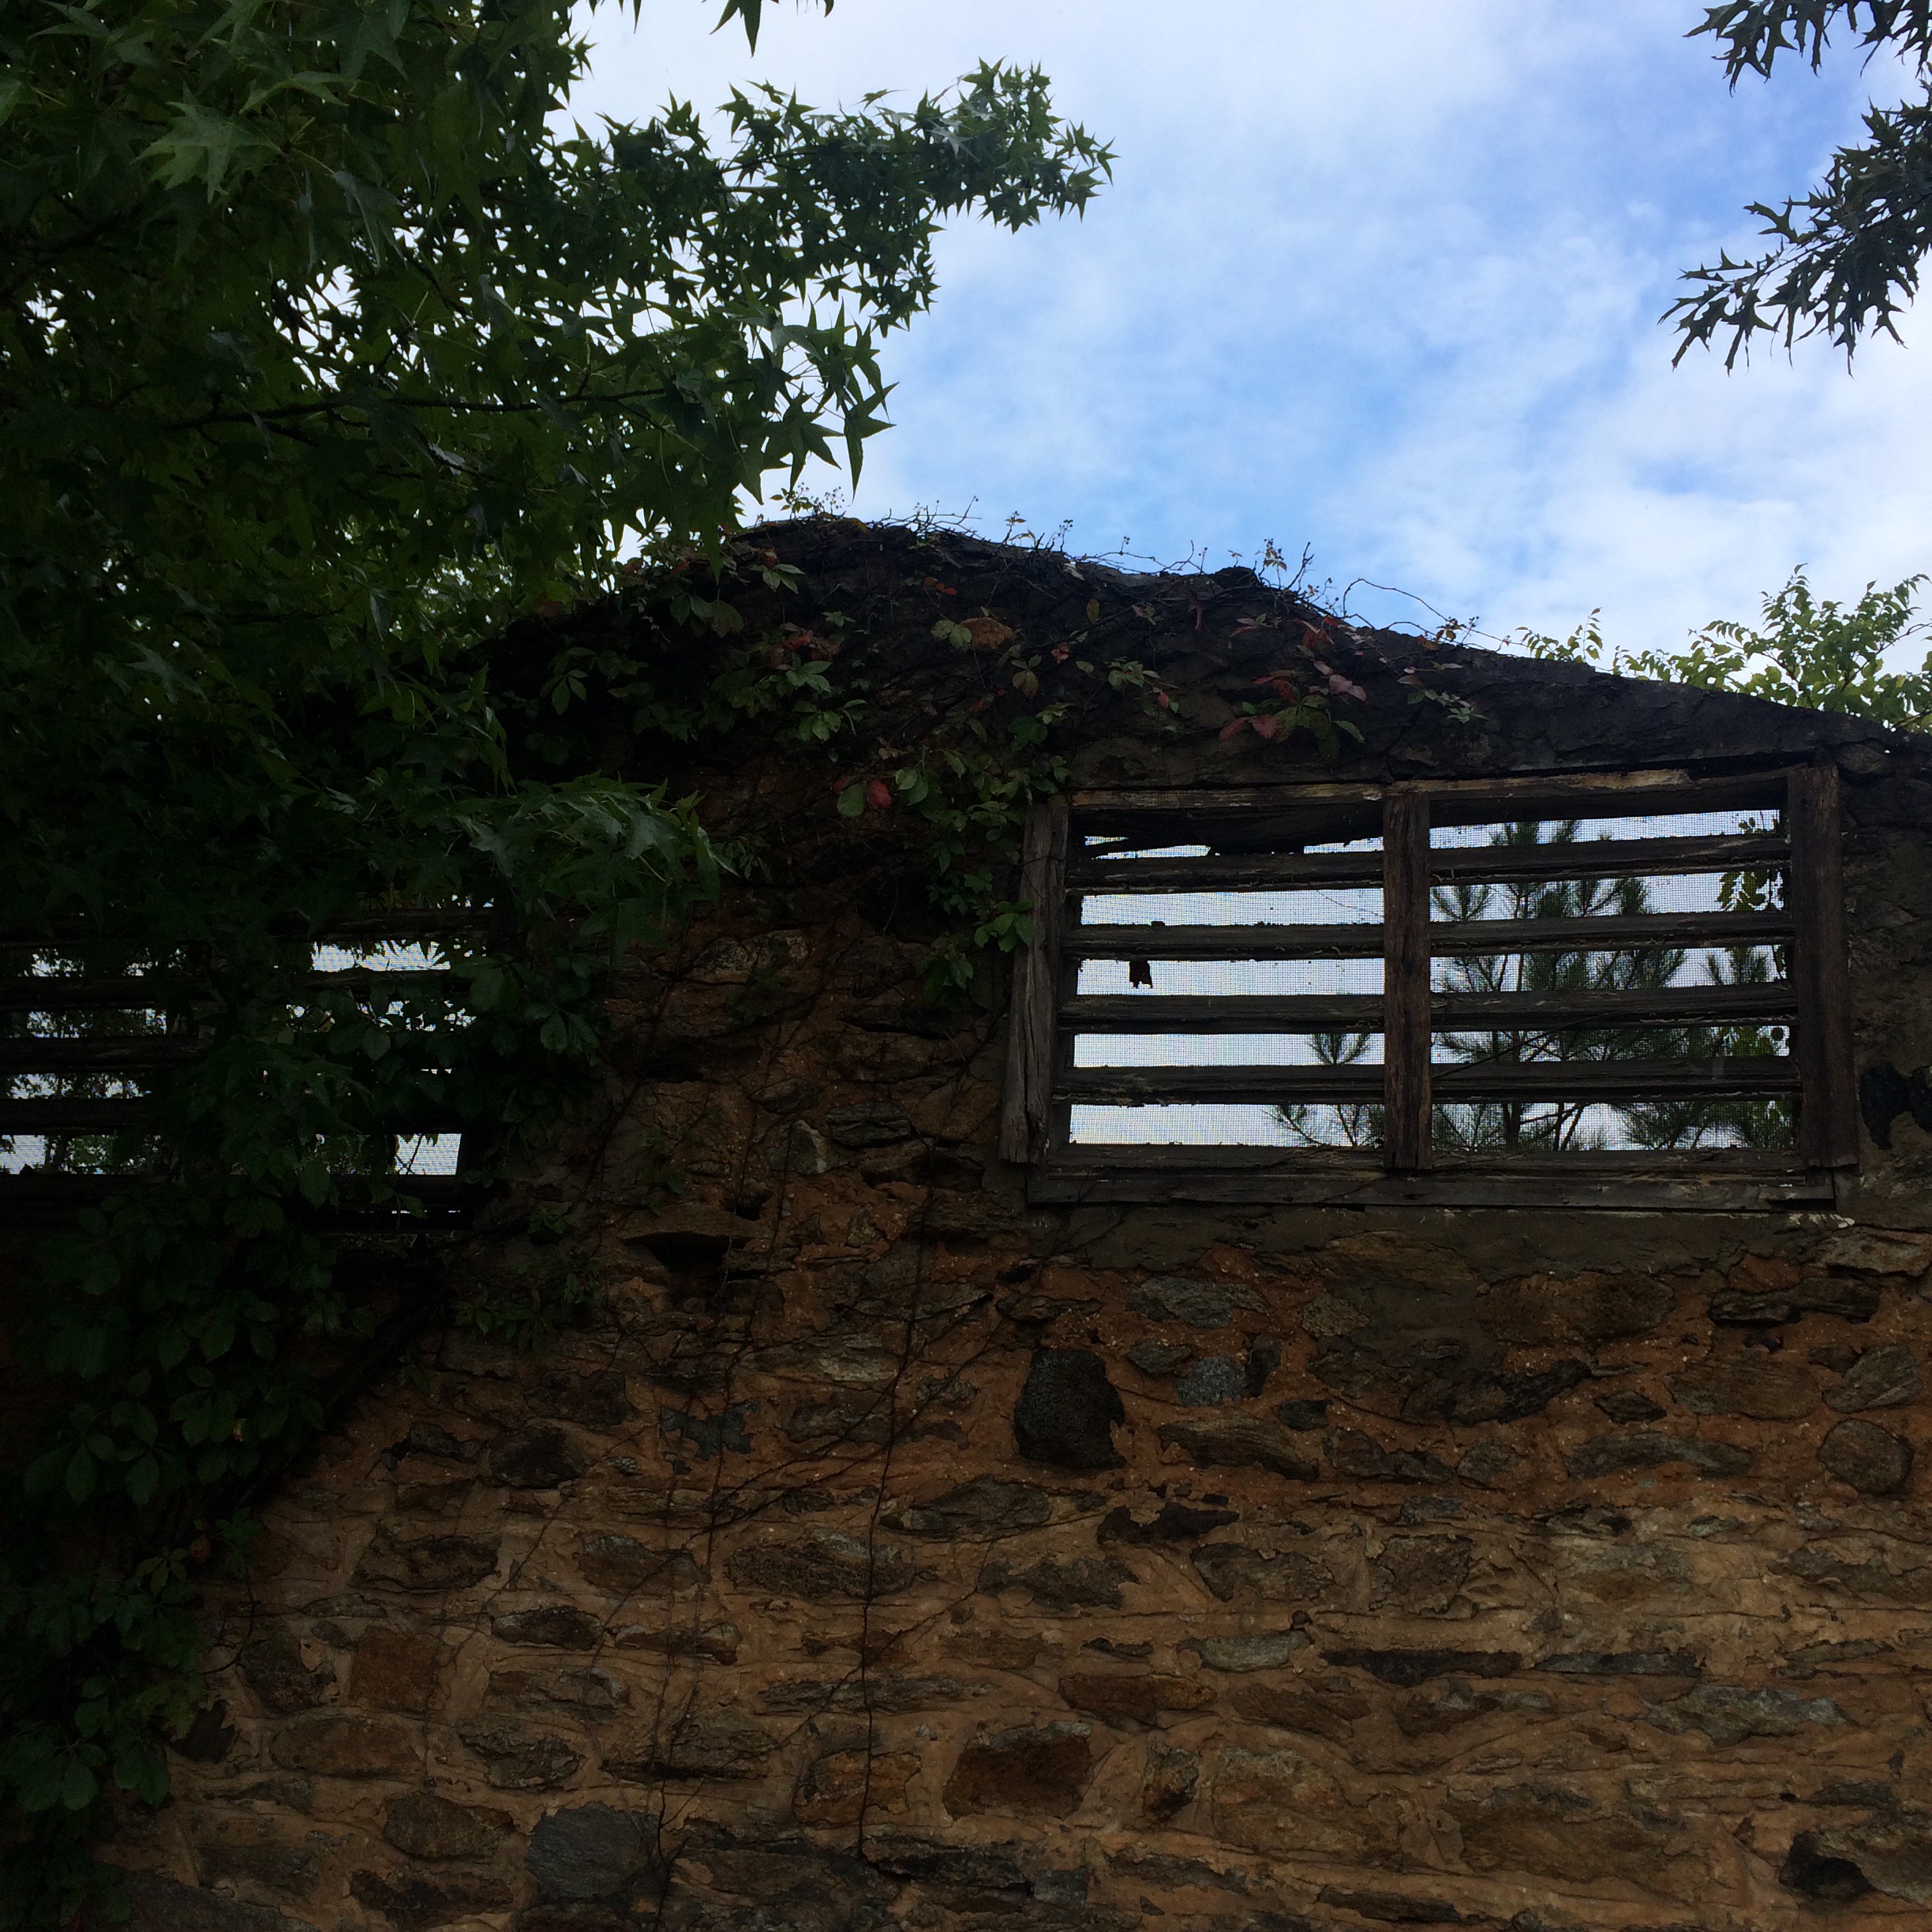
This old place looks to be some kind of workshop. I did not mess around it other than peek in the window.
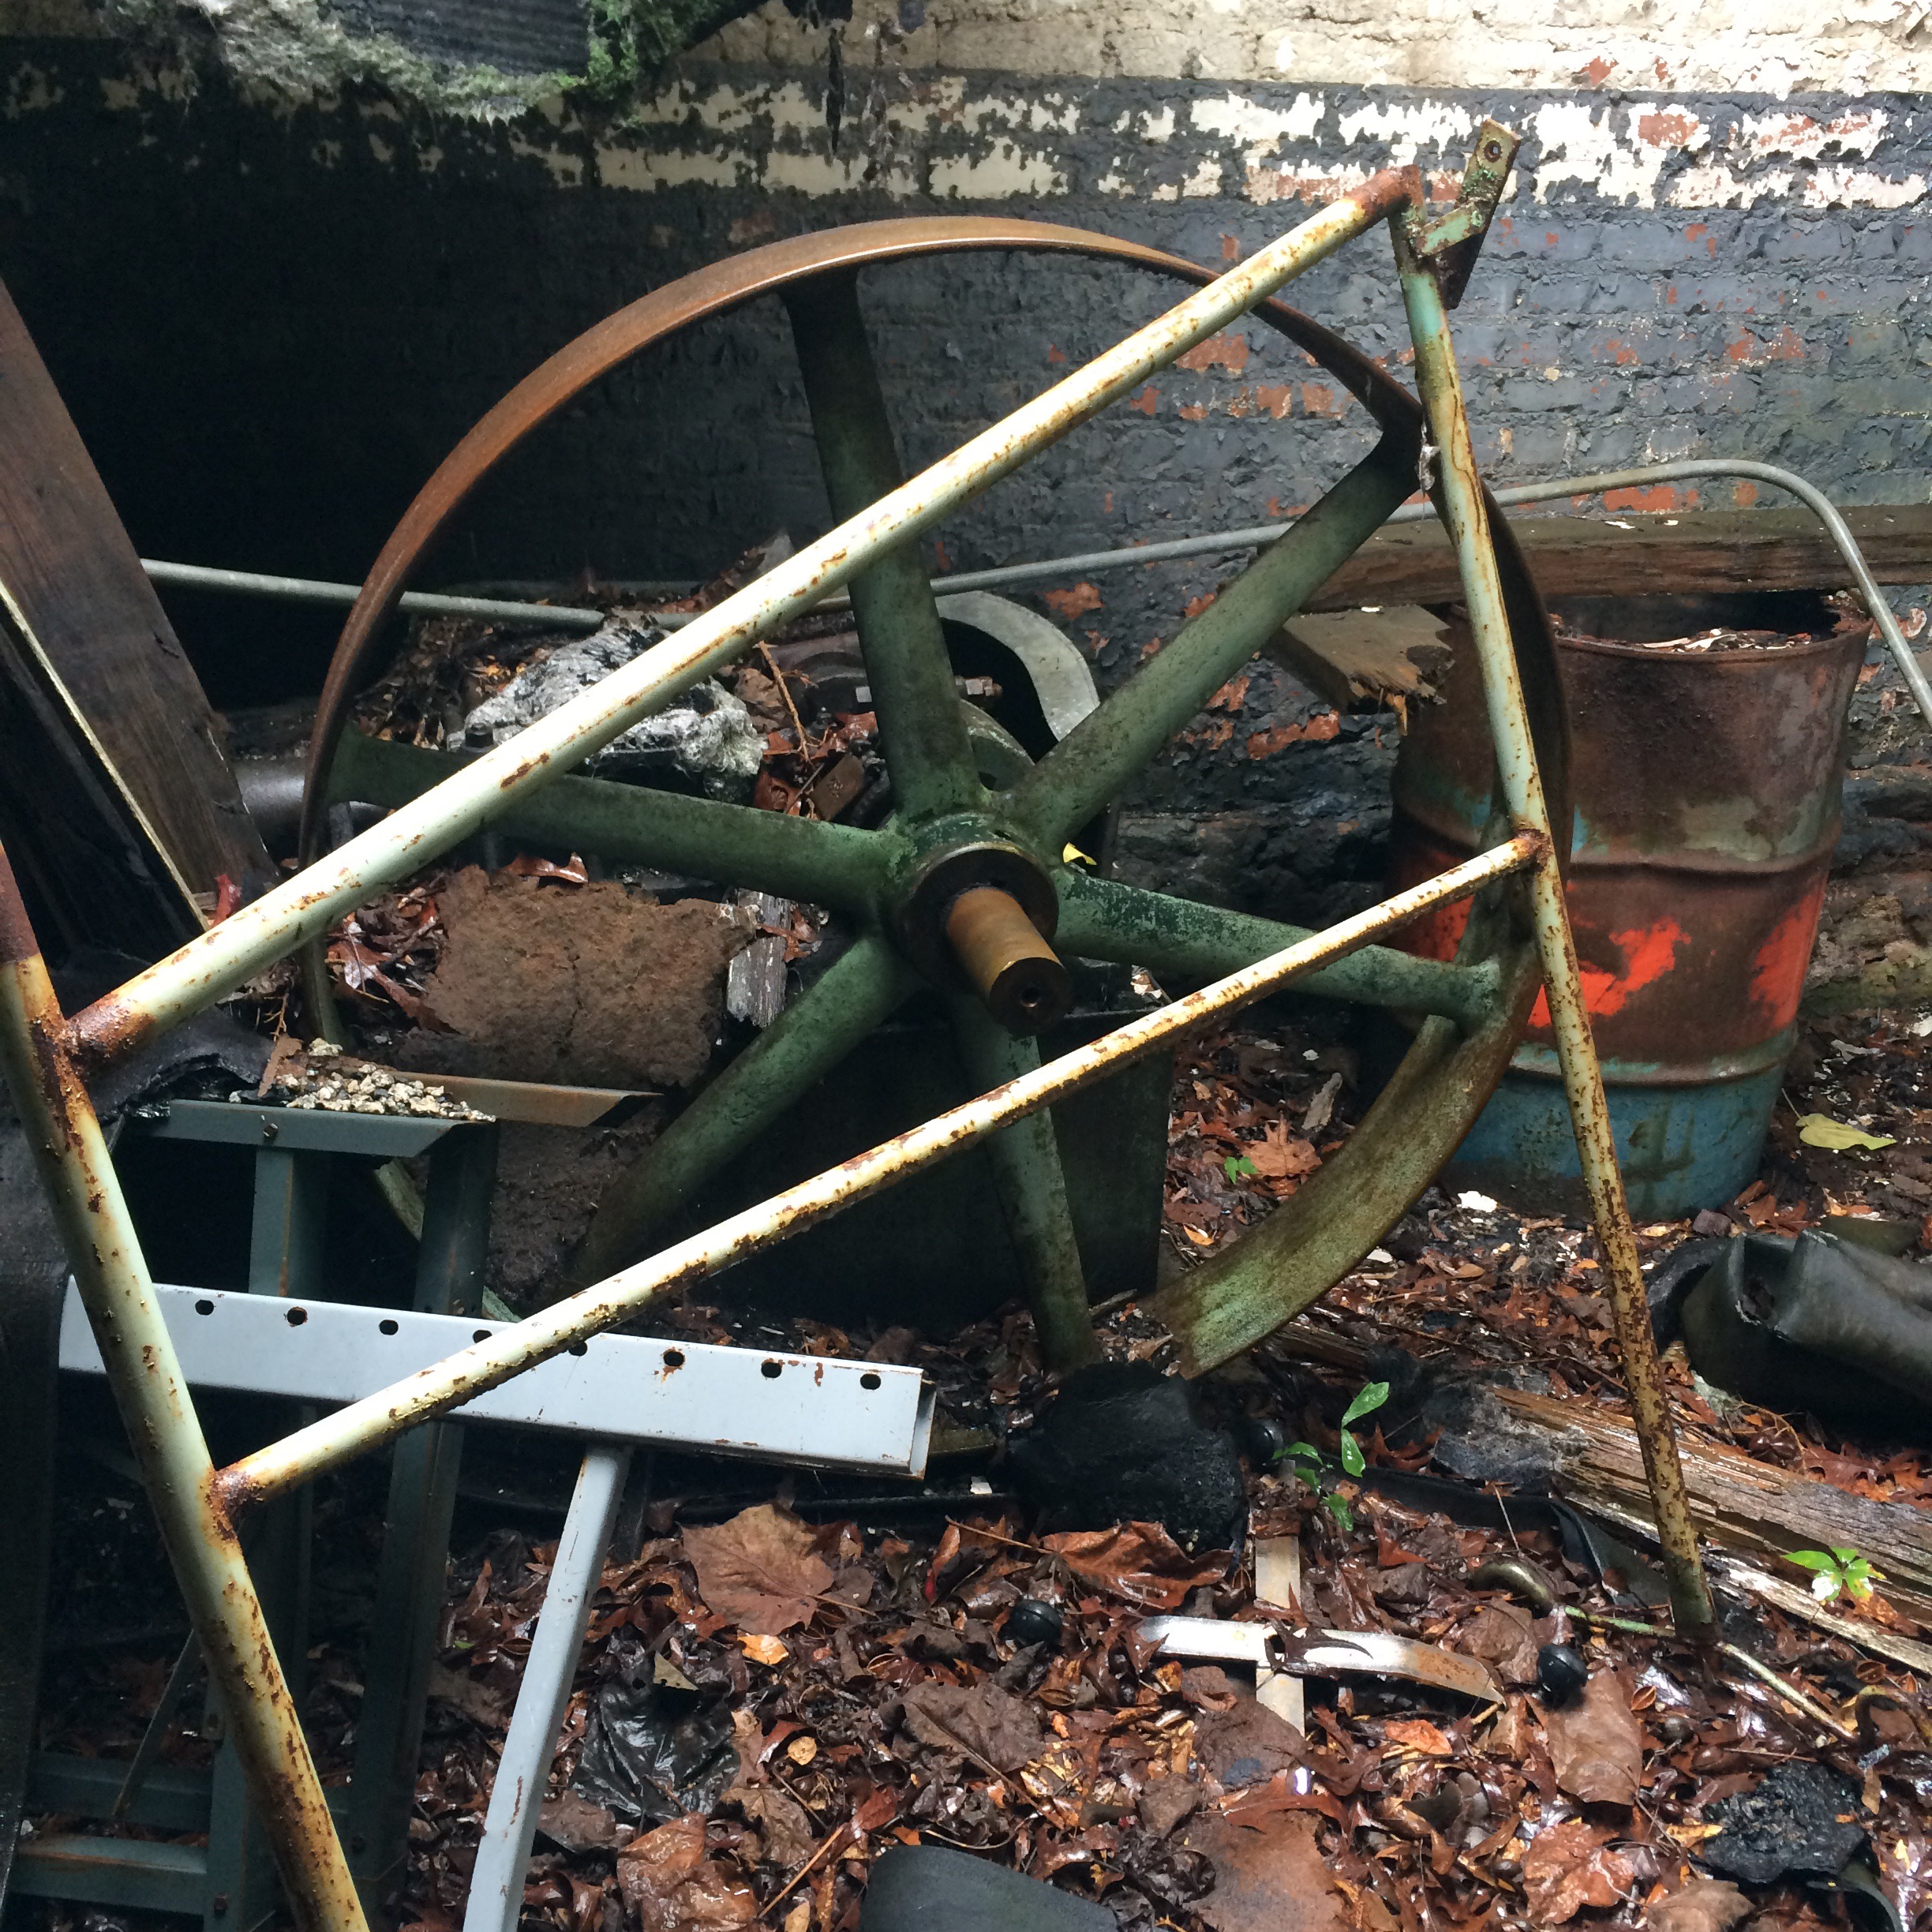
I’m guessing this was a pump house. Looks about the size of the pump house at my Nana’s old place anyway.
All this stuff is right by the NS railroad but I didn’t see any trains.
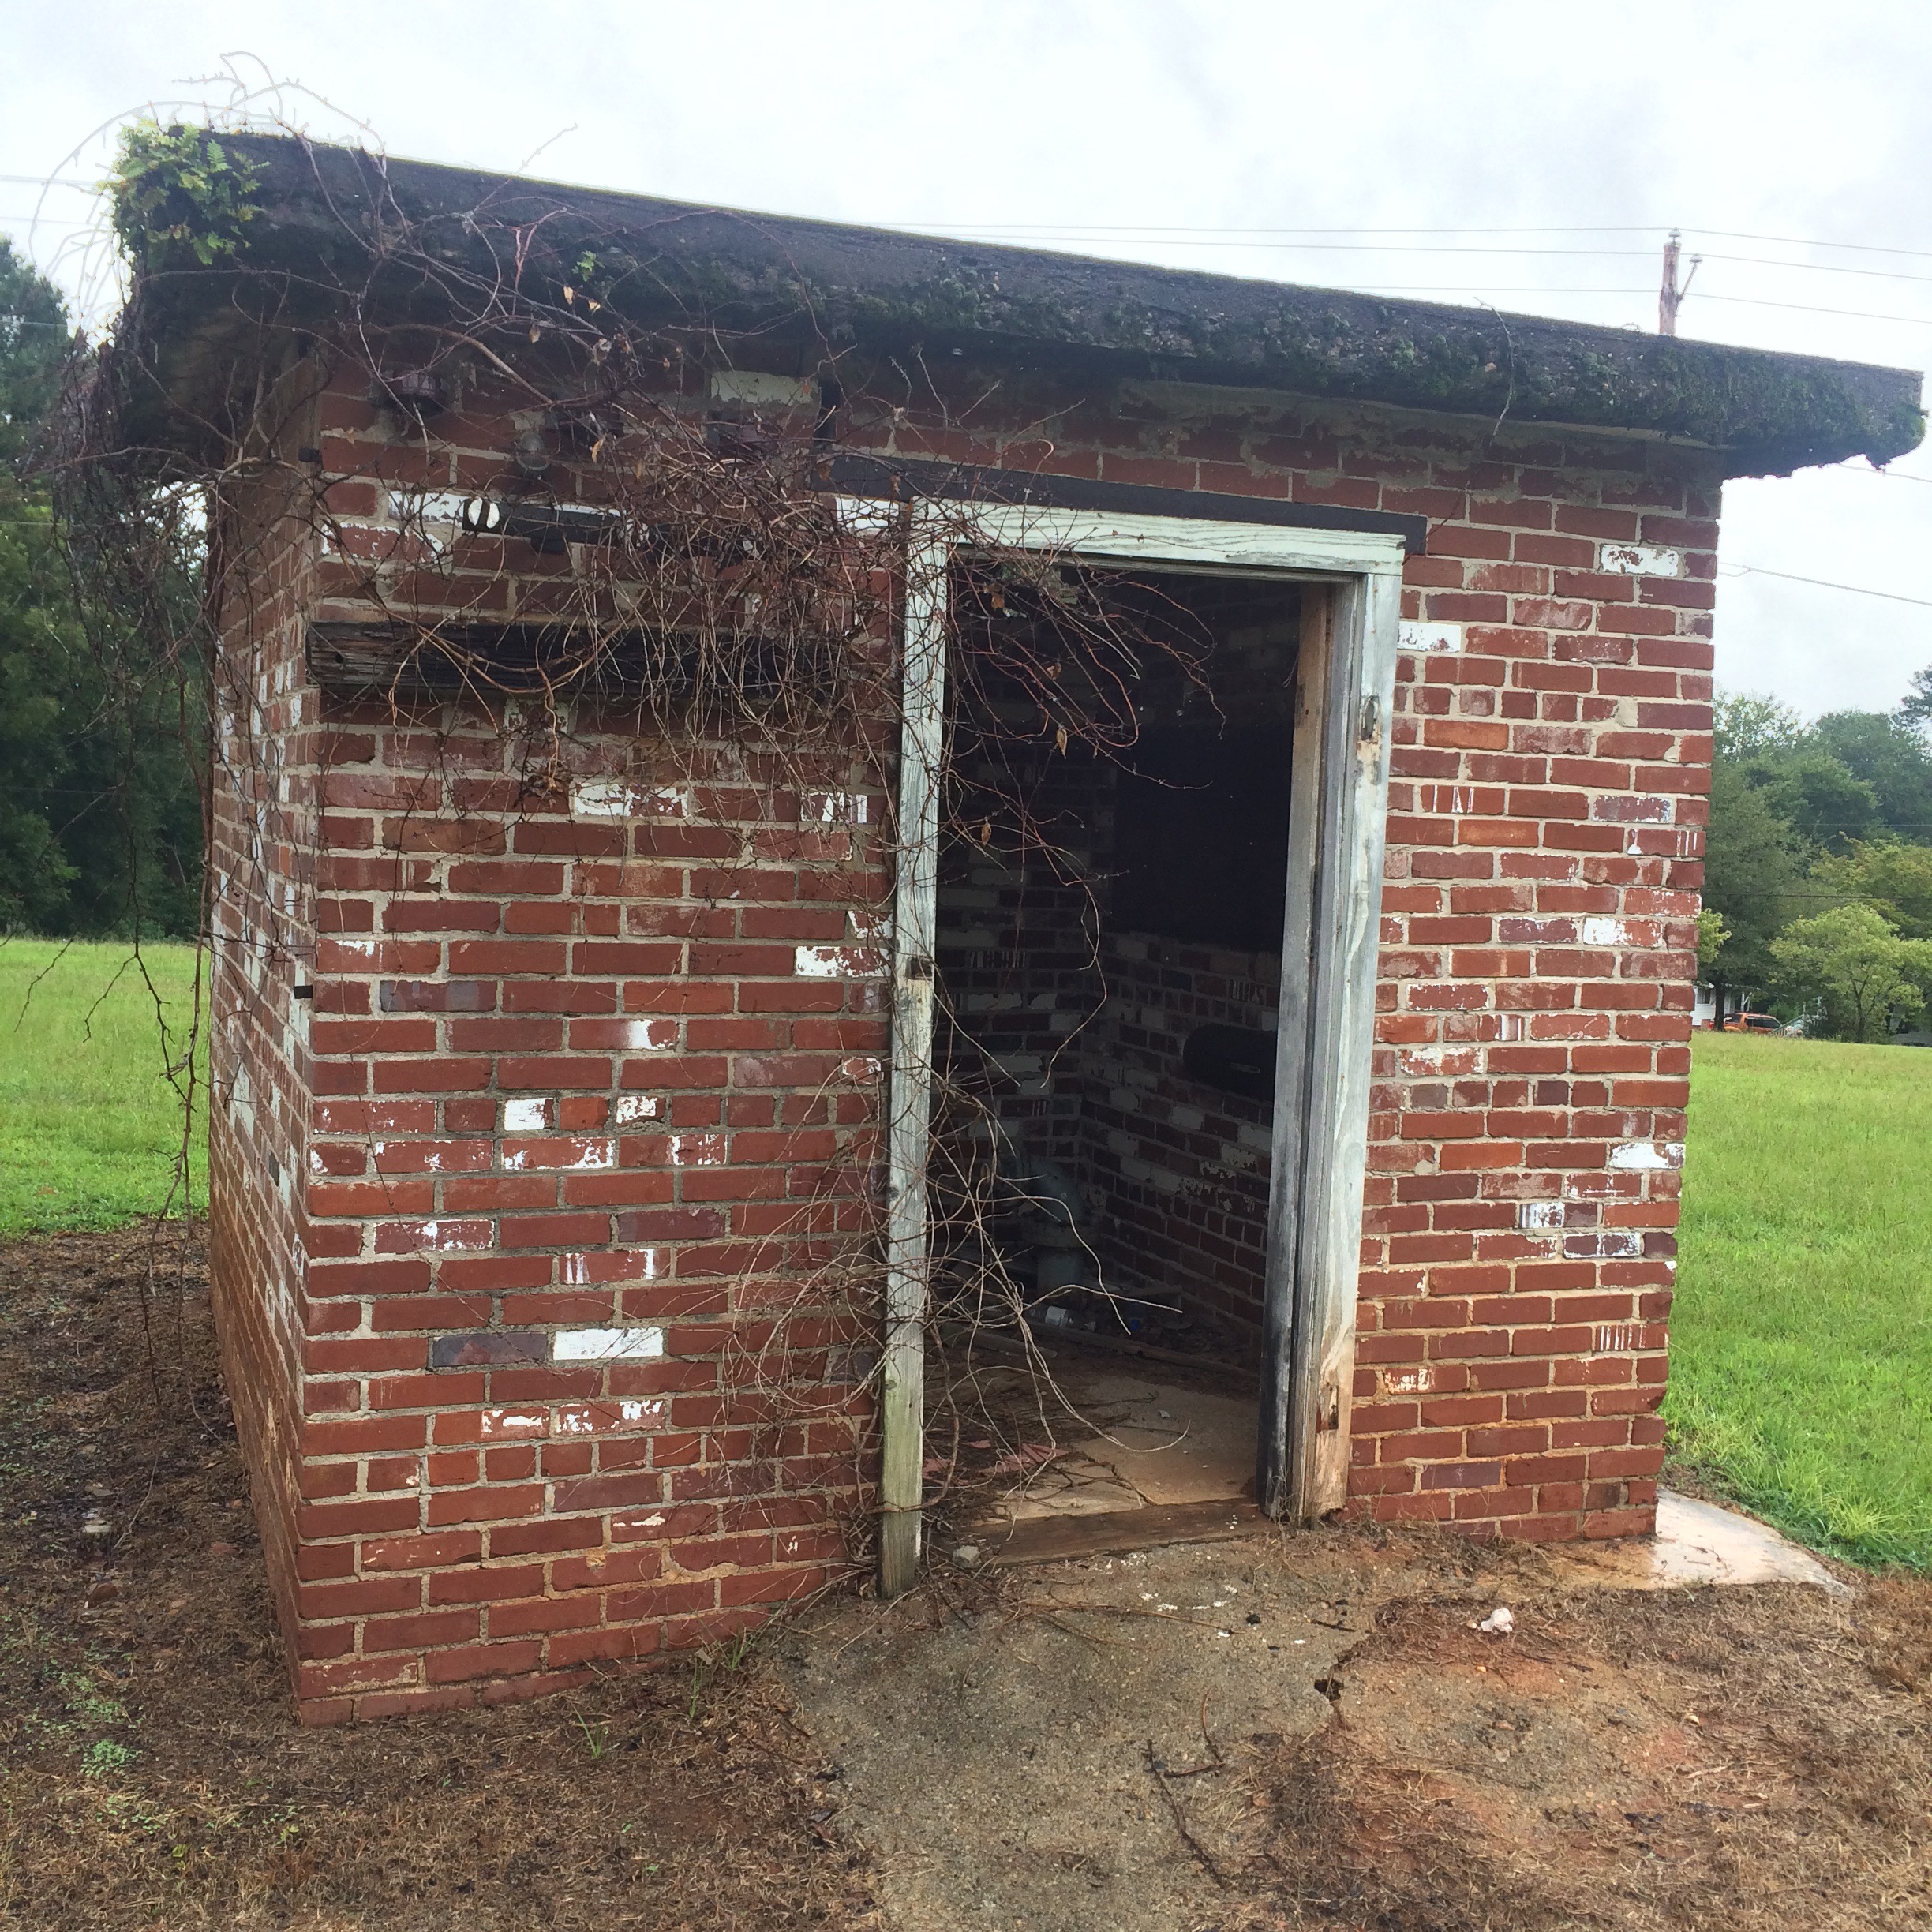
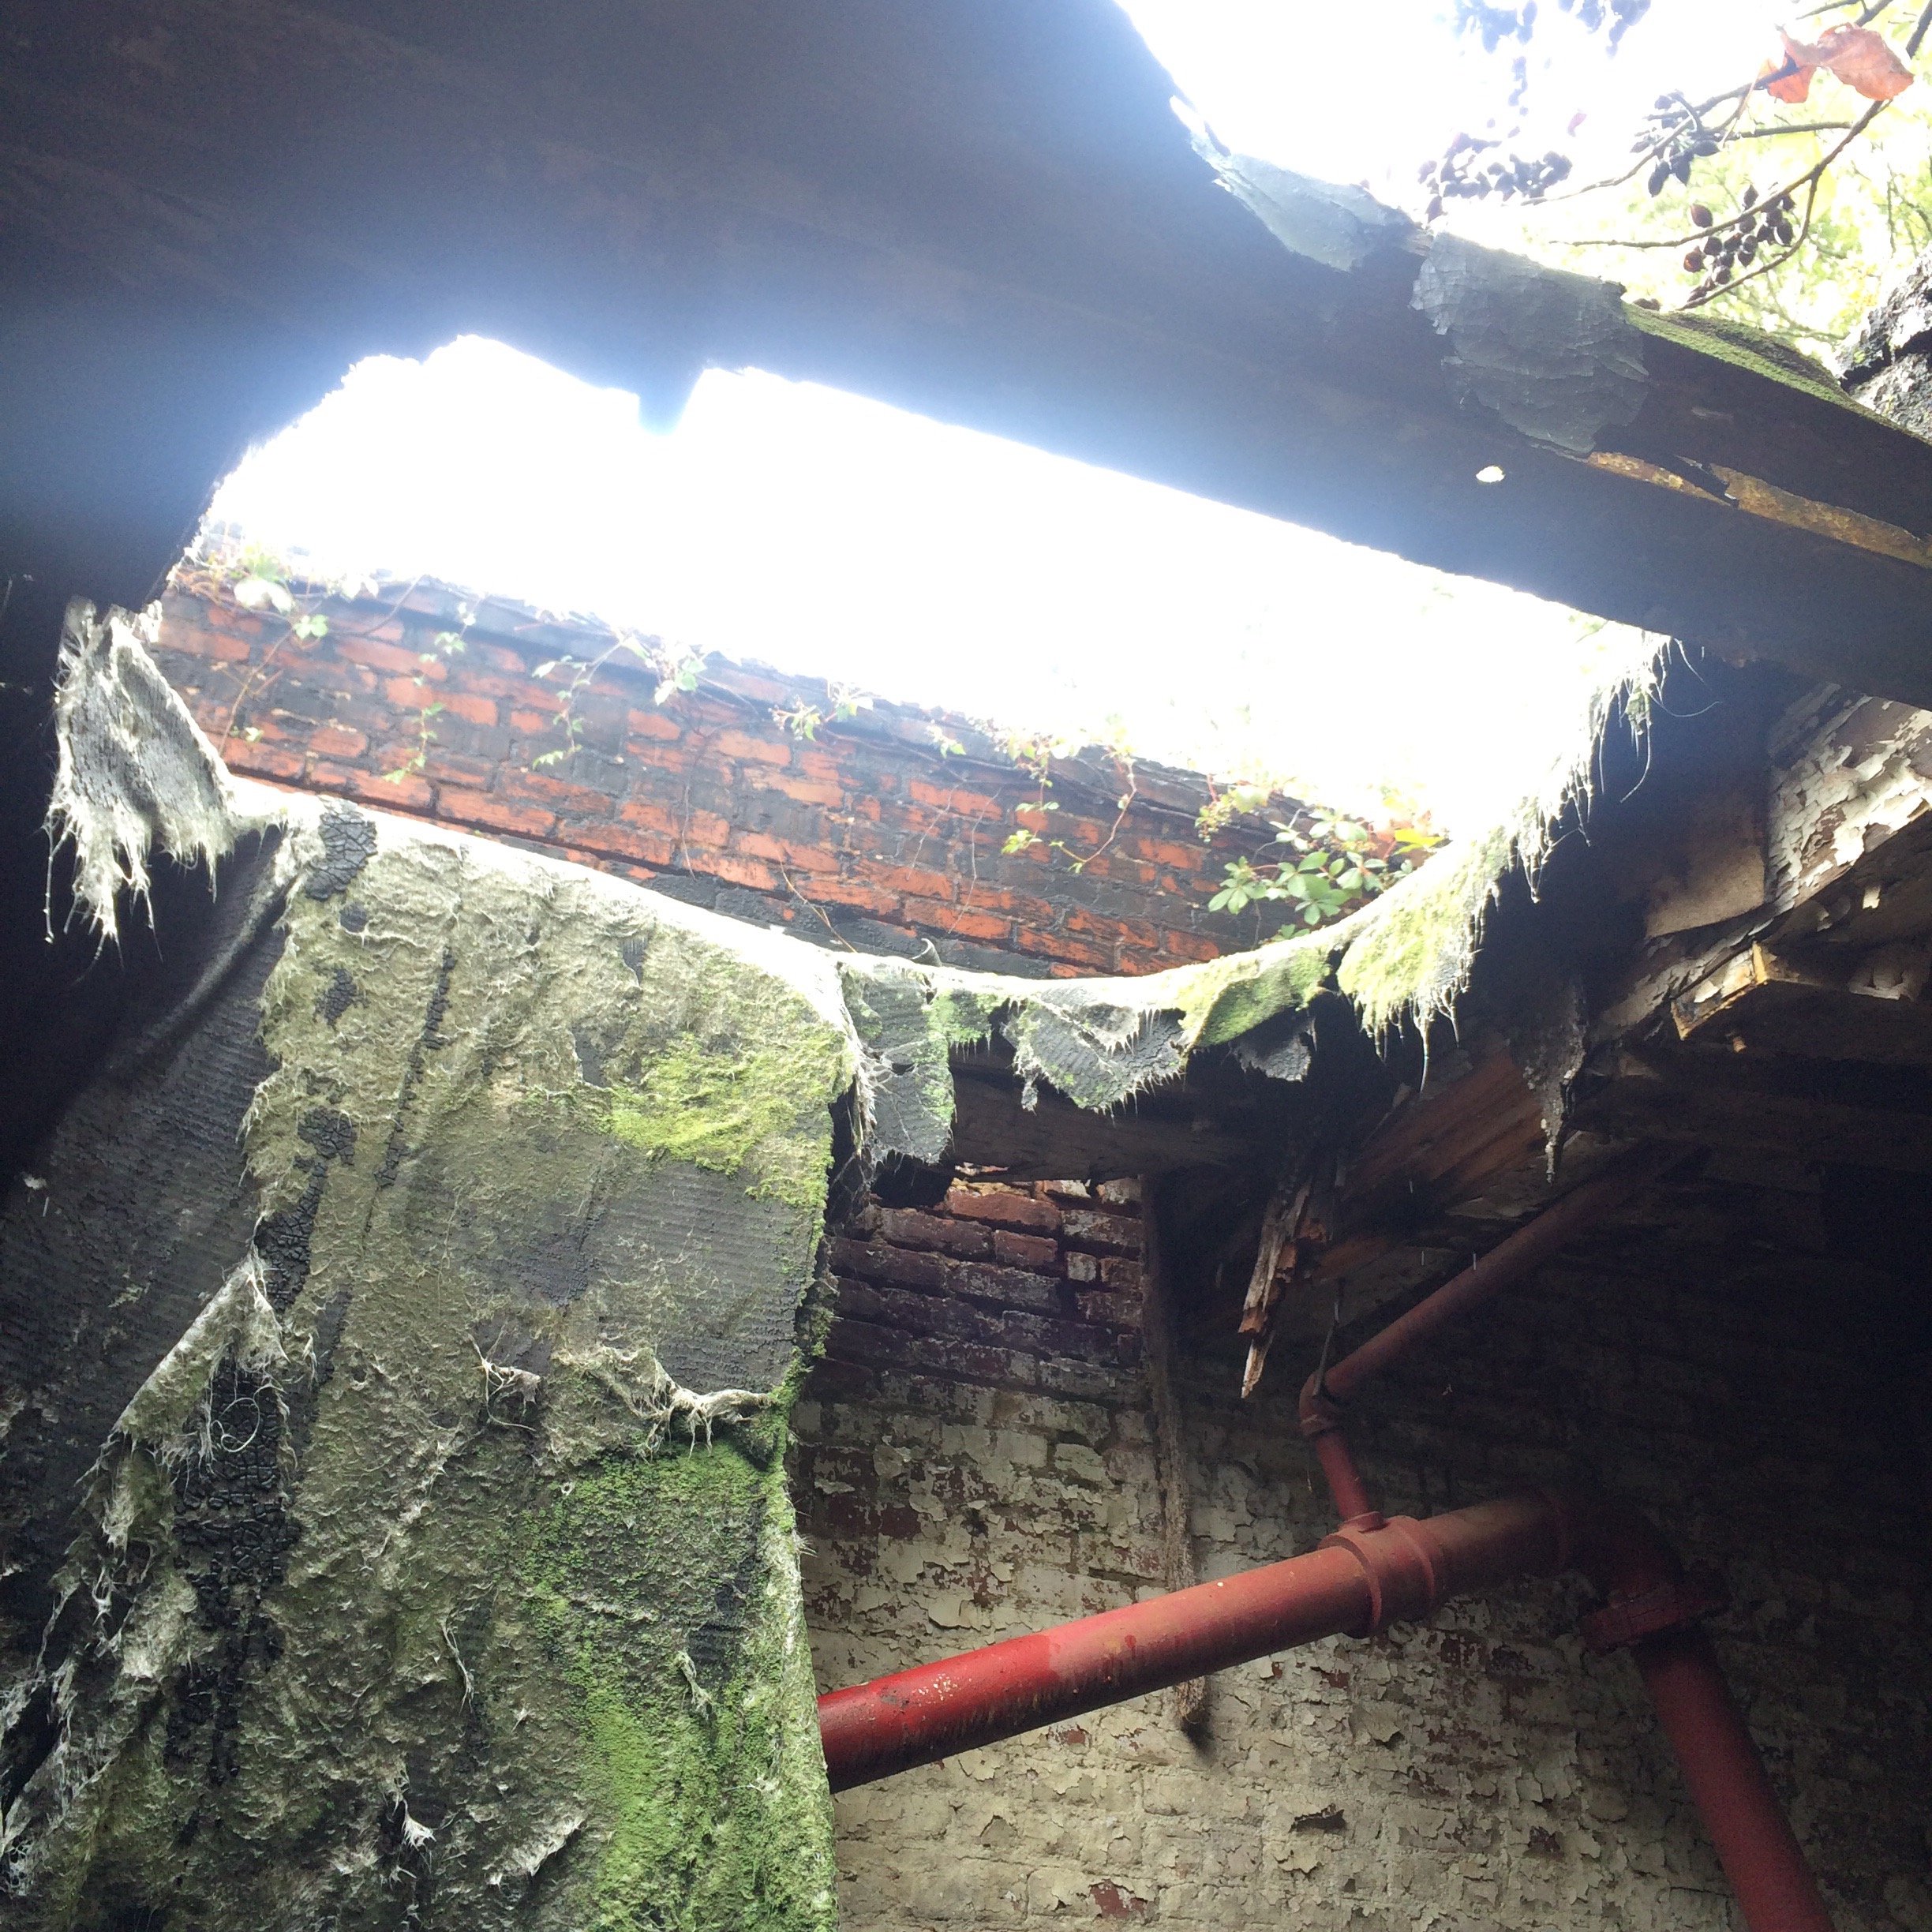
This structure whatever it was, has no roof is just stone walls now.
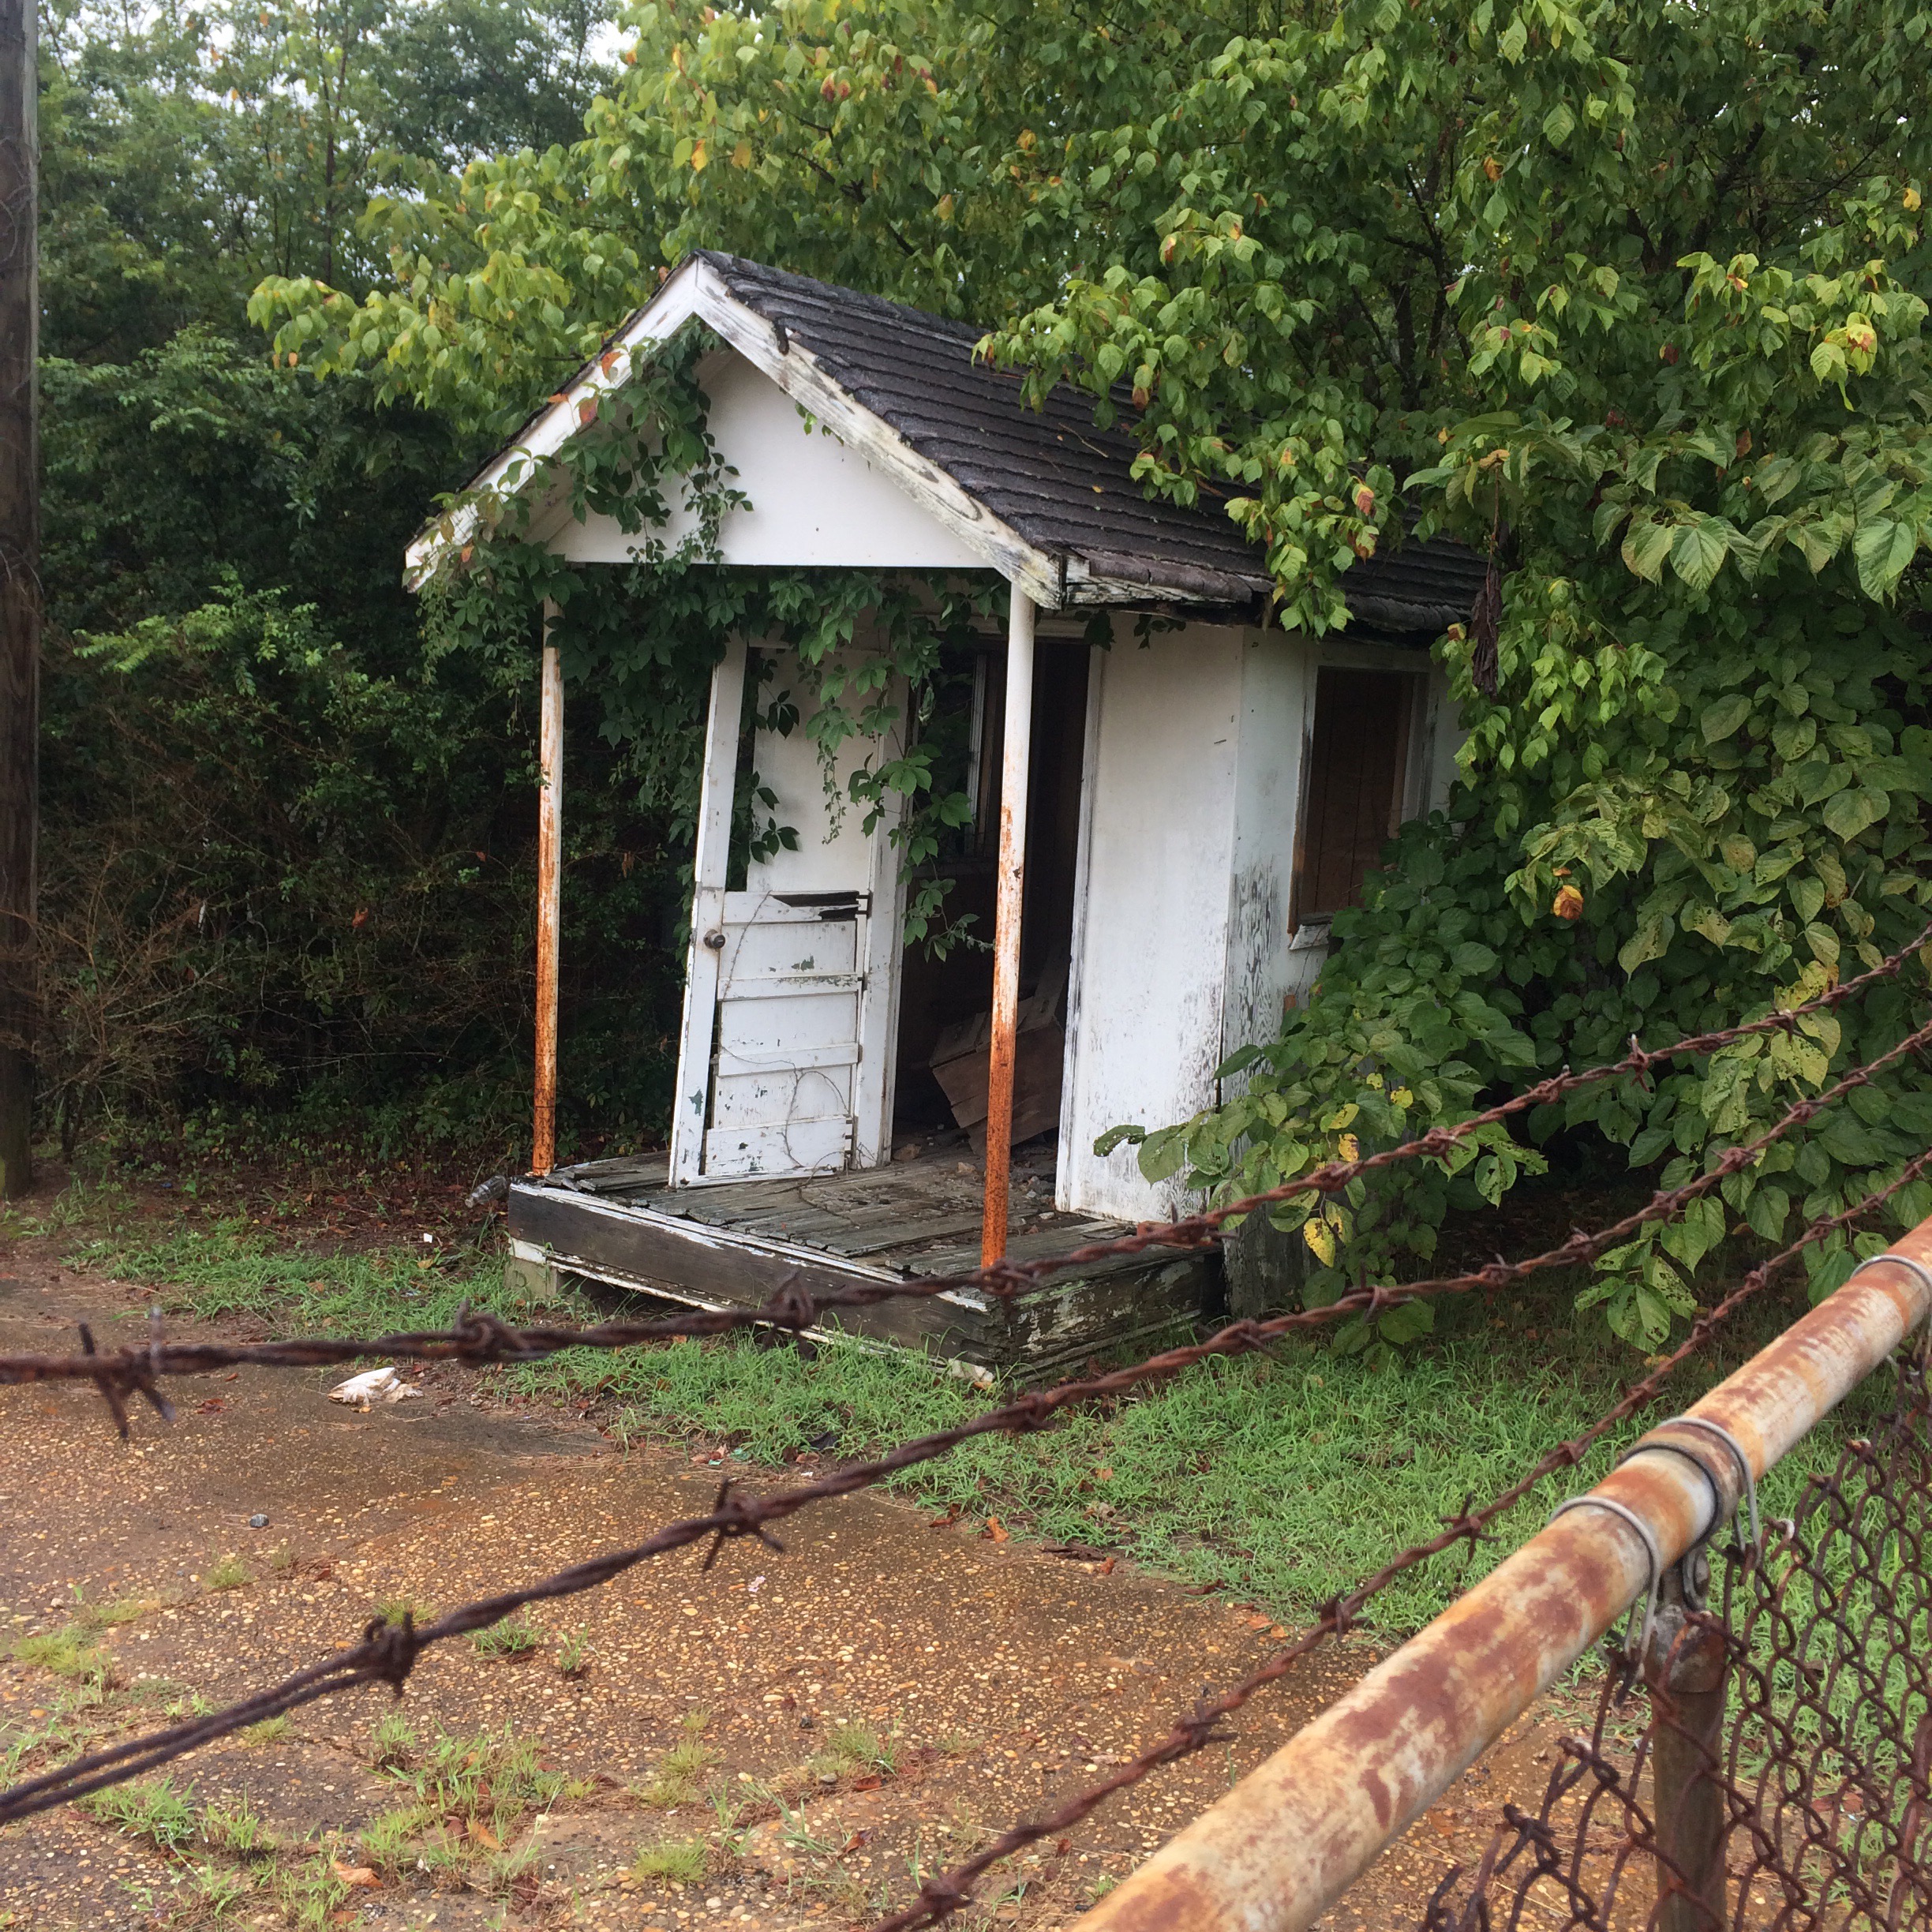
And then there’s this place. An old guard house I guess.
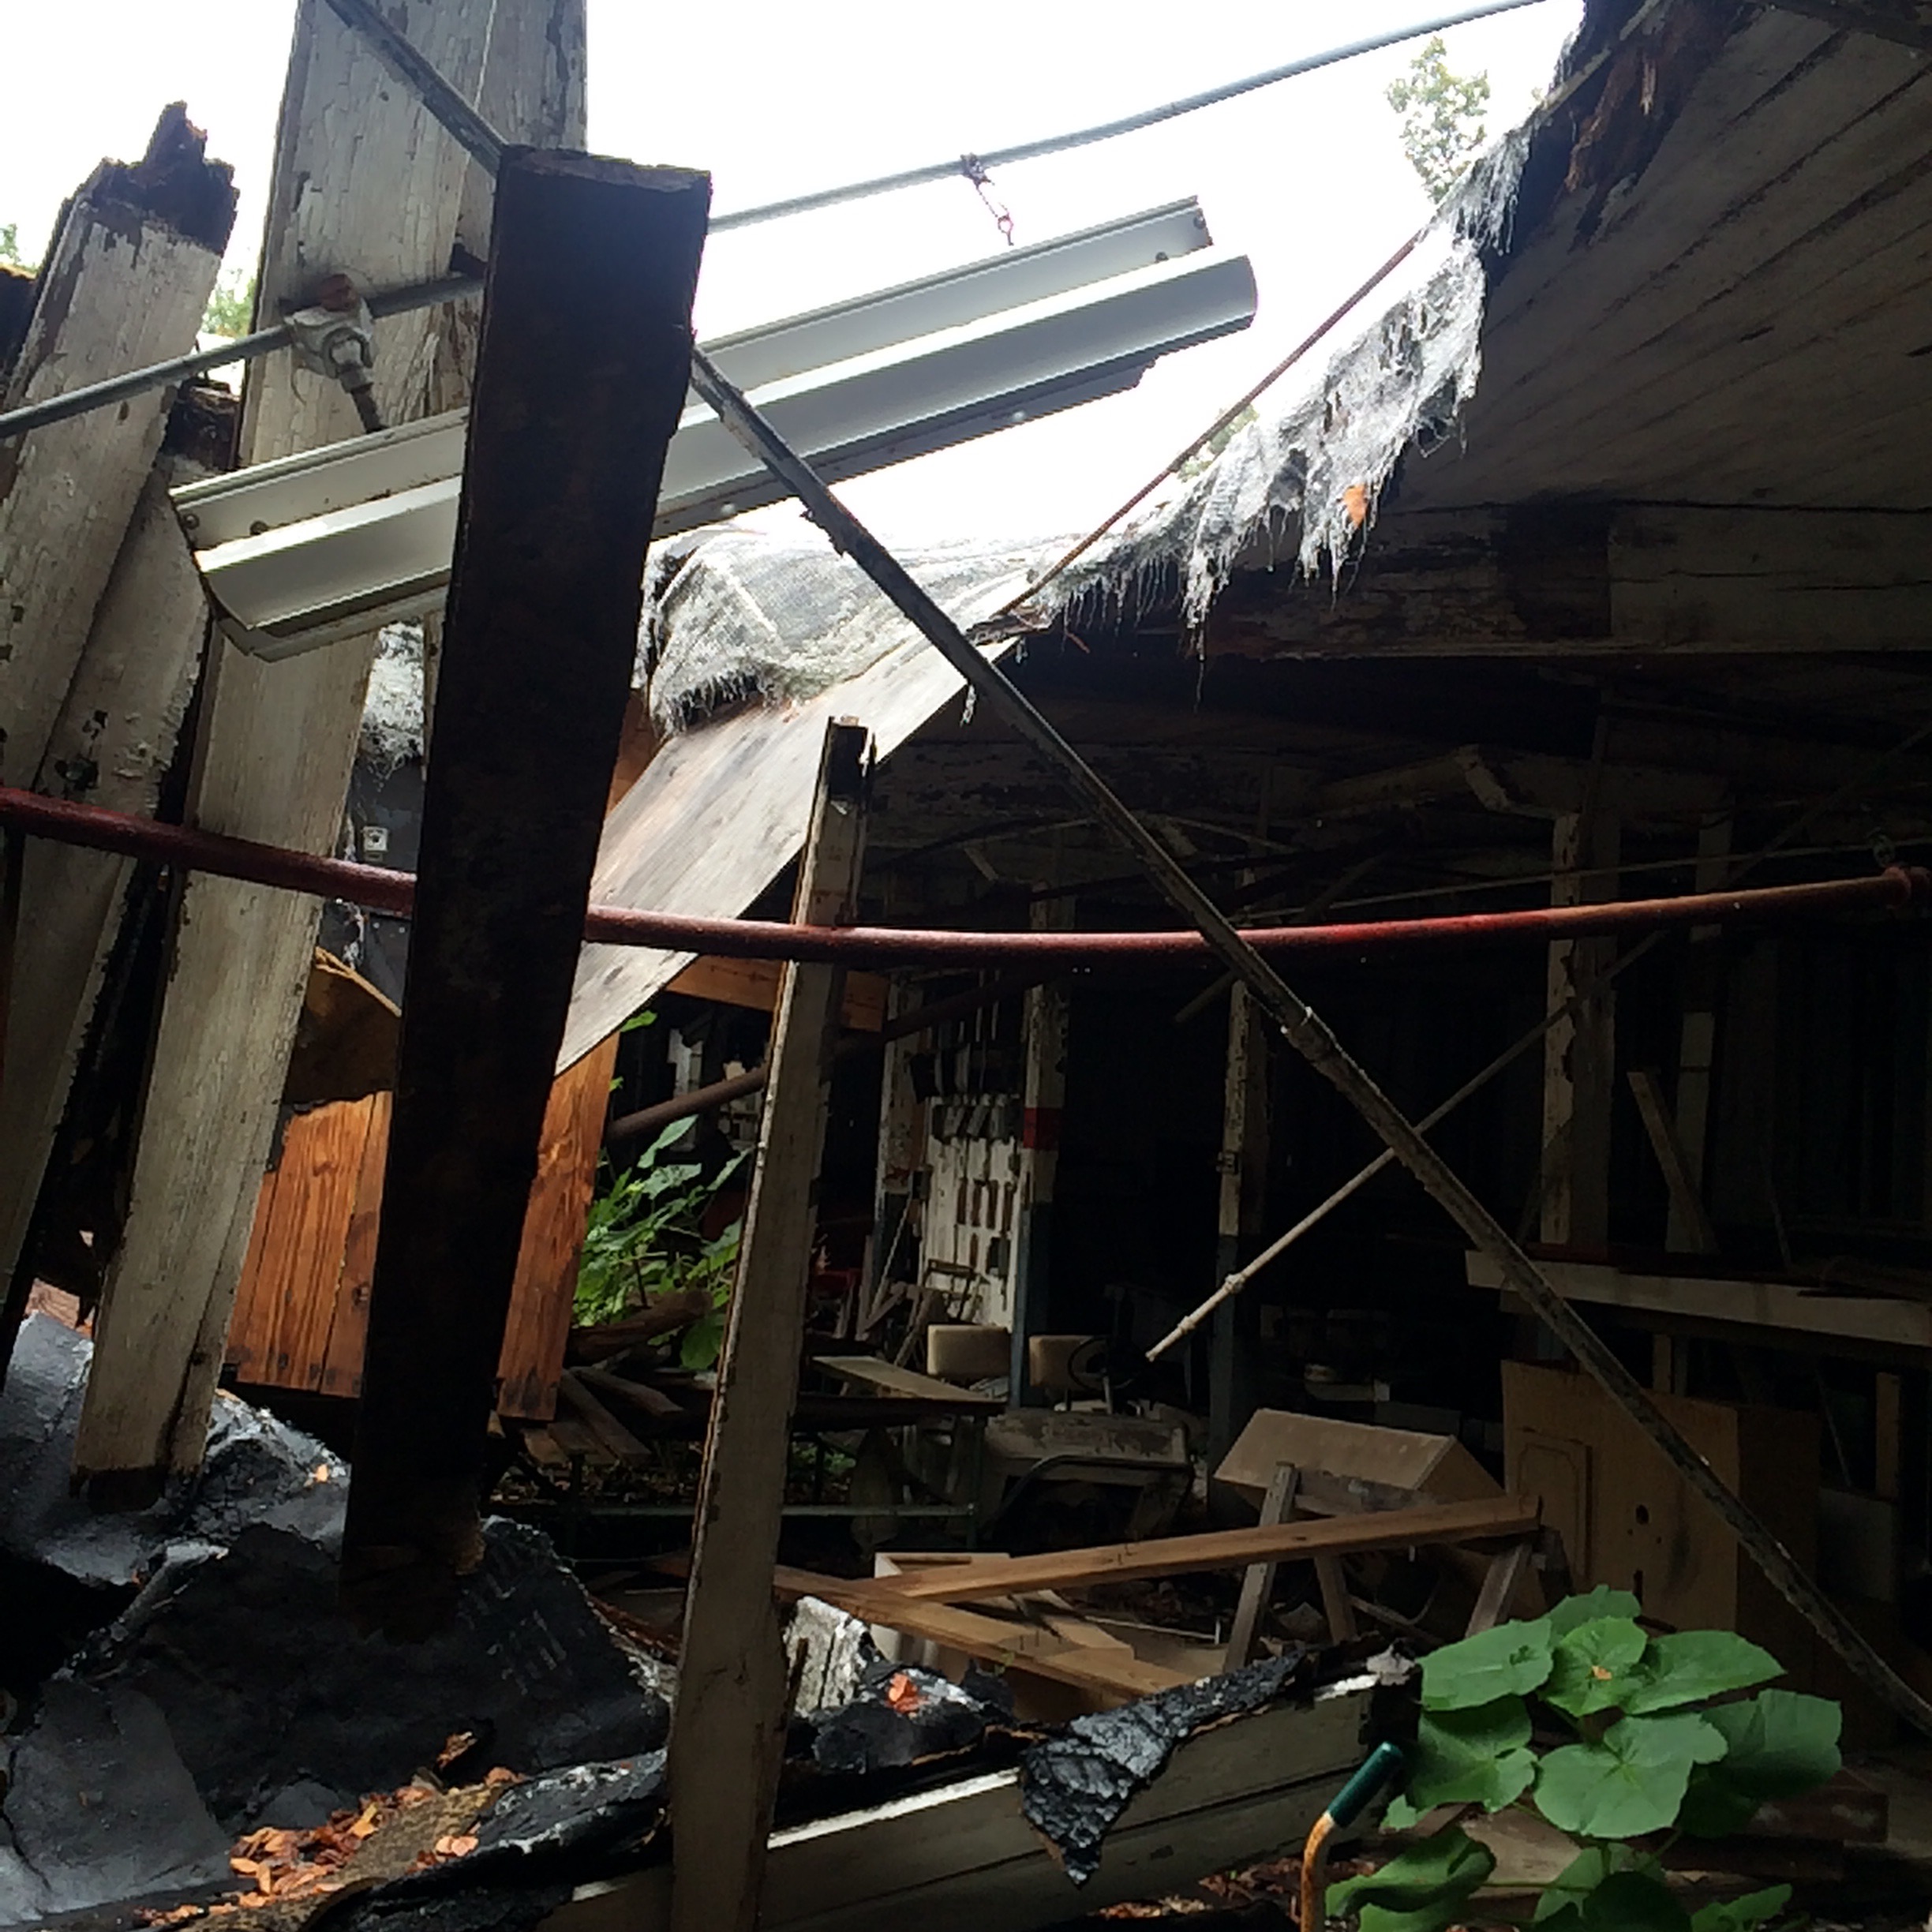
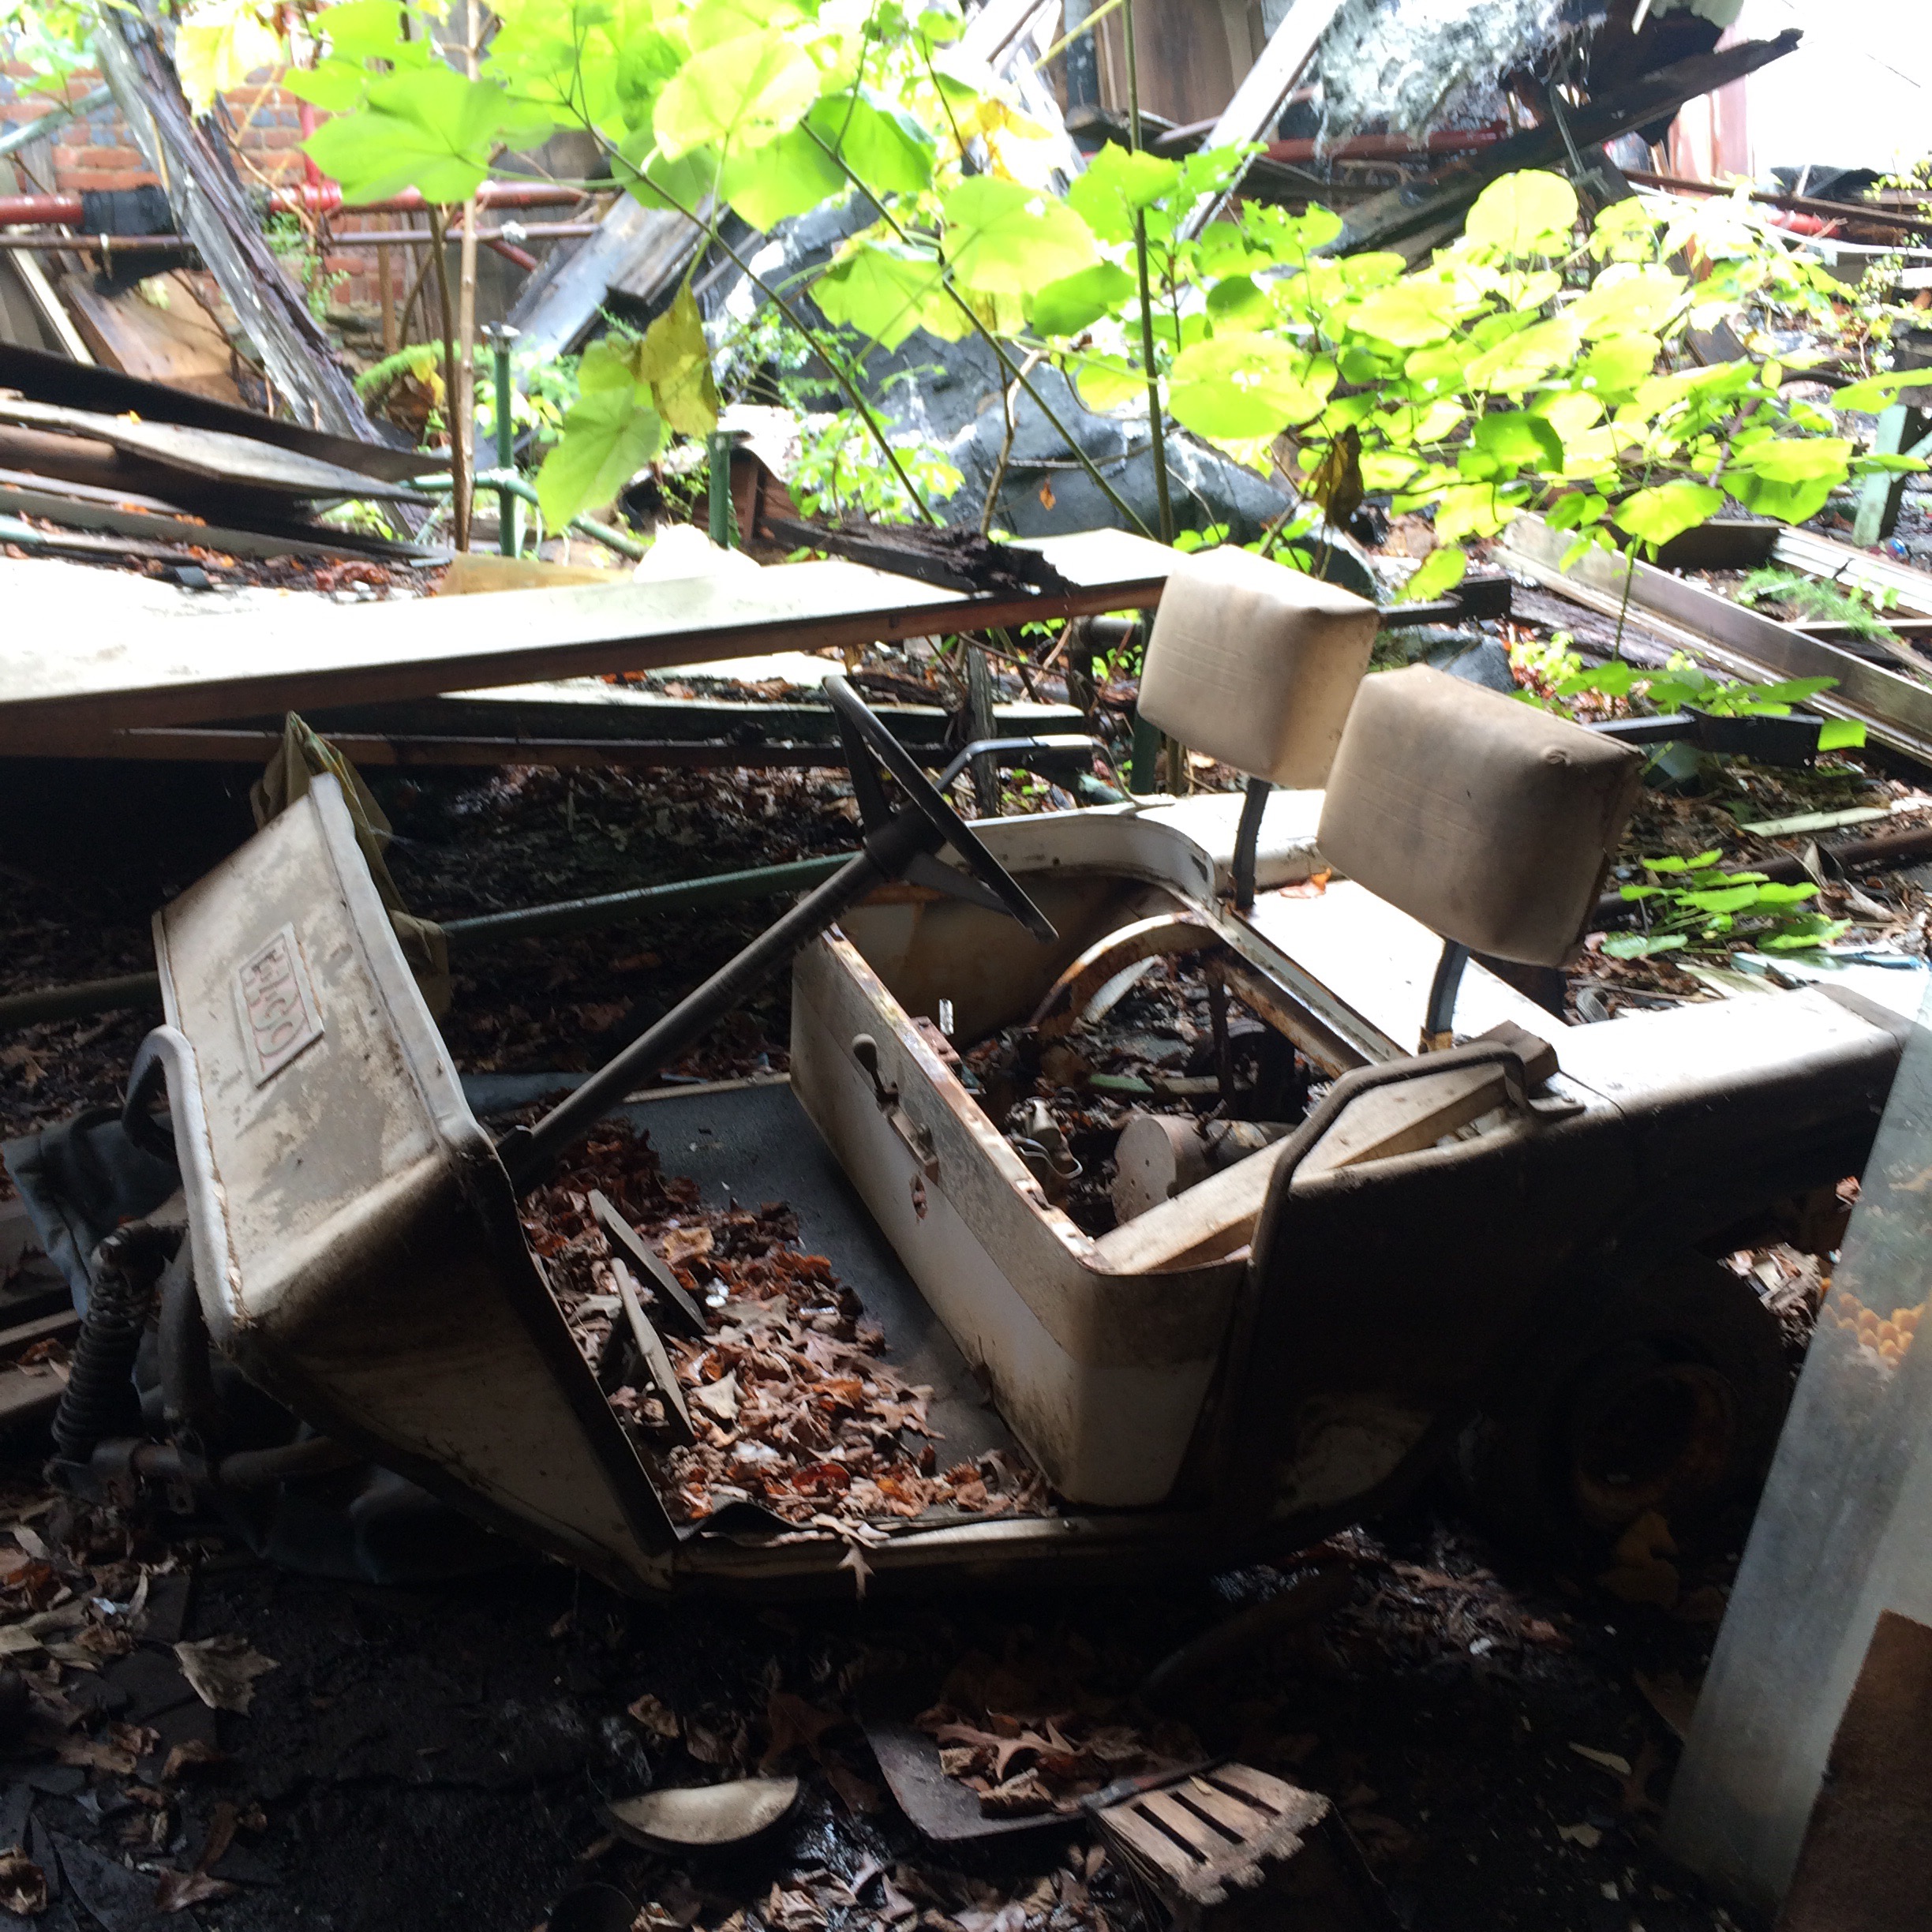
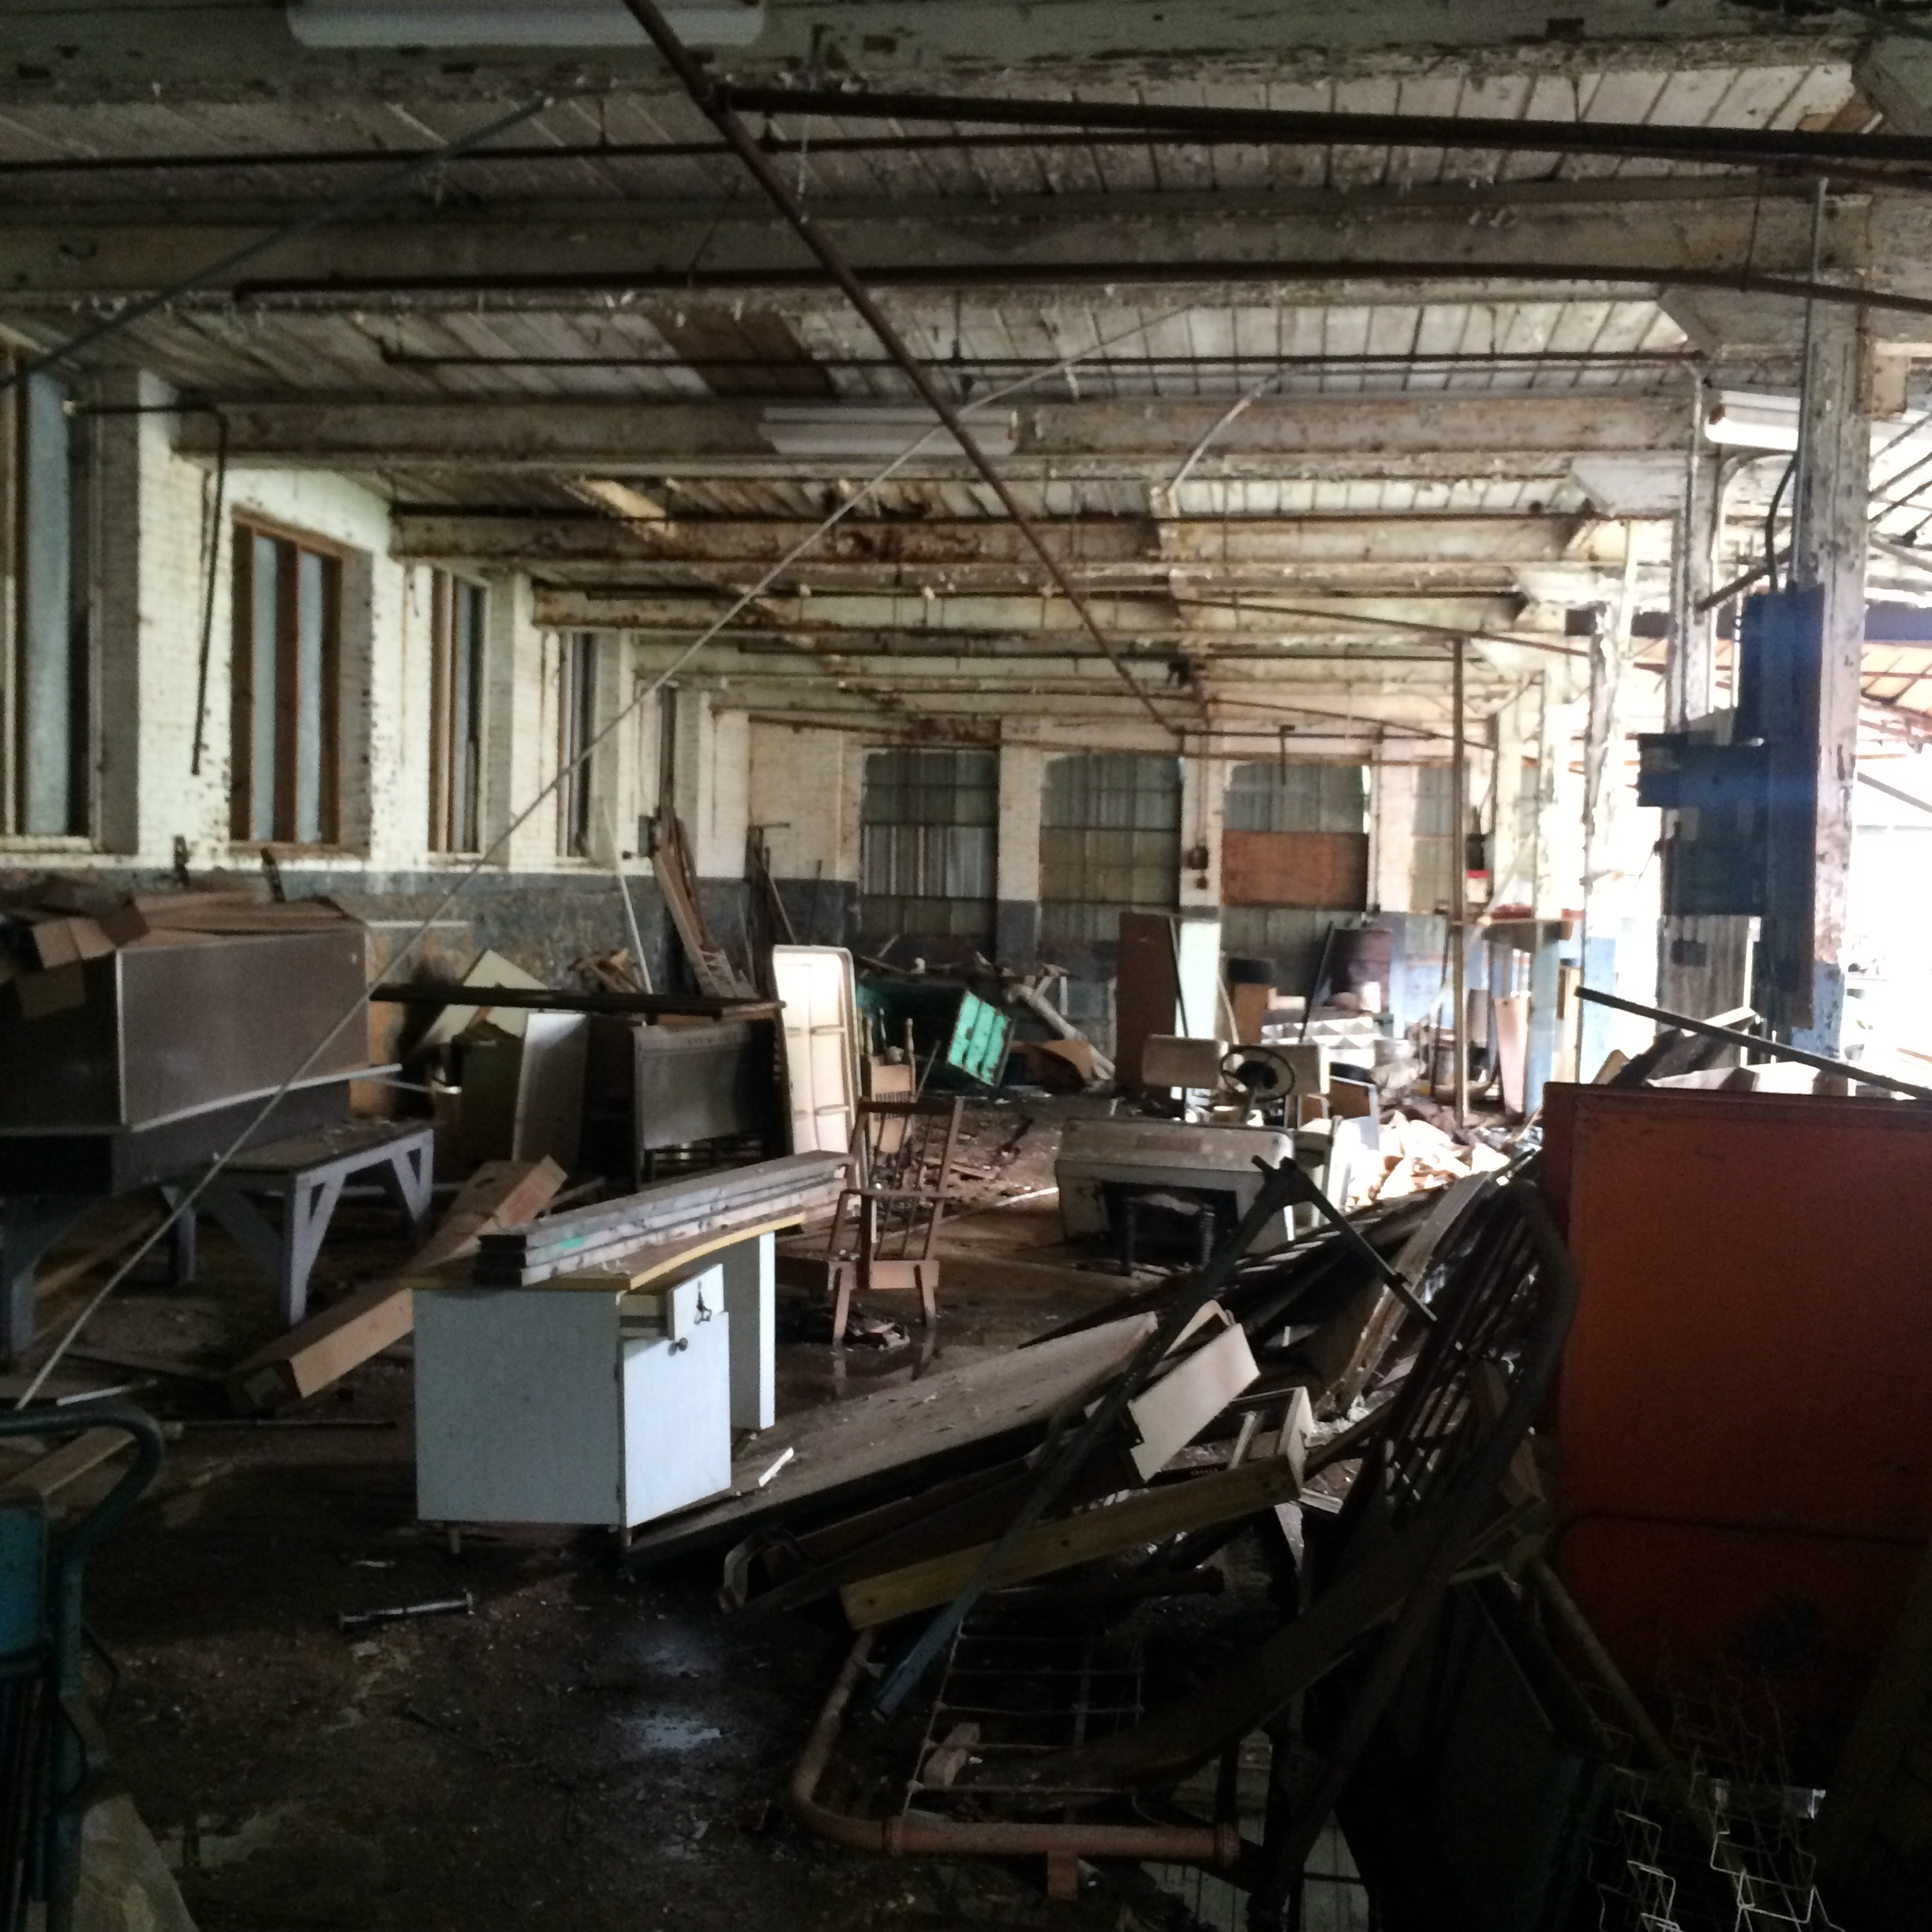
And this is what it was “guarding”. A partially collapsed warehouse full of random shit.
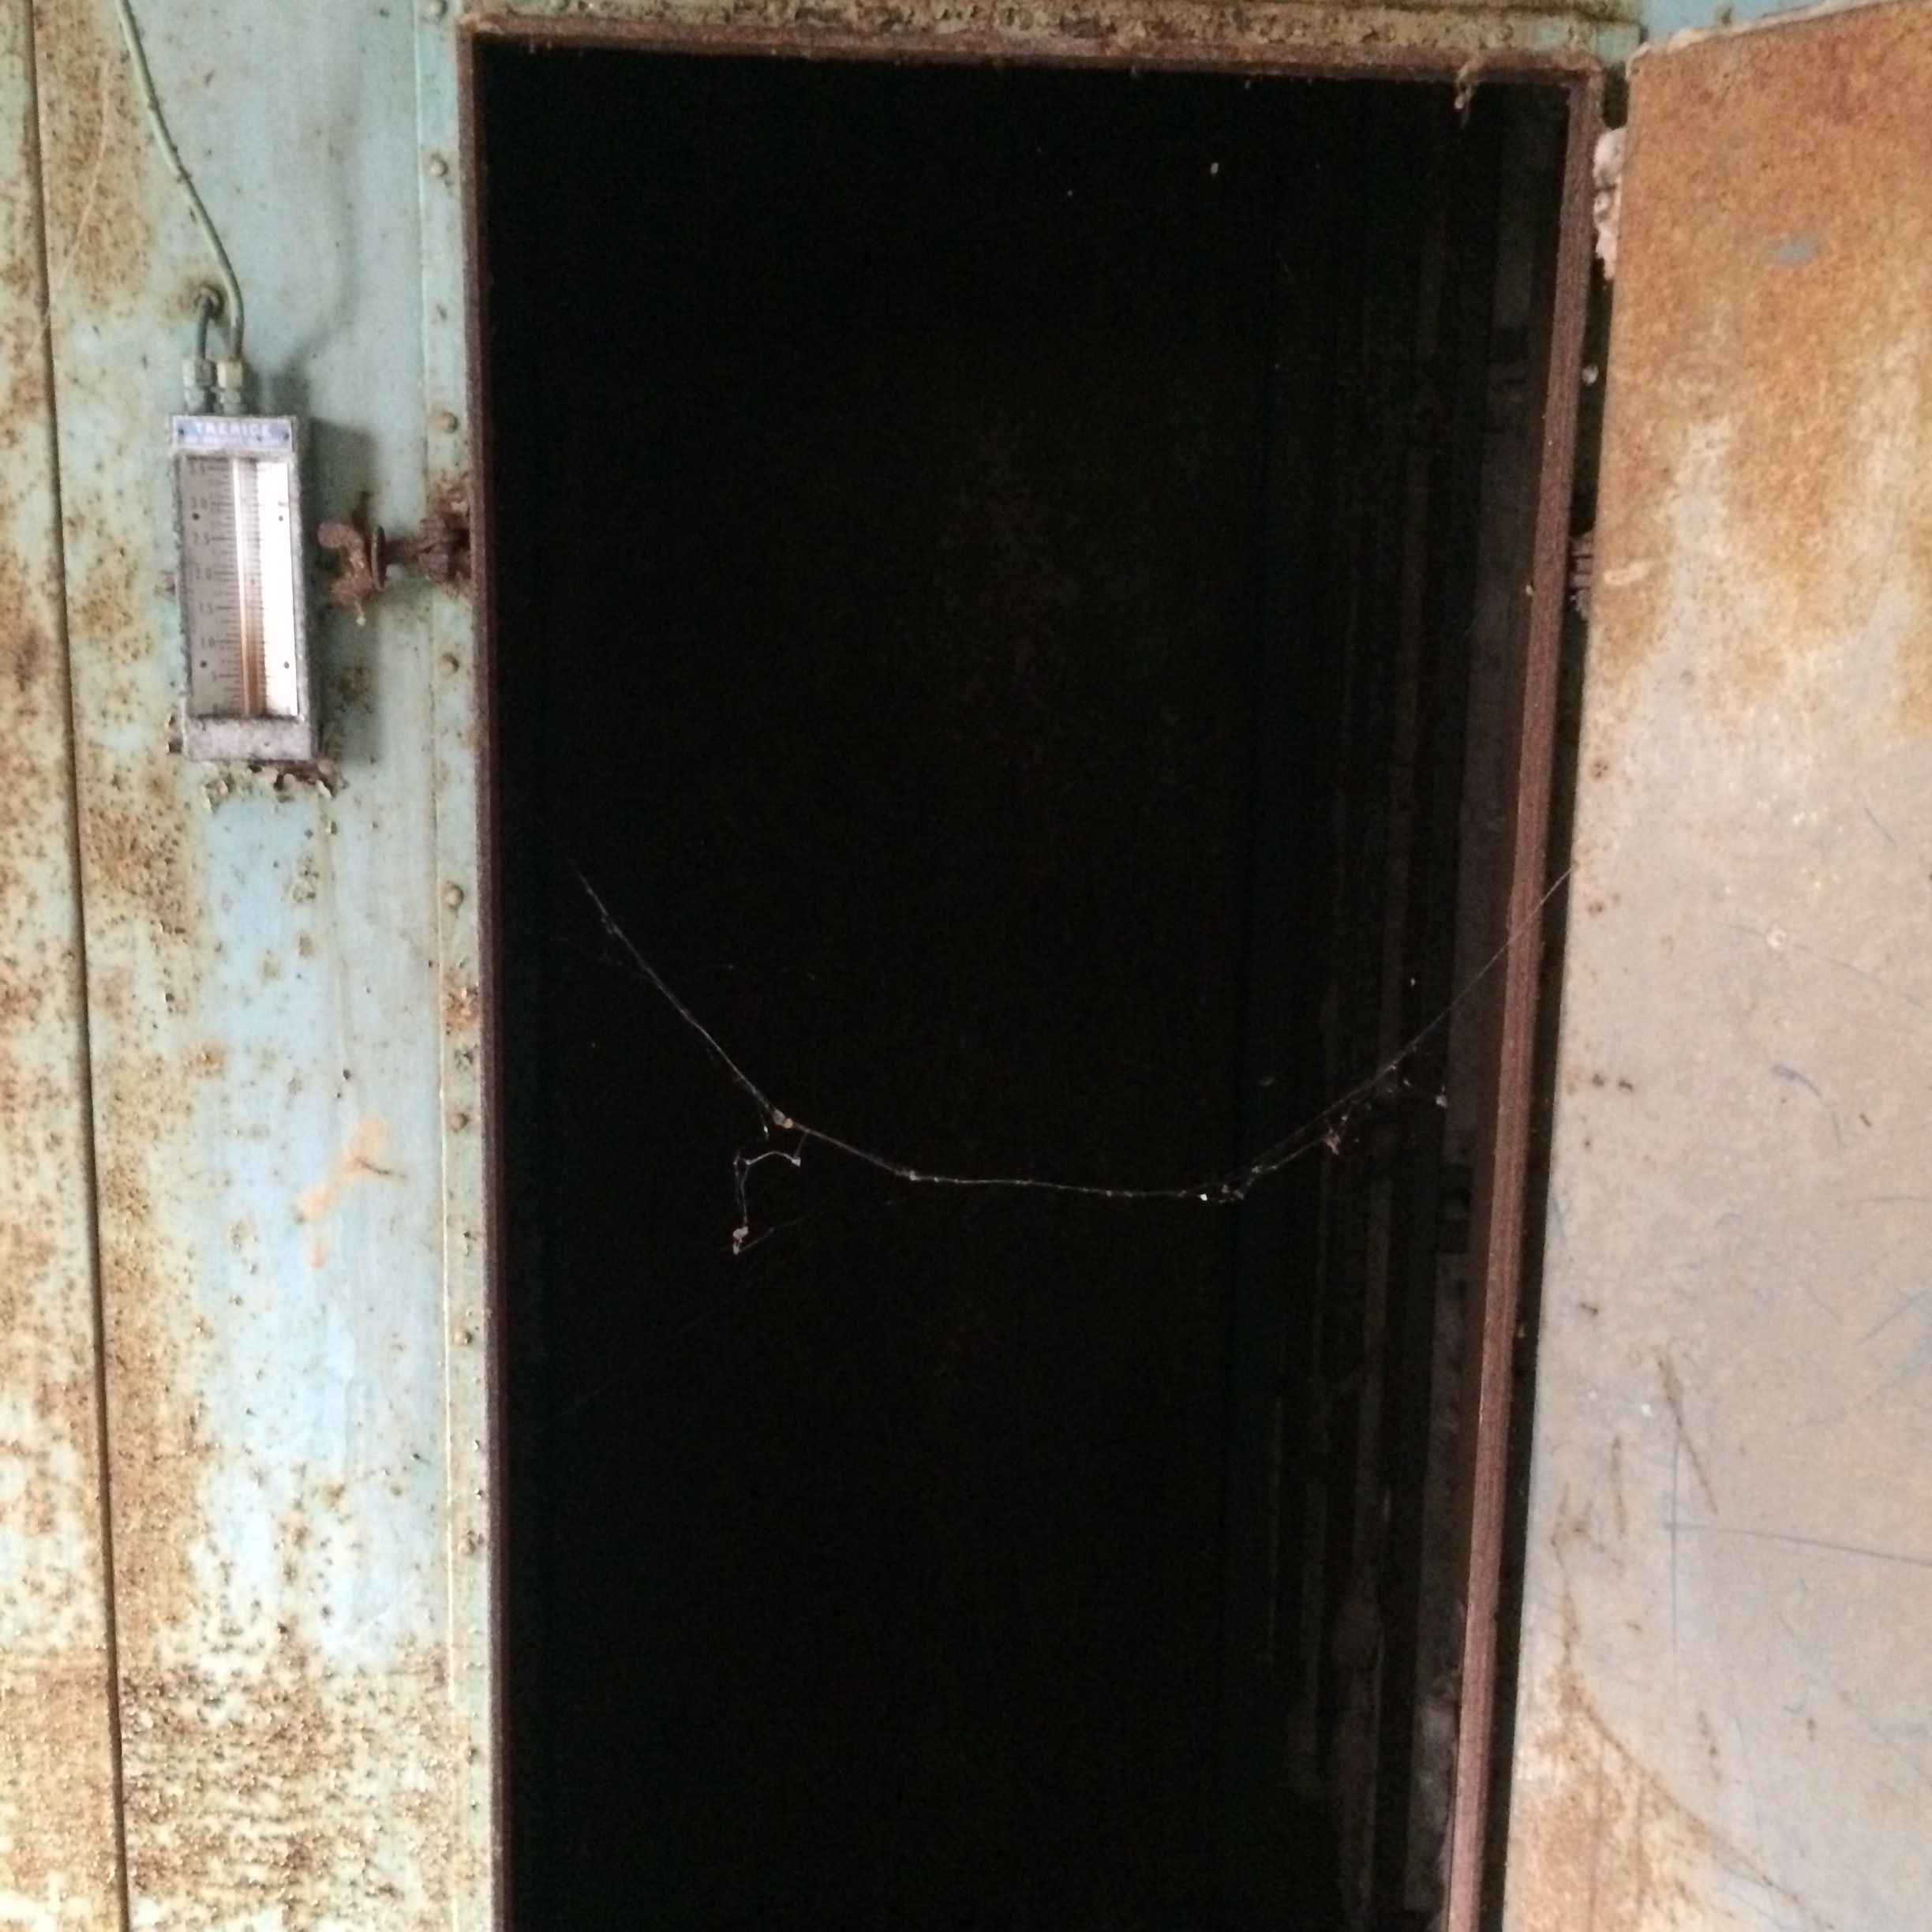
I shined the light from my phone into this door but it still was too dark to see anything beyond it.
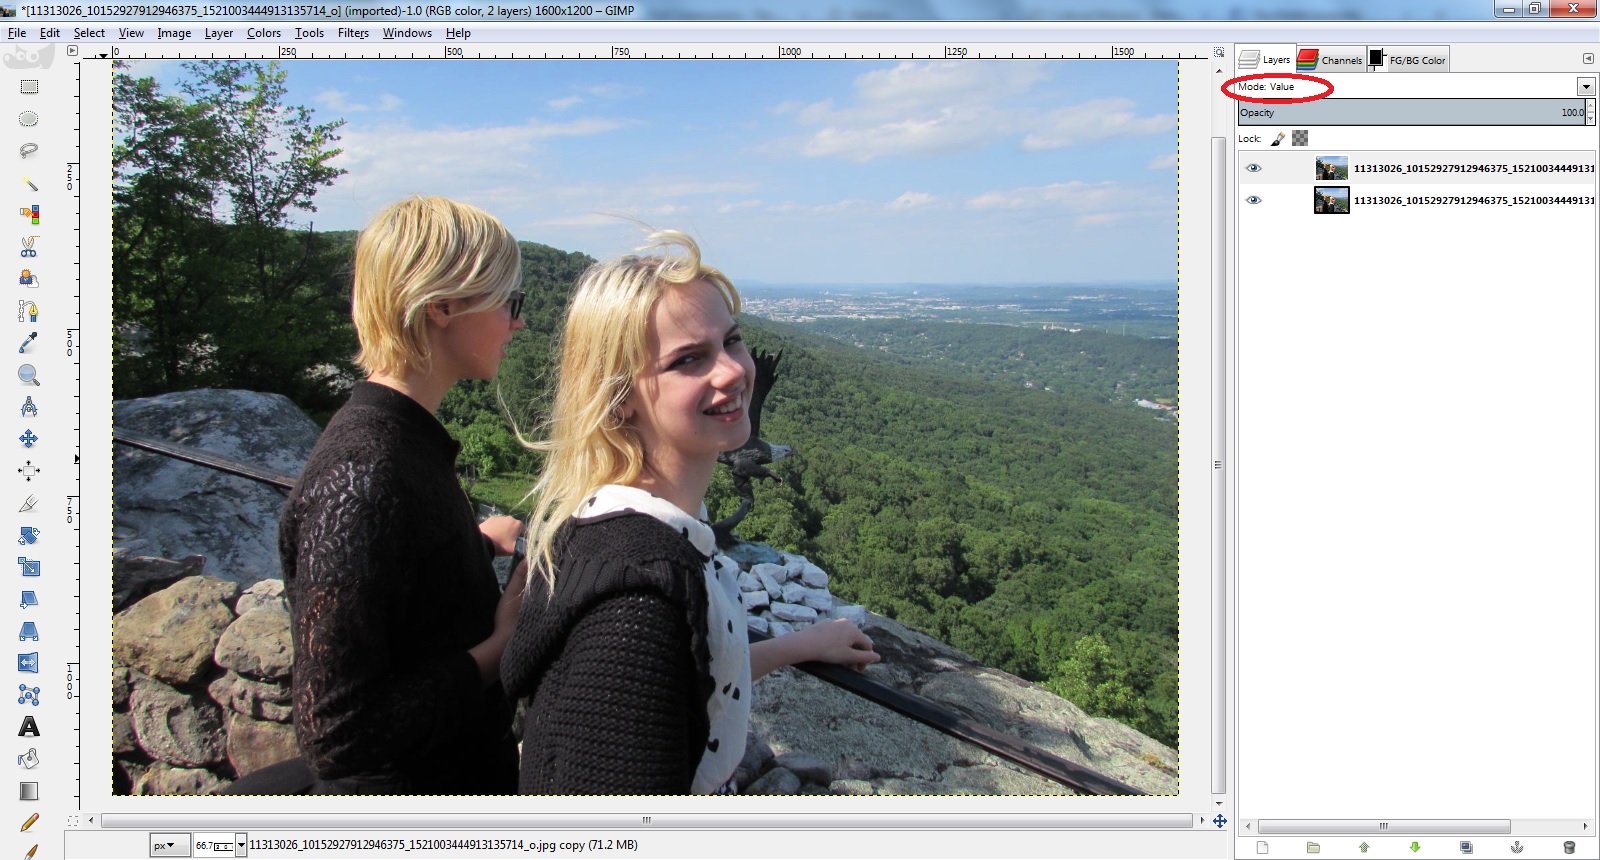
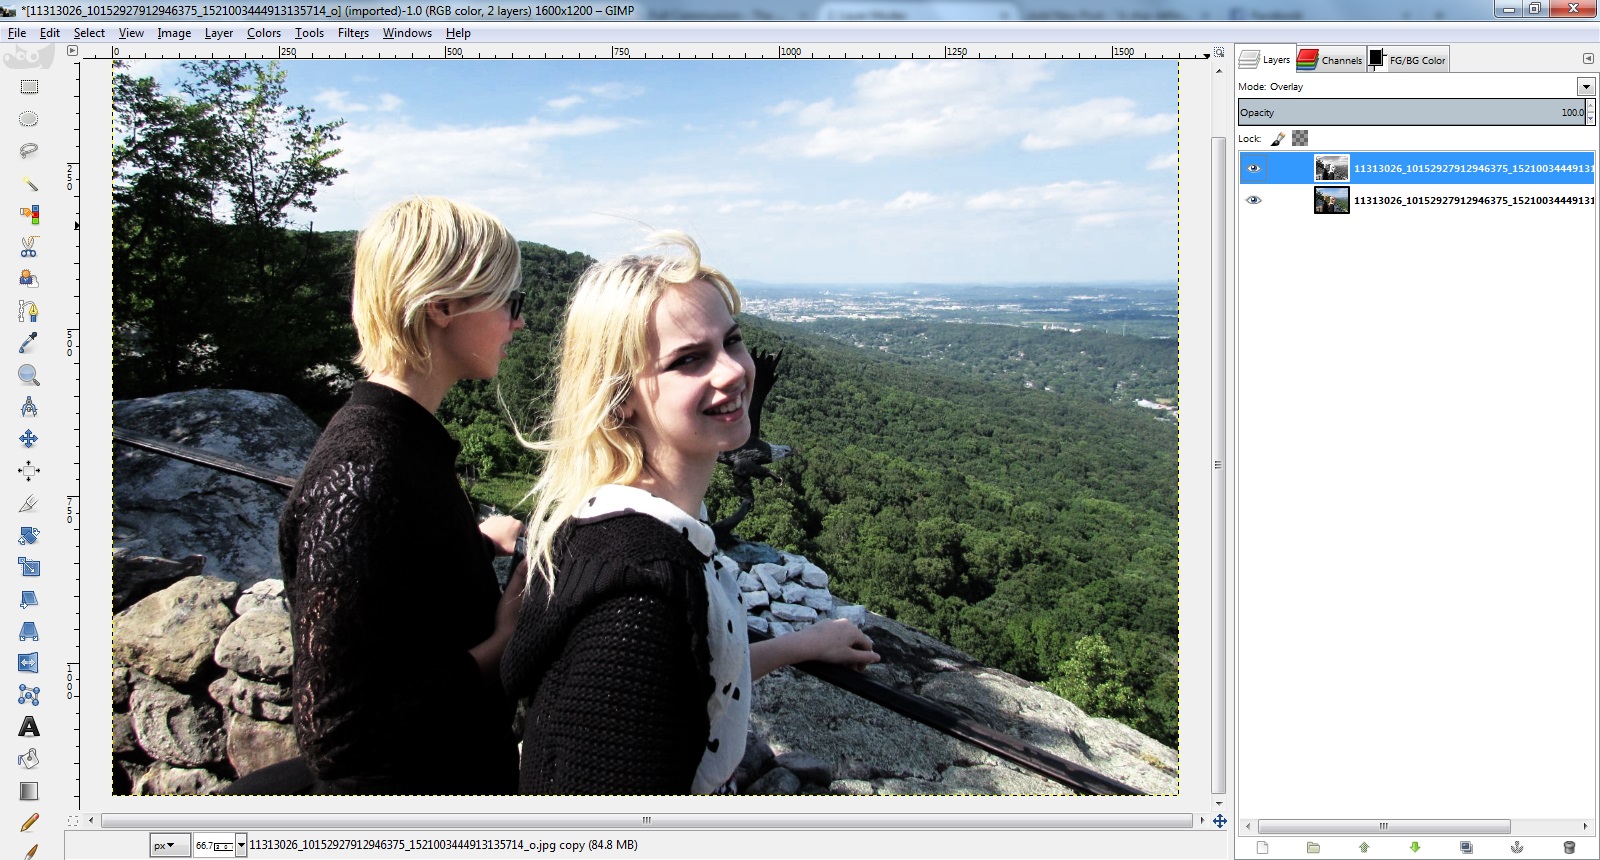
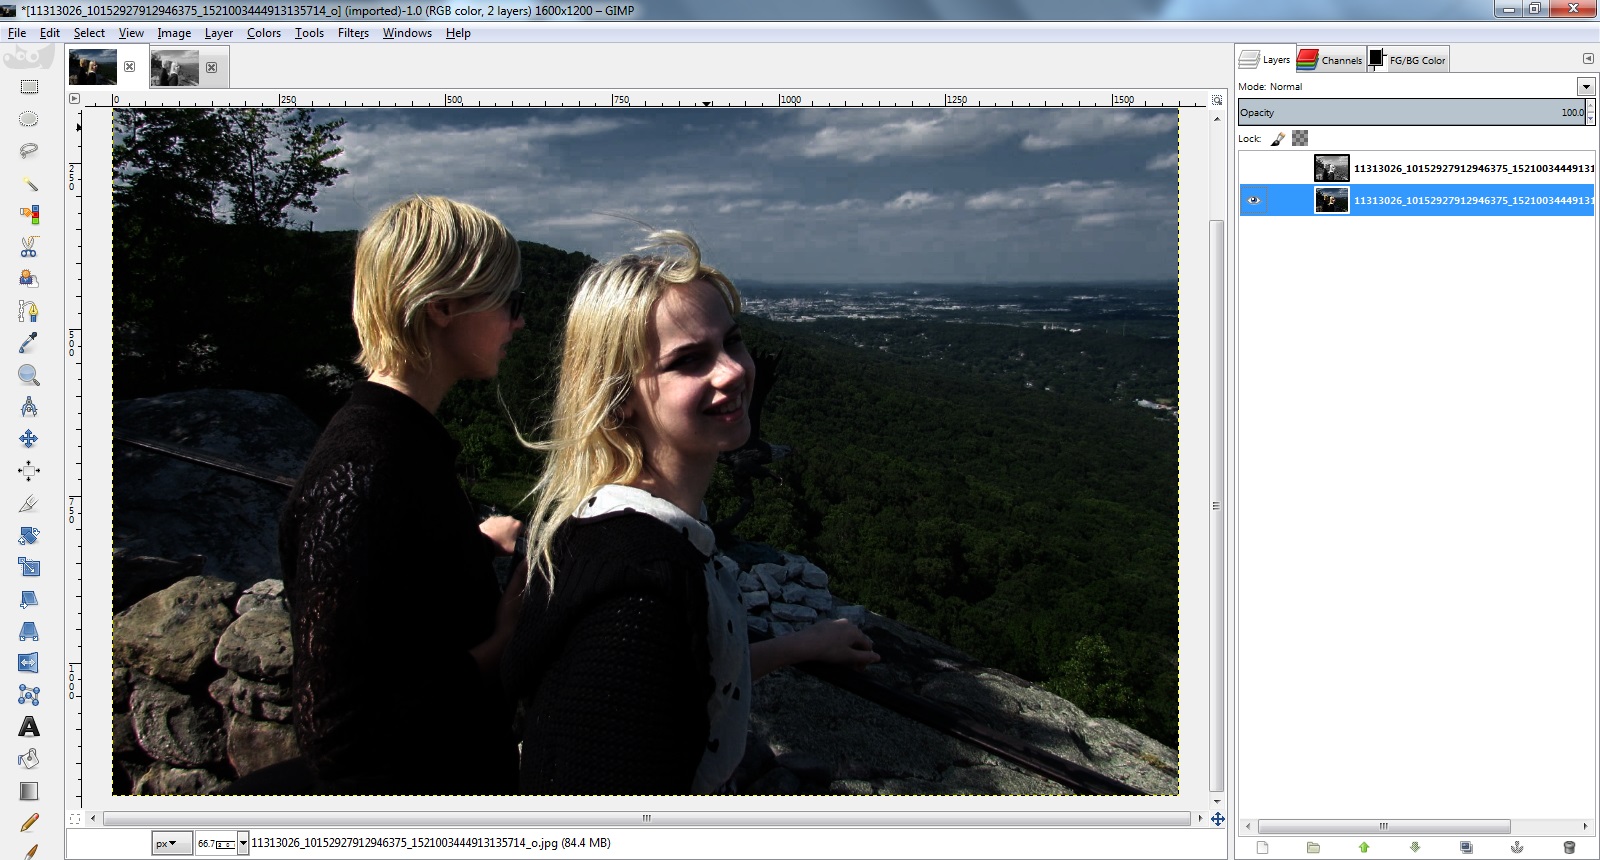
Let’s take another look at what we’ve been doing here. Because the “value” of a layer is a single number, you don’t actually have to make the layer gray-scale in order to use it like we have been doing.
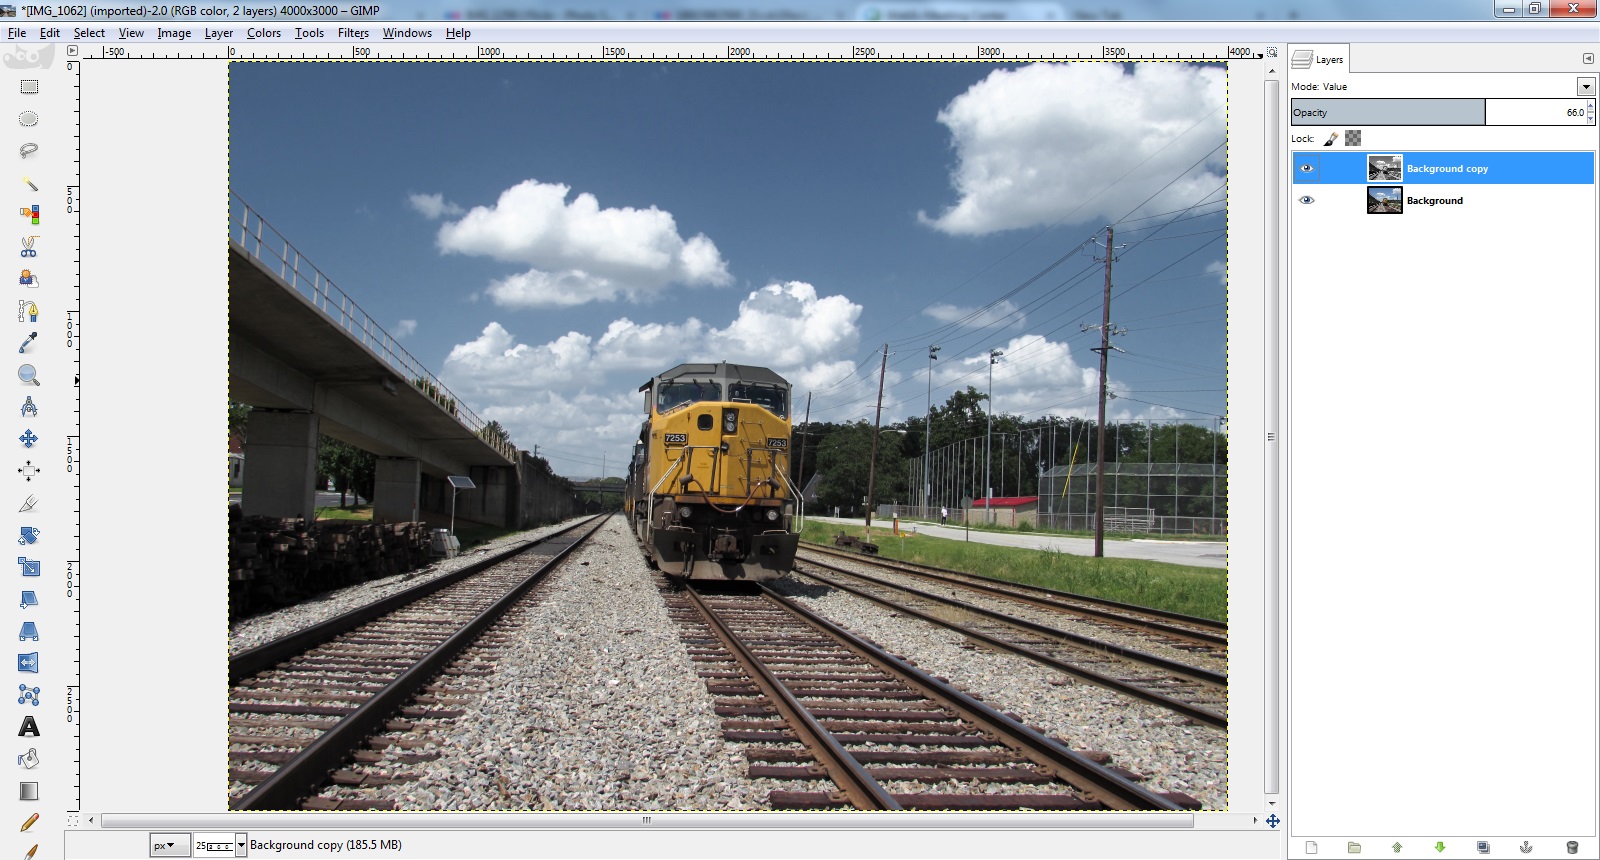
As before, I duplicate the layer, and this time I set the top layer’s mode to “value” without using any channel mixer first.
Now, initially it is not having any effect on the layer below it, since it is an identical copy it has the same value for all pixels.
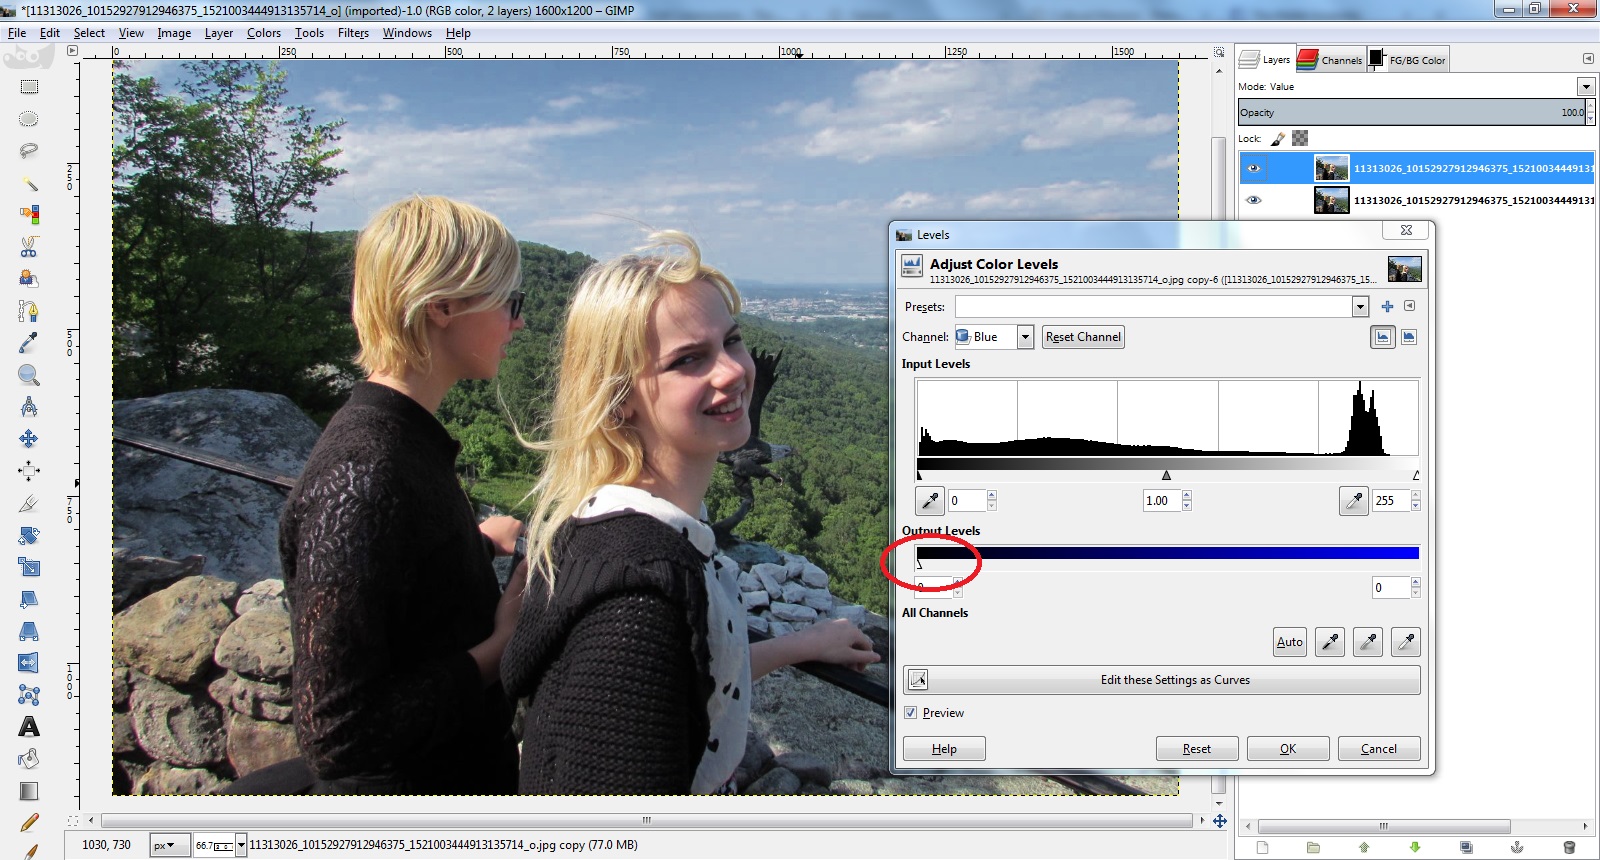
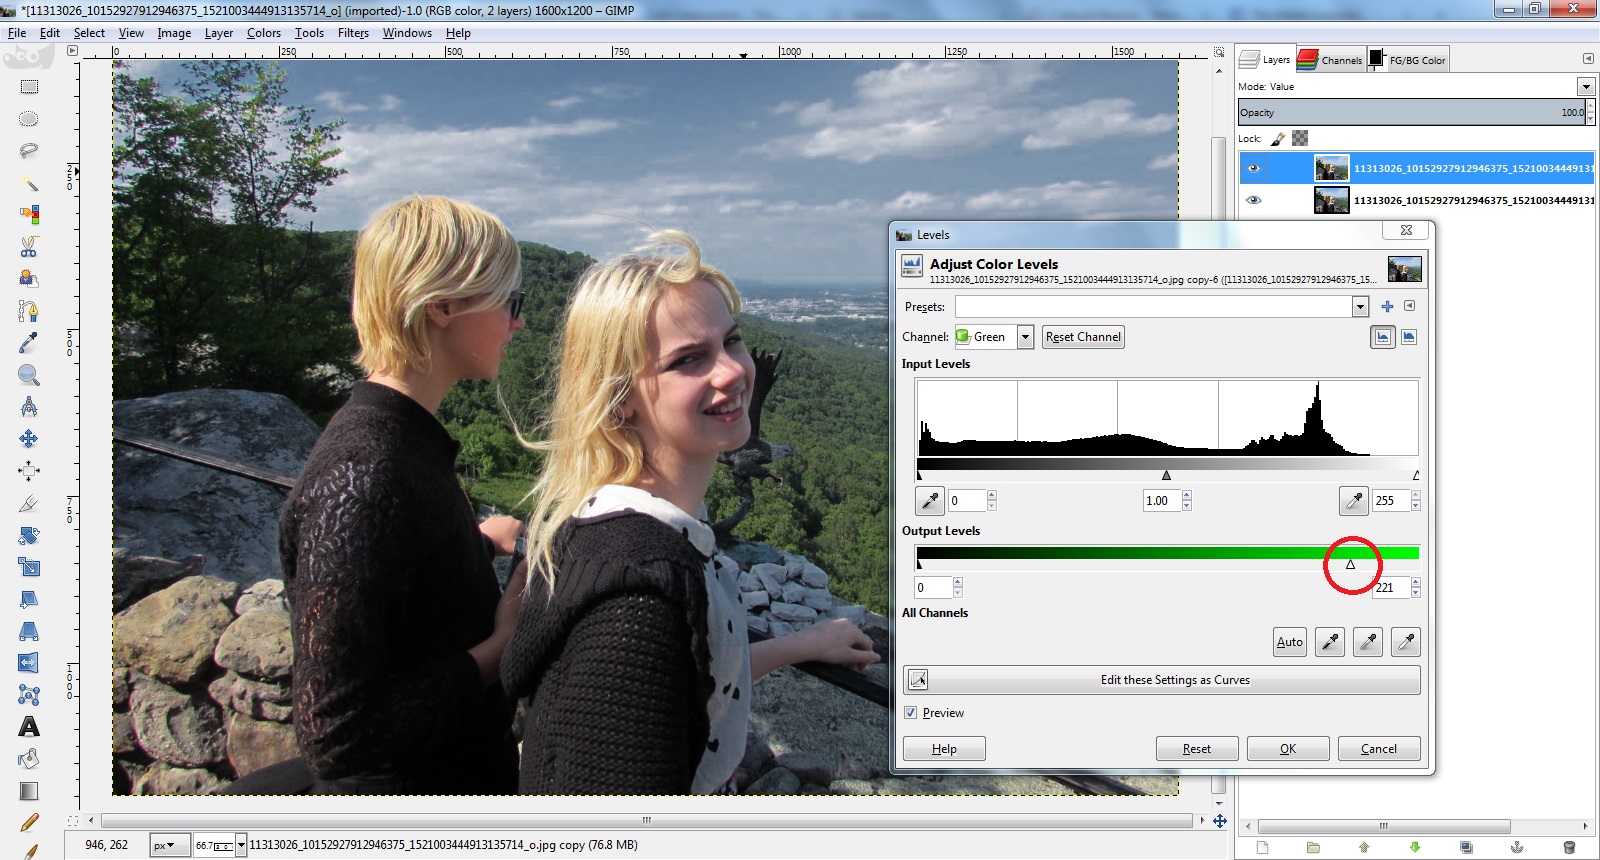
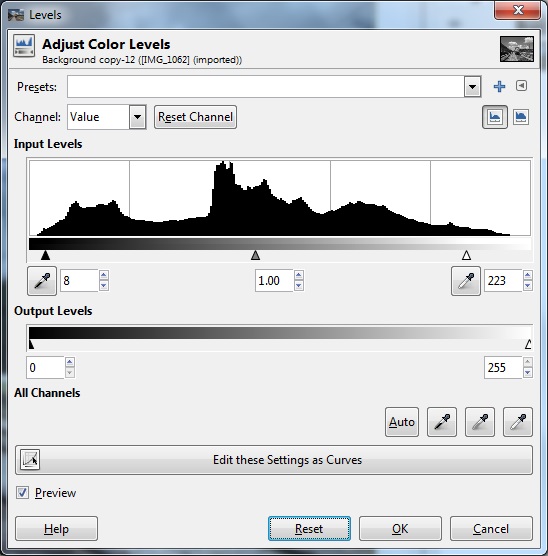
Now we are going to use Levels to get us back to where we were with the channel mixer, only because Levels previews the changes in real time, we will be able to see what the overall effect will be while we are monkeying with the sliders.
Choose the Blue channel and drag the output slider halfway down. Notice the sky gets darker. This is because blue is not contributing less to the channel’s overall value.
Go on and drag it all the way down to zero, completely suppressing any contribution that blue might have been making to the value.
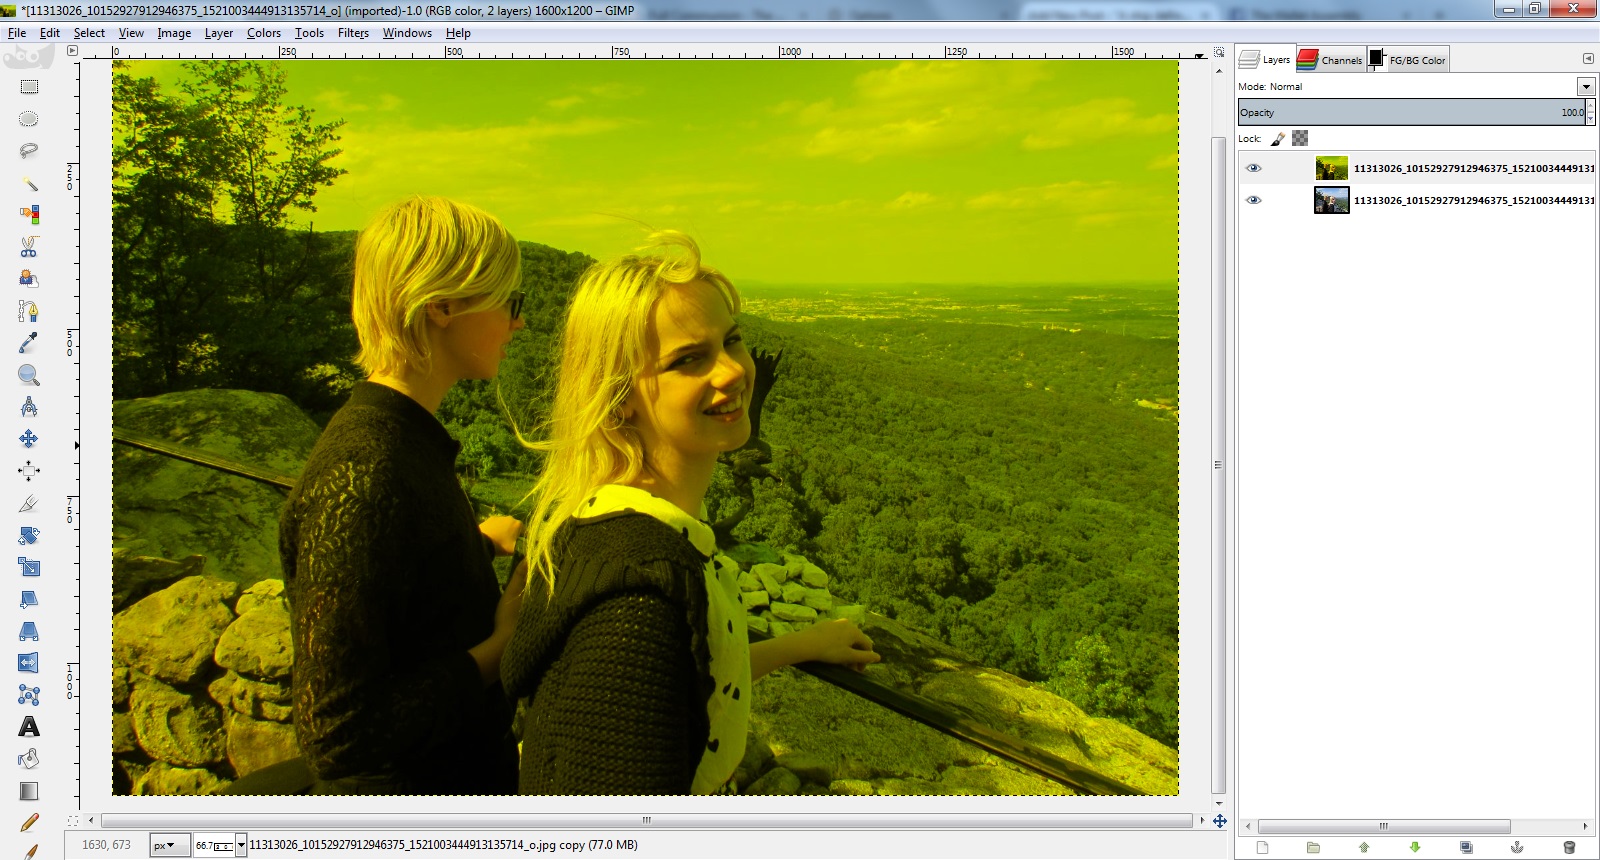
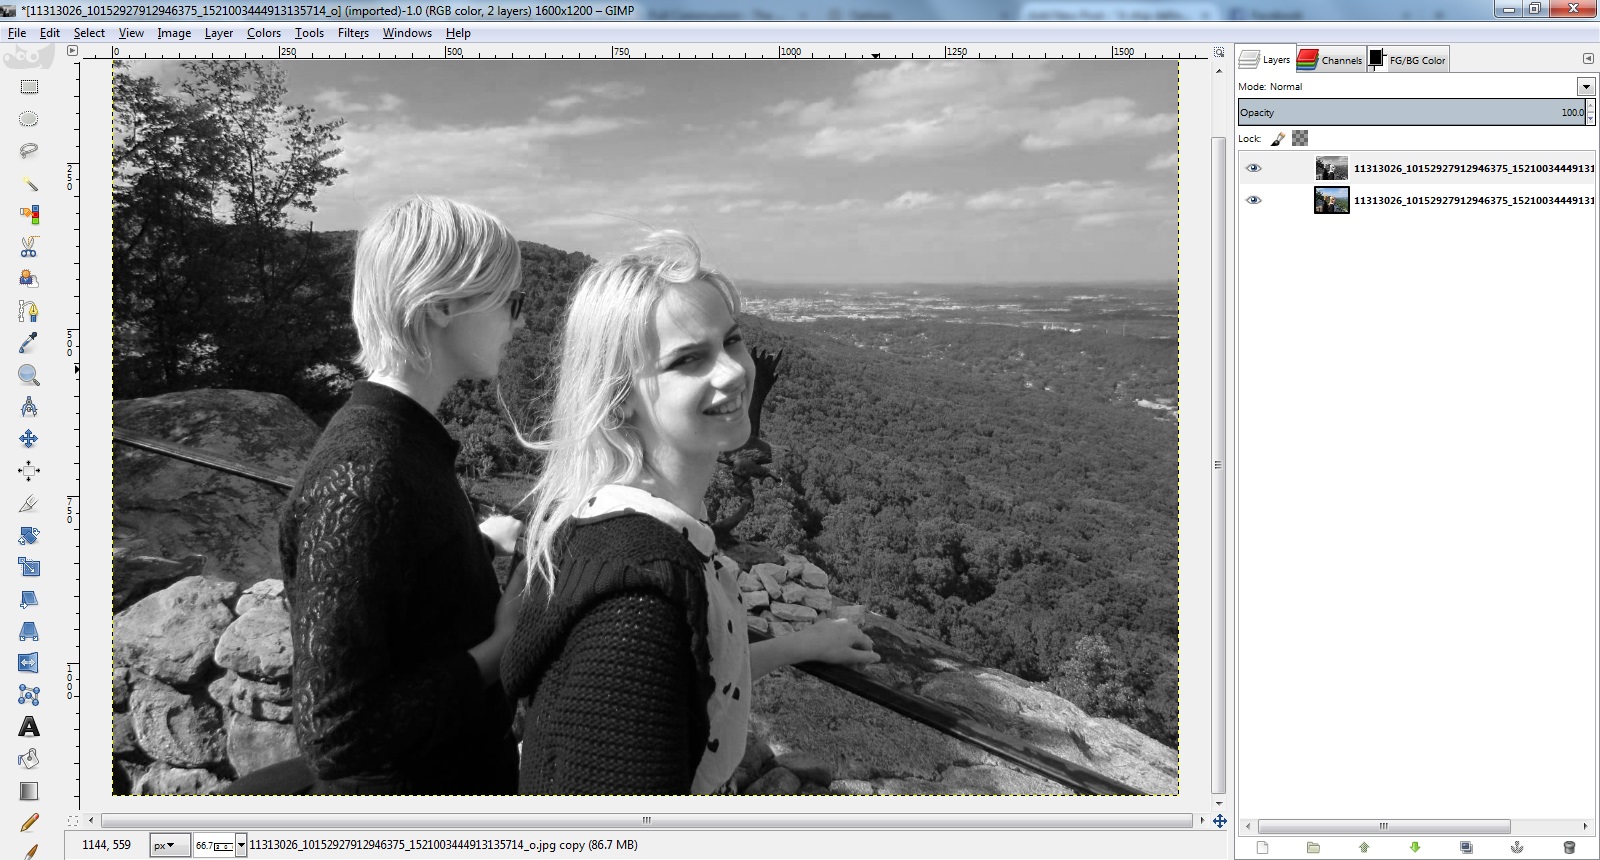
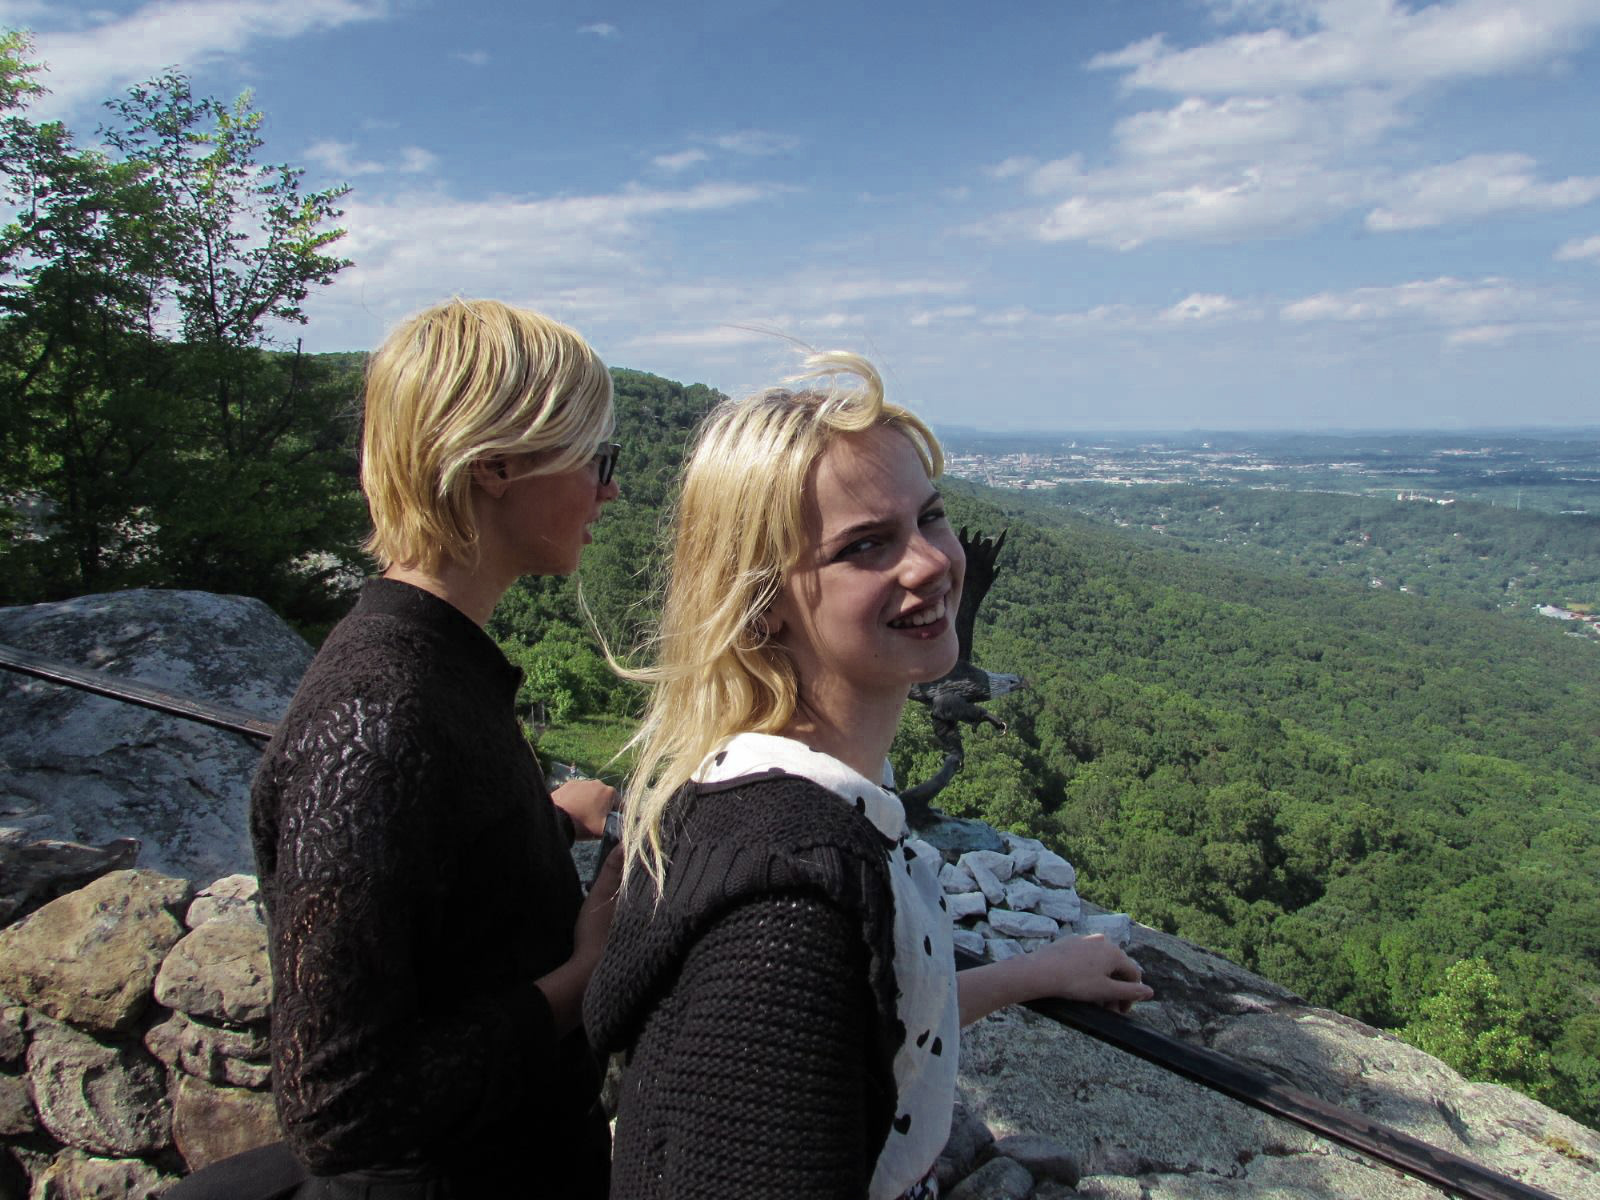
By the way, at this point if we view our top later as “normal” it looks like this:
The actual layer has red and green but no blue, giving it a yellow hue. But the fact that only its value is affecting the layer below it means we never see this yellow. But I digress.
Notice anything odd about what happened to the blended layers when we went from halfway to no blue at all?
What didn’t happen? The sky didn’t get any darker. It was already as dark with the slider halfway, as it was ever going to get.
Now think about how “value” is calculated. Value is the maximum of R, G, and B. So it a pixel has R=255, G=128, and B=80, it’s Value is 255. The smaller numbers play no role.
So what happened to the sky is, as soon as we had turned down the blue enough that it was no longer the largest of the three numbers, it no longer made any contribution to the value, it became irrelevant. The value of those pixels that used to be mostly blue is now determined solely by their red and green channel, even if there is still almost as much blue left.
If we then go mess with the green, we see the same thing, we only have to turn it down about 1/4 of the way before it stops contributing to the value.
This is just inherently how the HSV color space works. HSV was invented in the 1970s and intended to be used on the primitive computer hardware of the era, so the calculations to convert between it and RGB had to be as simple as possible.
It is, as noted last time, precisely this property that allows those pink faces in the picture to remain more or less as-is. The brightest channel for all of those pixels is already red in the original image, so their green and blue make no contribution to the value, and therefore those pixels do not change value when the overall amount of green and blue is reduced. That effect actually seems kind of beneficial when deal with people.
But what if we don’t like the limited amount of effect that our adjustments have? There are other ways of measuring the brightness of a pixel which take more than one RGB channel into account. Examples would be Lightness and Luminosity.
But GIMP does not give us layer blend modes for Lightness or Luminosity, only Value, so that trick isn’t going to cut it.
There are other modes that can allow a layer to affect the brightness of the layer below it, but we won’t be able to play our little slider games. If we try it with a color layer on top, the hue will be affected.. in the particular extreme case of turning down everything but the red channel, we’ll end up making our final blend be all red. We’ll have to convert to gray to start with, like in the original installment.
(If only GIMP supported non-destructive effects, this would all be moot)
So first start over with an exact duplicate of the base layer, and use the channel mixer to get a monochrome image of 100% red, 0% green, 0% blue.
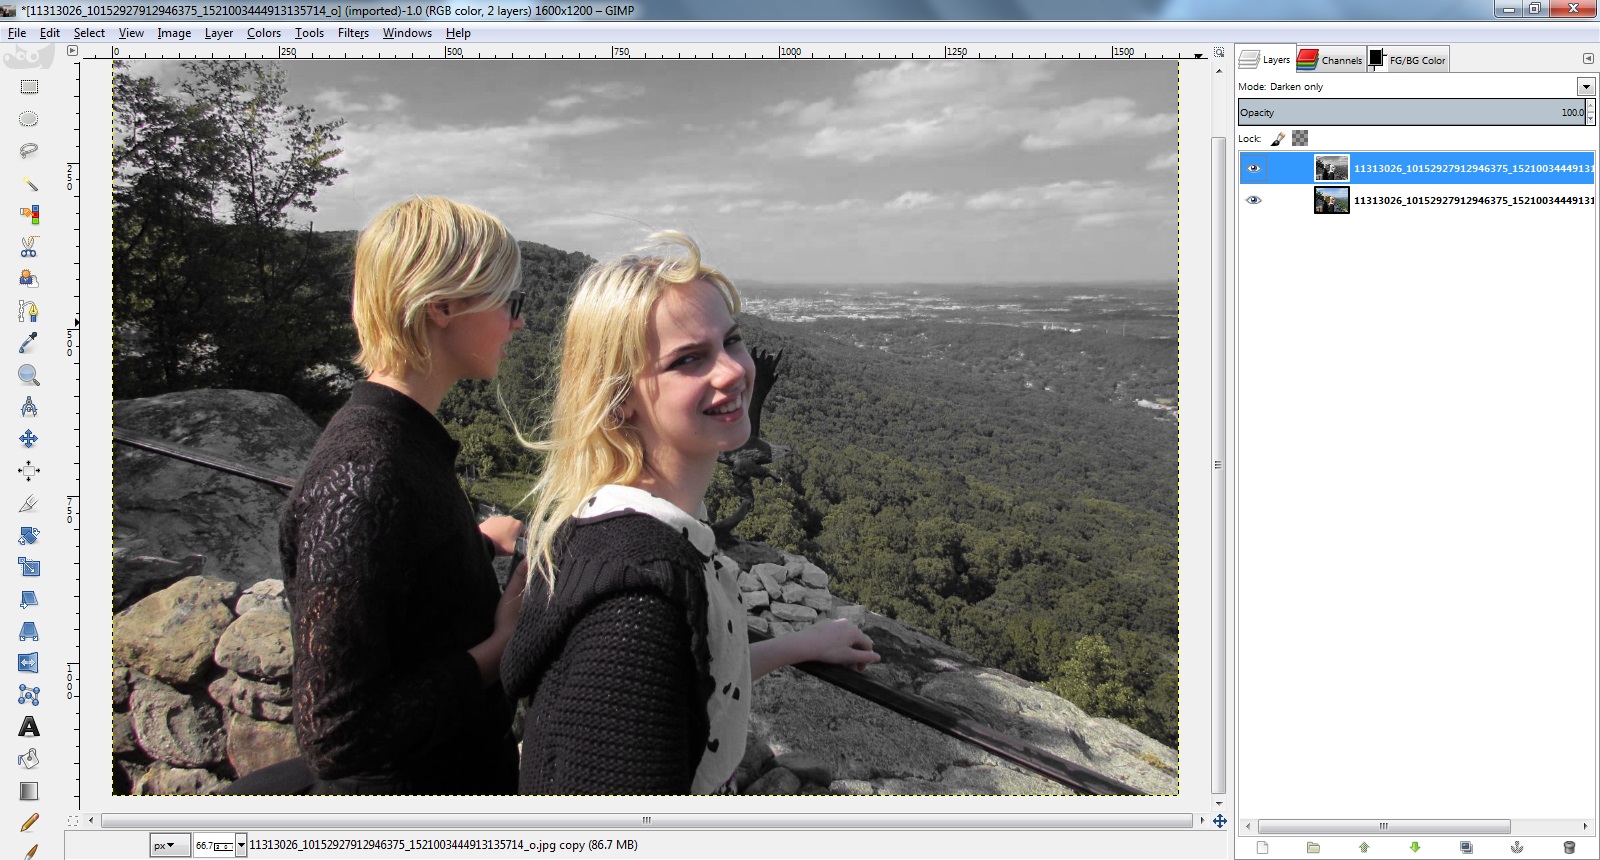
The first one I want to point out is Darken Only. The way this works is, it compares the all three channels of both layers, and chooses the darker of the two values every time. What this means is, areas that are dark in the monochrome layer, like the sky, and up monochrome in the final blend while areas that were bright like the faces in the monochrome end up using the color of the orignial.
That is, the sky is completely desaturated as well as darkened, the trees partially so, and subjects mostly untouched! That’s kinda neat, I guess.
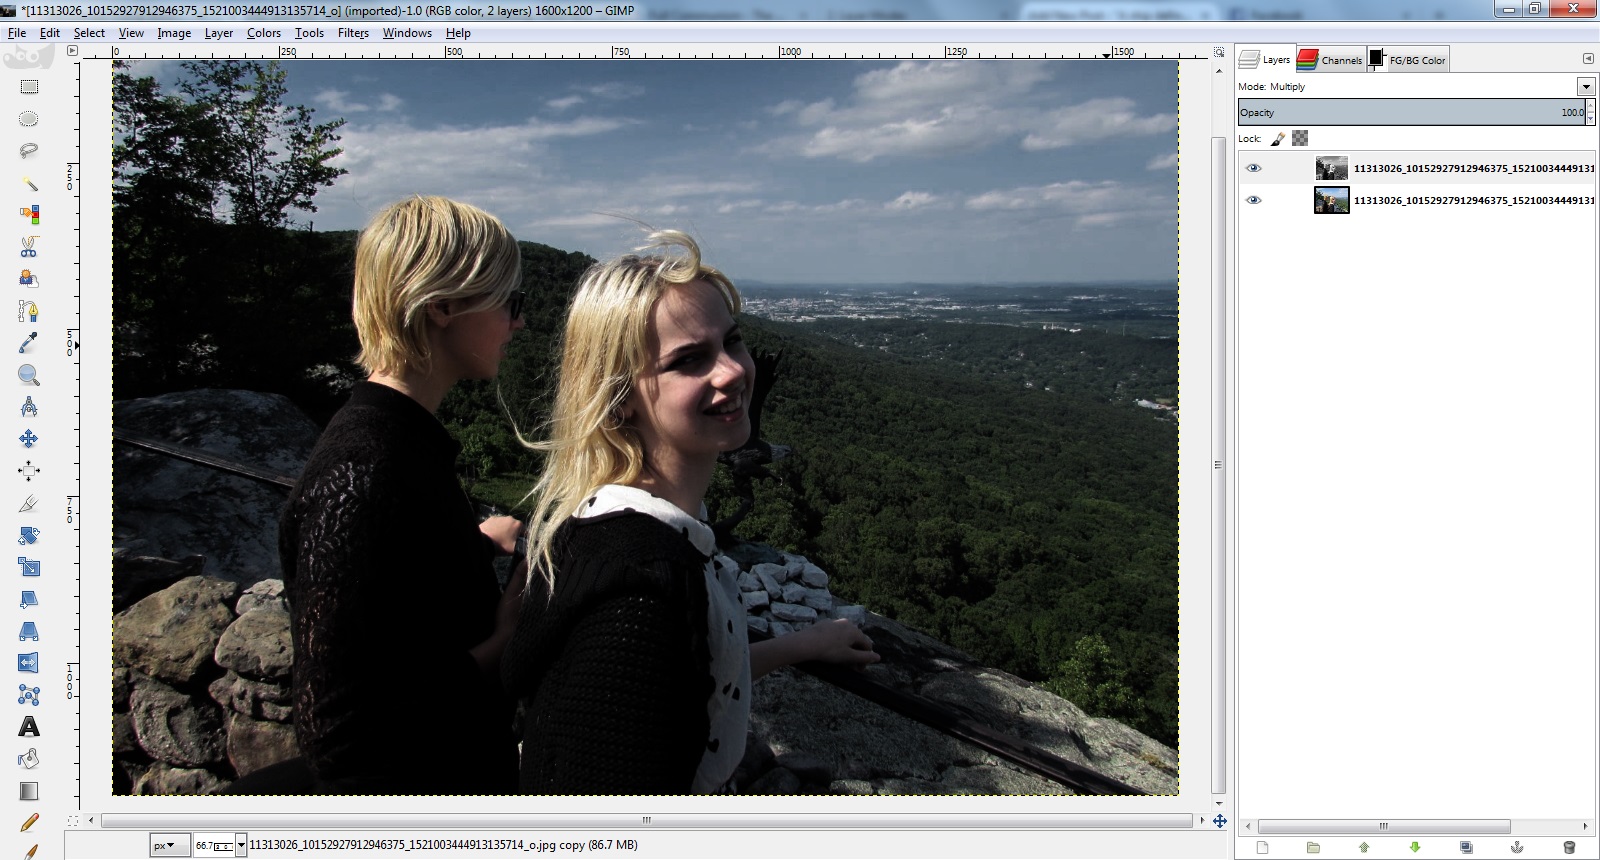
Now lets look at Multiply. As the name implies, this multplies the values of the two layers, scaled down so that brightness can not blow out the highlights. This darkens everything, but especially the blue and green areas, and also mutes the colors but not as drastically as Darken Only.
You can mess with levels and curves to try to re-brighten it, but the more you do so you will be undoing the darkening of the sky as well.
Overlay is normally supposed to darken an image, but in this case it actually makes it a lot brighter in the areas that have a lot of red. I don’t really feel like trying to understand why.
There are a lot of other modes but they are all really ugly and are left as an exercise for the reader.
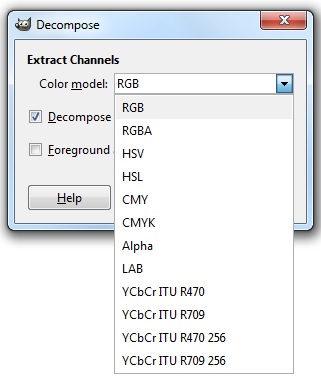
Now, we still have at least one more trick up our sleeve. We can use the decompose/recompose workflow to substitute this red channel in for one of the various types of “brightness” channels that exist several of the color models other than RGB.
So, turn off the visibility of the monochrome layer and select the base, original colored layer, and go Colors->Components->Decompose. Look at all those color models to choose from.
Obviously skip RGB and RGBA, we already used channel mixer to accomplish anything we could use that for. Also skip HSV since it is equivalent to what we were doing in the first place.
Let’s try HSL (Hue, Saturation, Lightness), another 1970s era color model for crappy hardware with simple math.
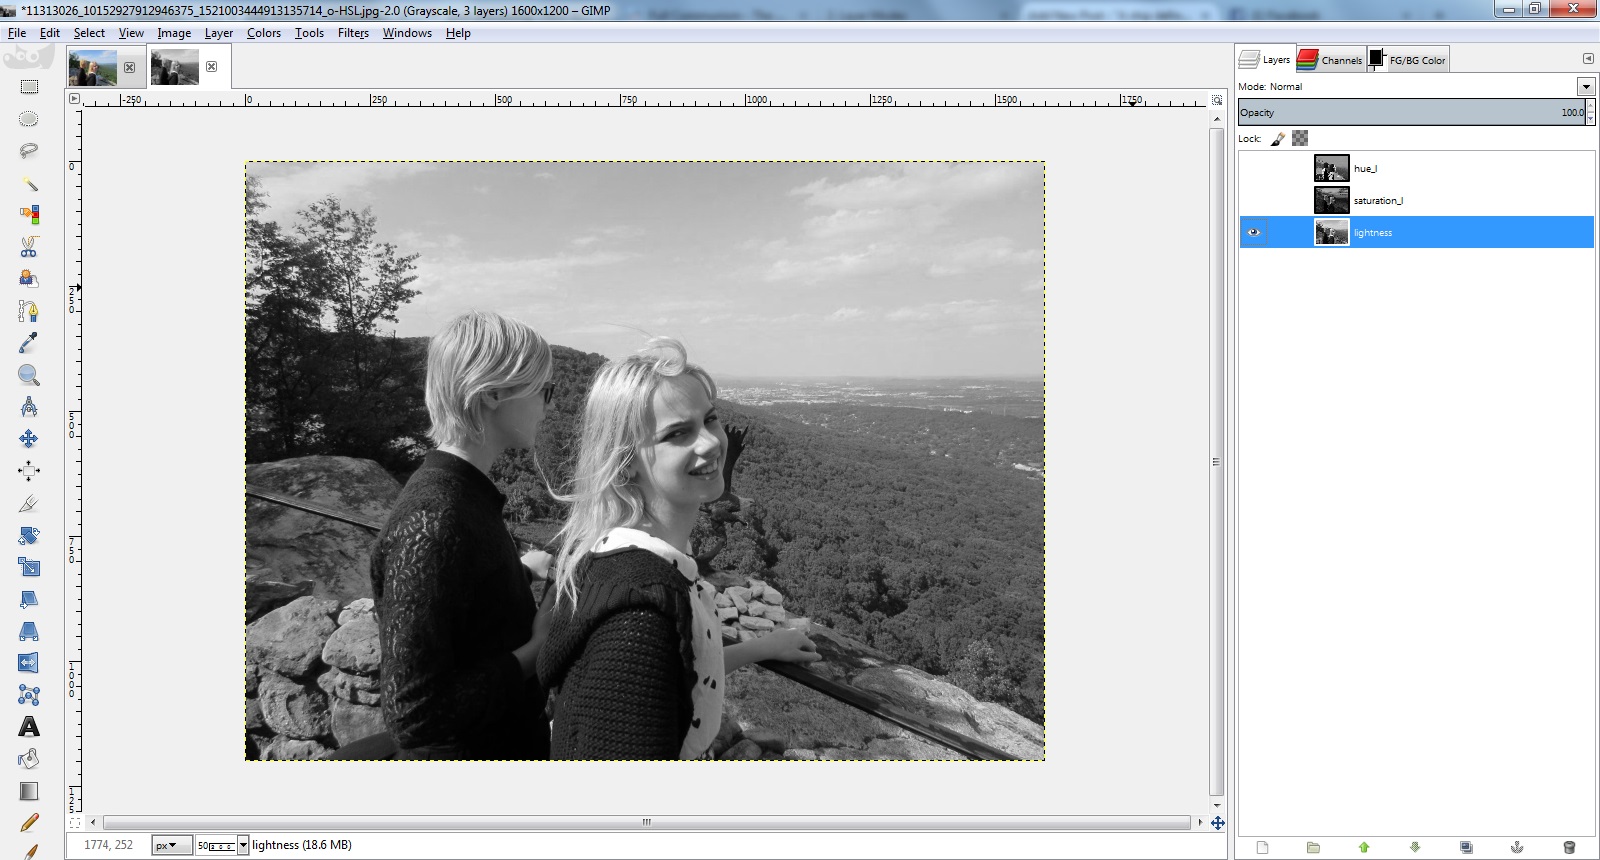
This creates a new image with layers for each of Hue, Saturation, and Lightness. Hide the first two and look at the Lightness channel. It is a greyscale representation of the original image.
Now, what I’m going to do is copy the layer that we originally made using channel mixer, and paste it onto the Lightness layer of the decomposition, completely replacing the contents. I’m going to assume you know how to copy and paste layers in GIMP.
The difference is subtle in the monochrome, but the pasted contents are slightly more “contrasty” than what was there before.
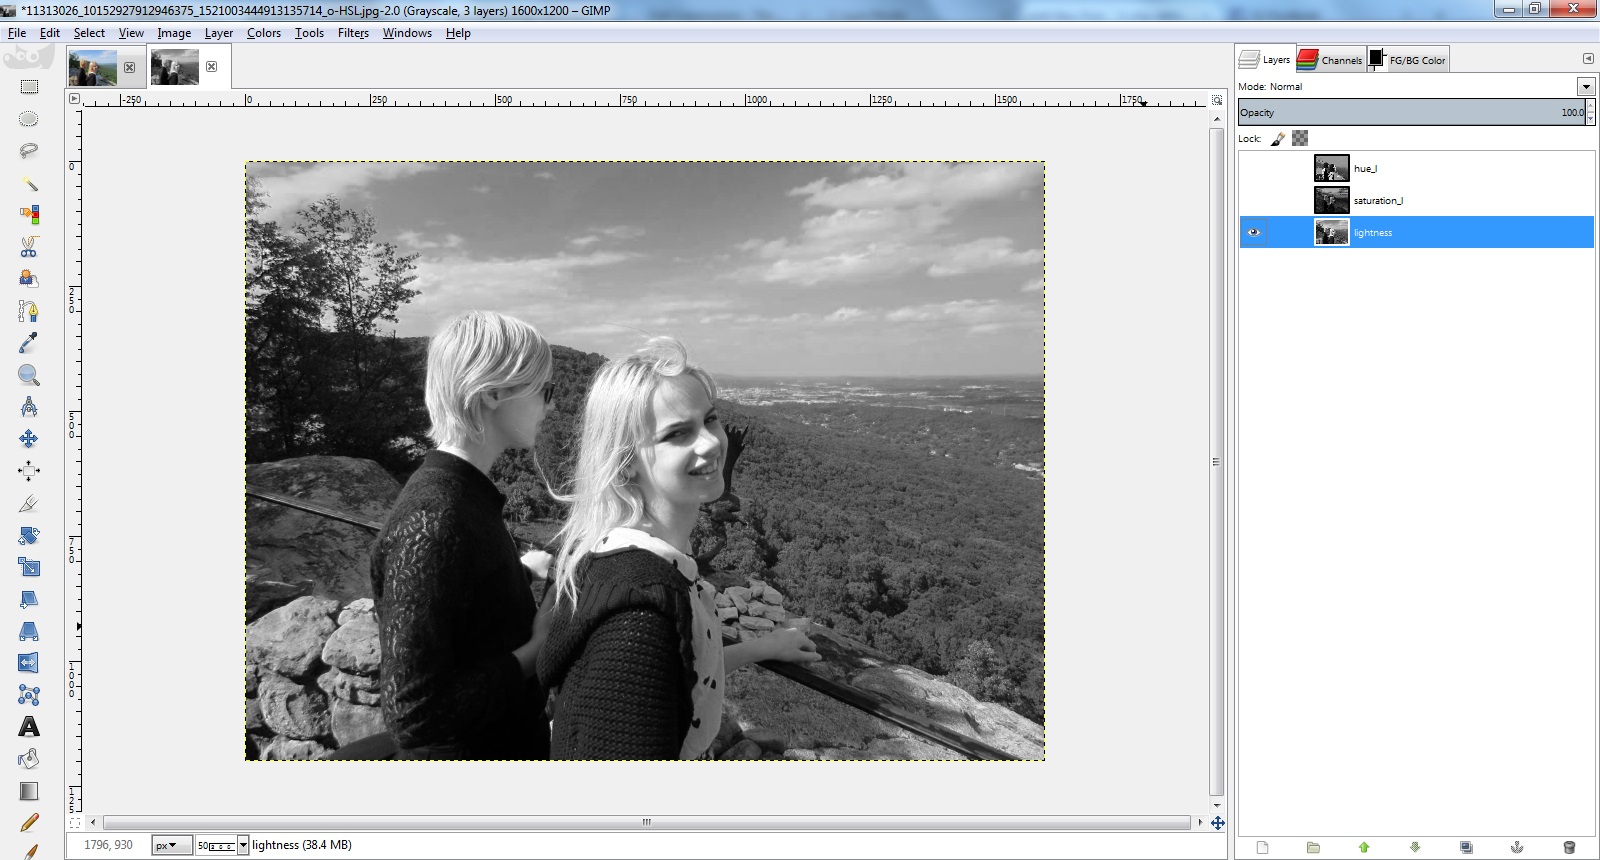
Now, go to Colors->Components->Recompose, to reassemble these layers back into a color layer. GIMP remembers which layer they were extracted from and puts the new image back on the same layer in the original image.
The result, the contrast has been boosted without affecting the saturation like some of the other approaches (that is, the sky is a deeper blue not a dull blue-gray). It is certainly a less dramatic effect that some of the other stuff we’ve been doing though.
Other color models choices should have varying degrees of difference. I don’t feel like looking at them all.
LAB ends up darkening things quite a bit, almost but not quite as much as the Multiply mode did:
CMYK with our monochrome image pasted over the blacK channel and inverted ends up being exactly the same as the Value mode we started with. I guess that means that the K channel is really just the inverse of the V channel from HSV. Huh.
That’s probably about as much as I feel like messing with this for right now.
Remember last time, I said that I wasn’t sure what would happen if I tried that particular layering process on a portrait. Well, I tried it, and I was pretty surprised by the result at first, and then realized it wasn’t so surprising after all.
Since the actual technique – create a black and white image of one channel, and then apply it as the value for all channels – was covered last time, I’ll skip the GIMP screenshots and jump straight to results. These examples also use the red channel, as before.
Mind you, I’m not claiming this is a great photo, but it has the advantage of being (a) my own work and (b) has a blue sky in the background.
Now see the before and after:
Notice anything about the subjects? They hardly changed at all, compared to the background. It looks almost as if you separated the humans onto an isolated layer before you messed with the colors of the background layer.
If you are wondering what the blue and green channels do, they notably do not share the red channel’s property of preserving the faces unchanged. Here’s the green version:
This preserves the brightness of the foliage, and probably you could brighten it overall and get the faces back close to the original but the trees extra bright.
The blue, I don’t see much use for but here it is anyway:
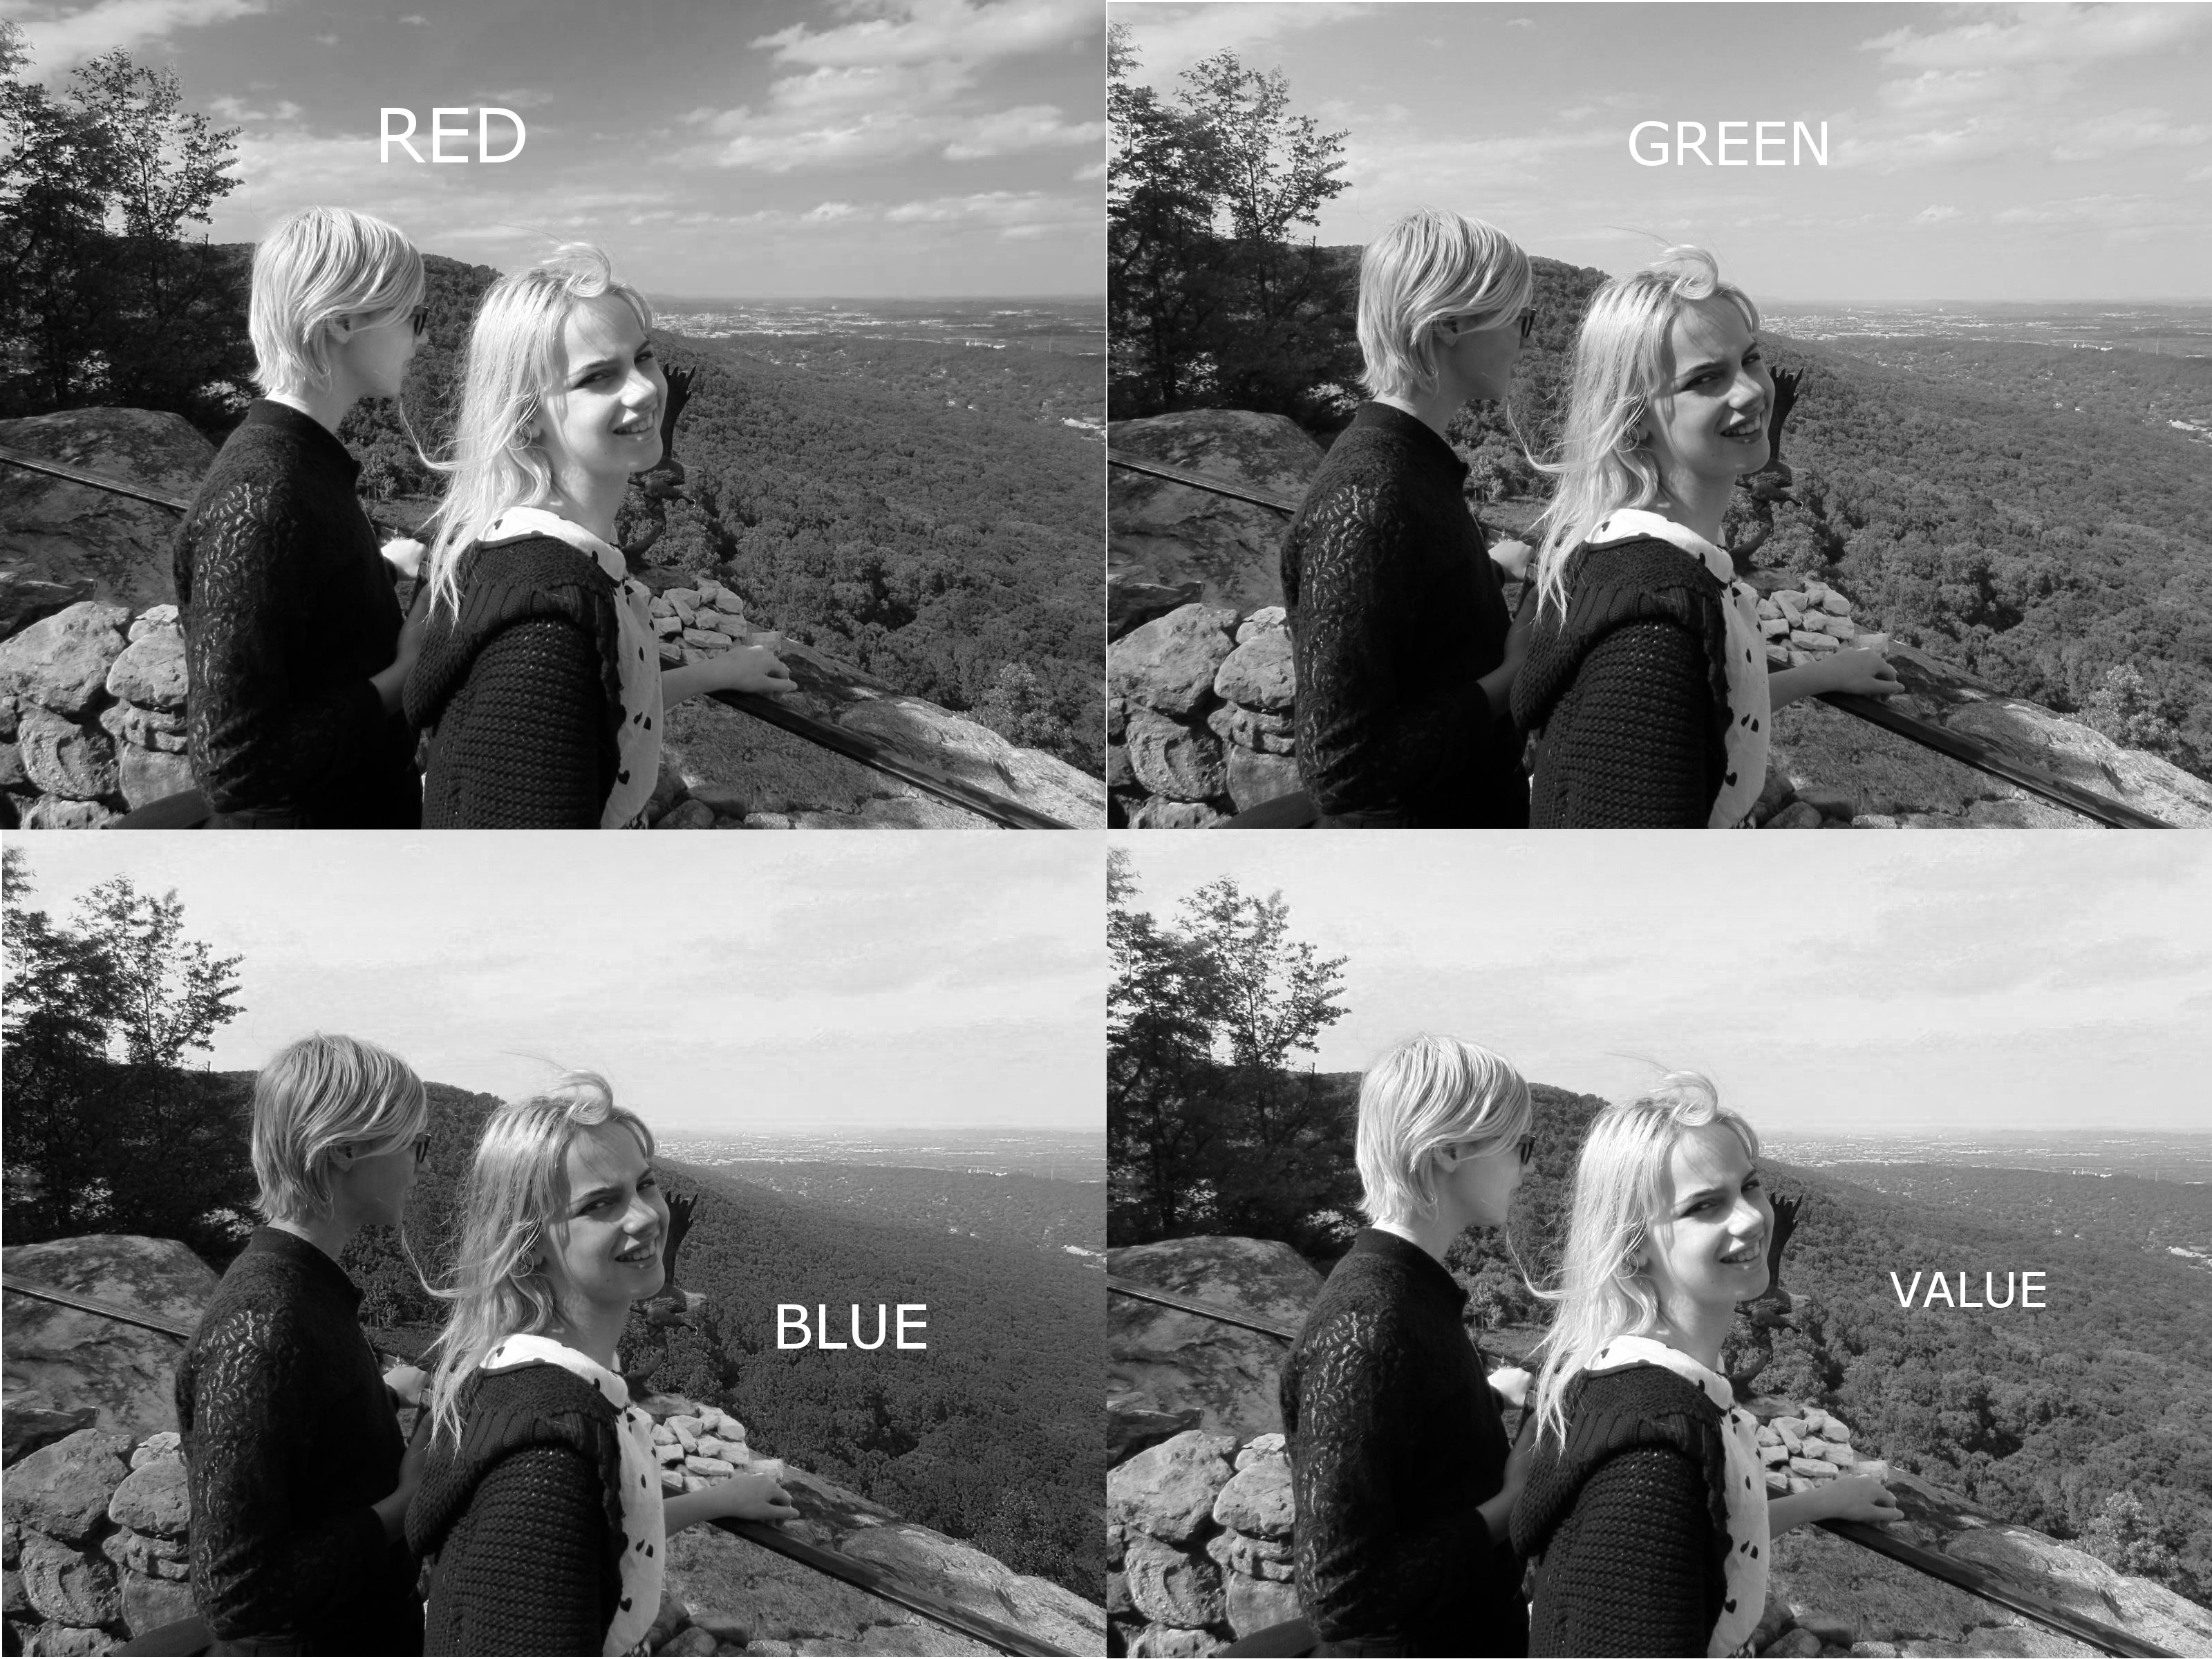
Now, why is none of this surprising in hindsight? Because these subjects have more or less pink skin, and the tones of their mostly yellow hair is also captured by the red channel. Their clothing is of course monochrome, so its going to be the same on every channel.This can be seen using the Colors->Decompose tool. This is all three channels of a RGB decomposition and also the V channel of an HSV.
Notice the red channel looks most like the V in the faces, the green looks more like it in the trees, and the blue has a similar (nearly white) sky. This is because the V(alue) channel in HSV is defined as the maximum of the R, G, and B values. No shit, Sherlock!
By the way, if the intention was to make a black and white version that looked good, I would probably not use any of the above as-is. The Desaturate tools’s Luminosity looks better than any of these, and I think 50/50 mix of the red and green channels (which is presumably close to panchromatic B&W film with a yellow filter) looks even better.
Now, the really interesting thing is, I’ve tried this on pictures of people with varying skin tones, and it does pretty much the same thing to everybody.
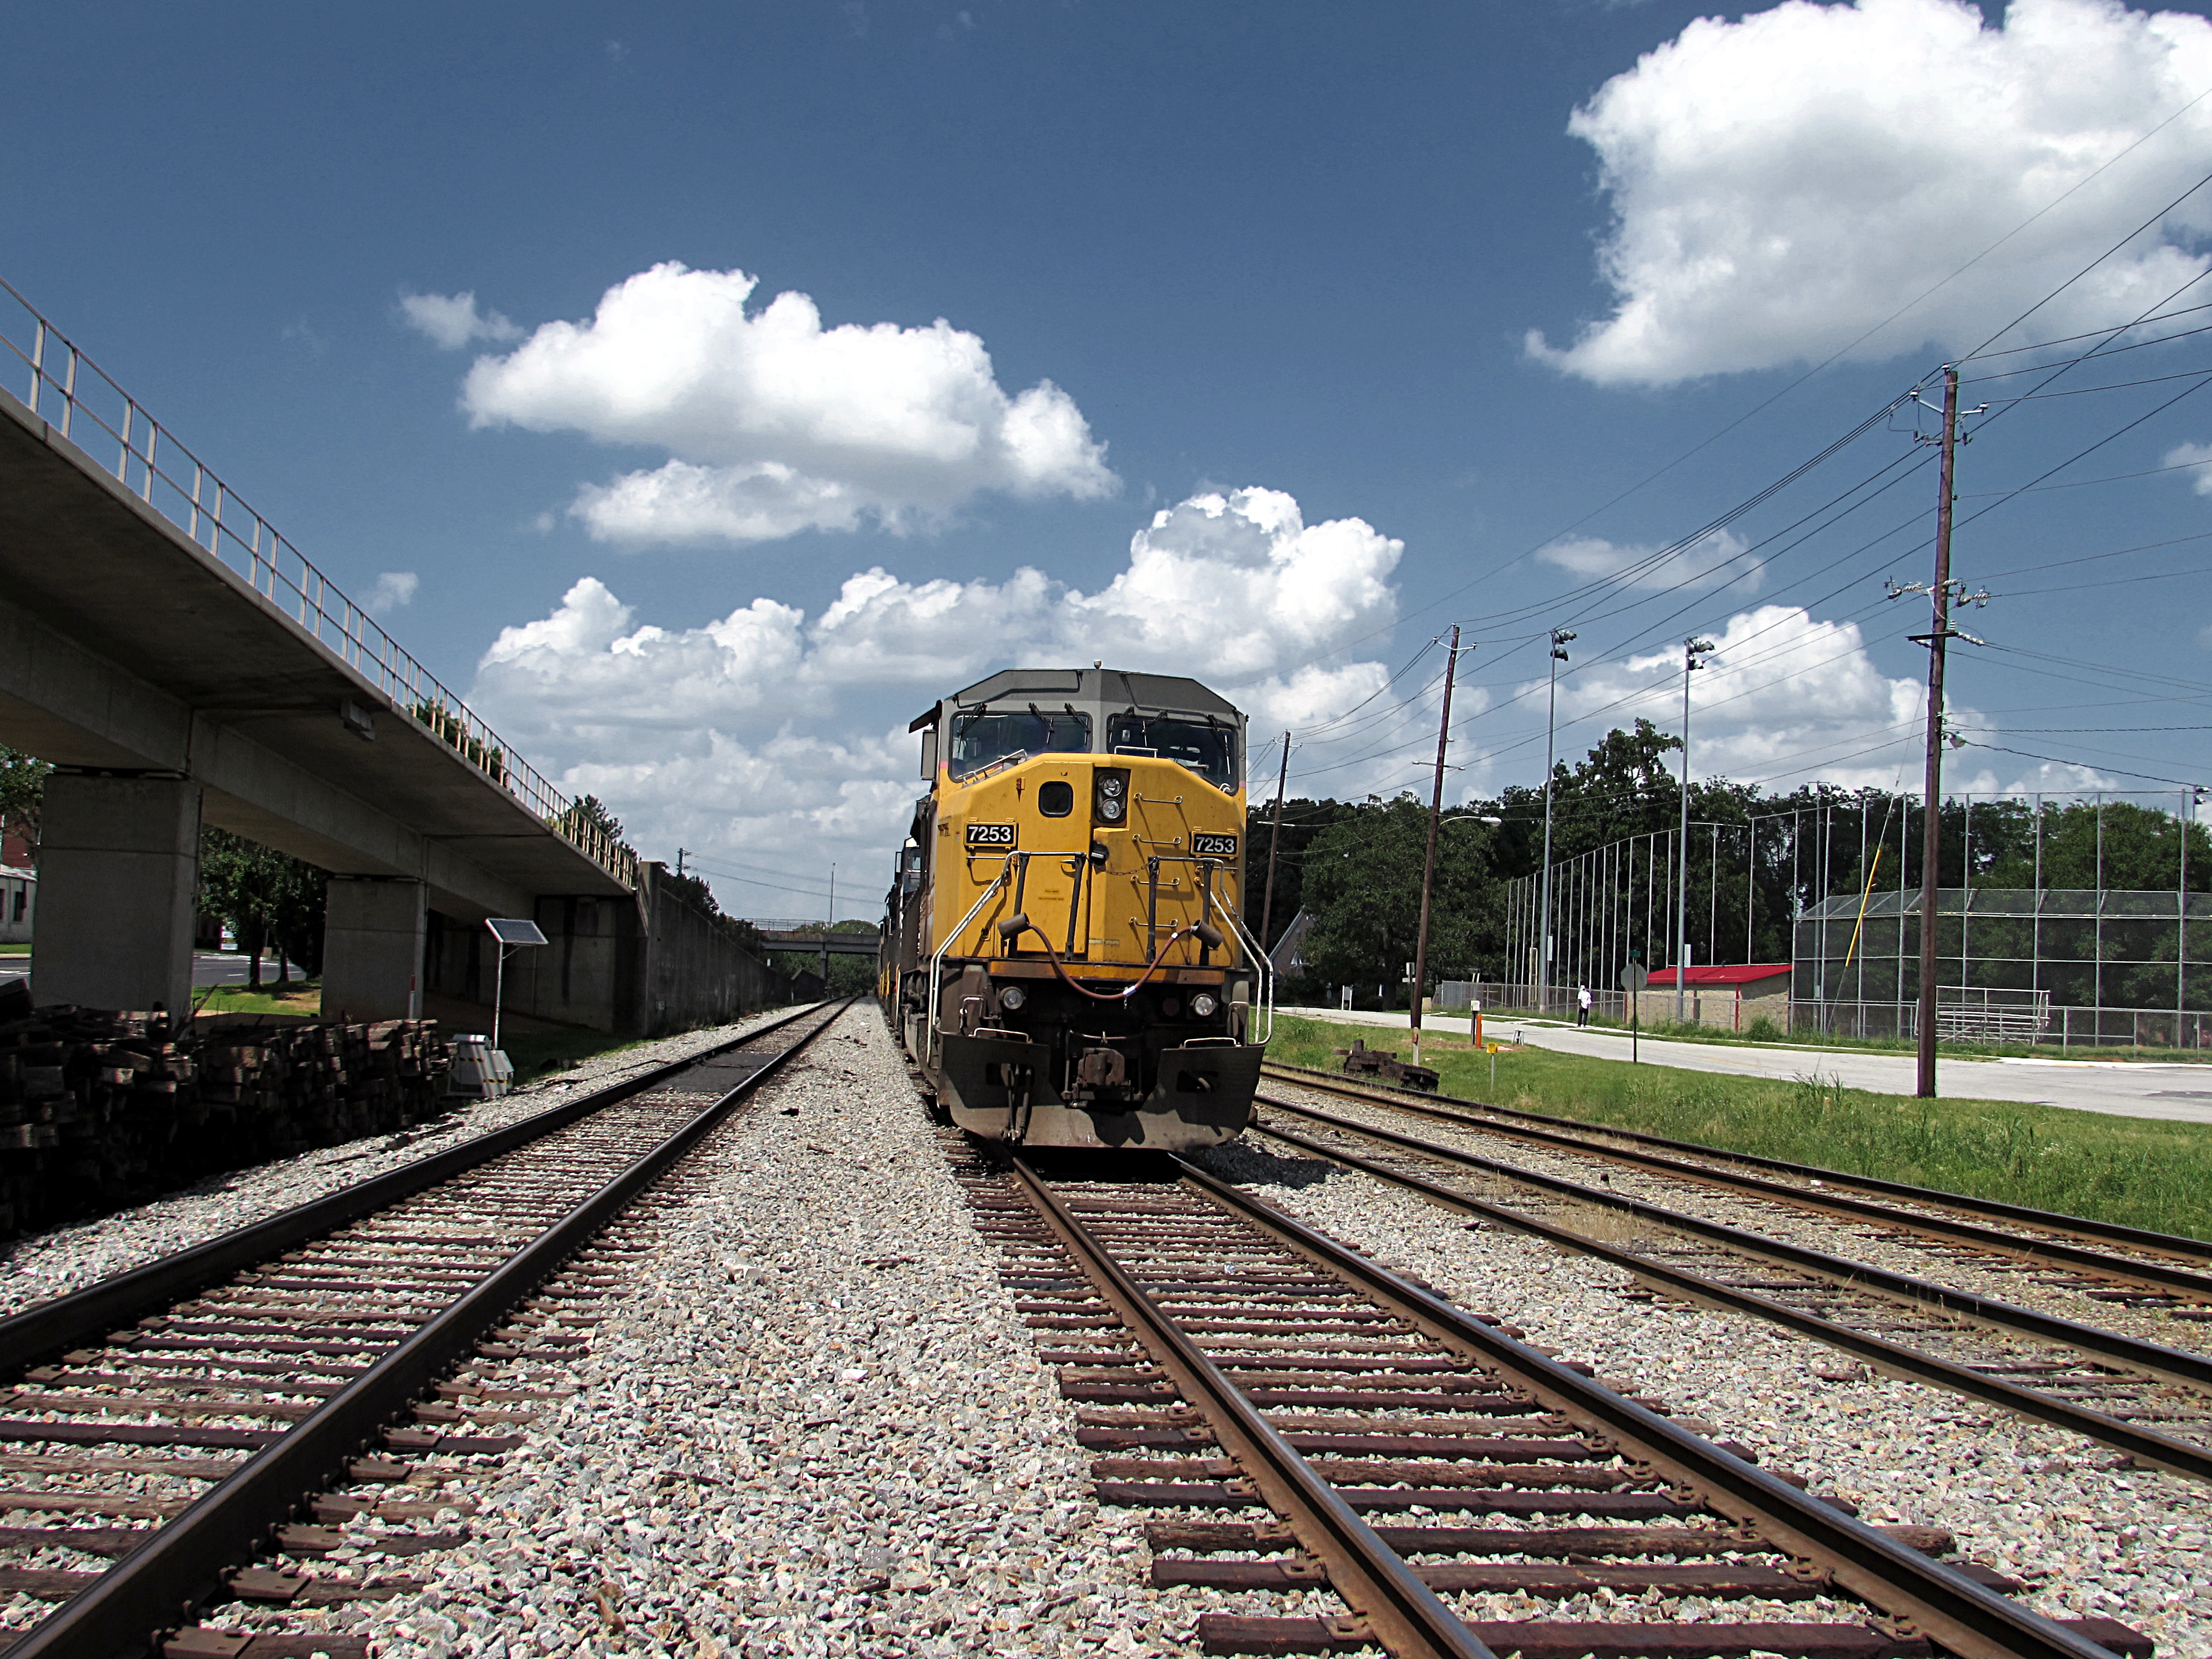
I’ve been re-acquainting myself with some of the capabilities of the GIMP lately. This is something I’ve stumbled on.
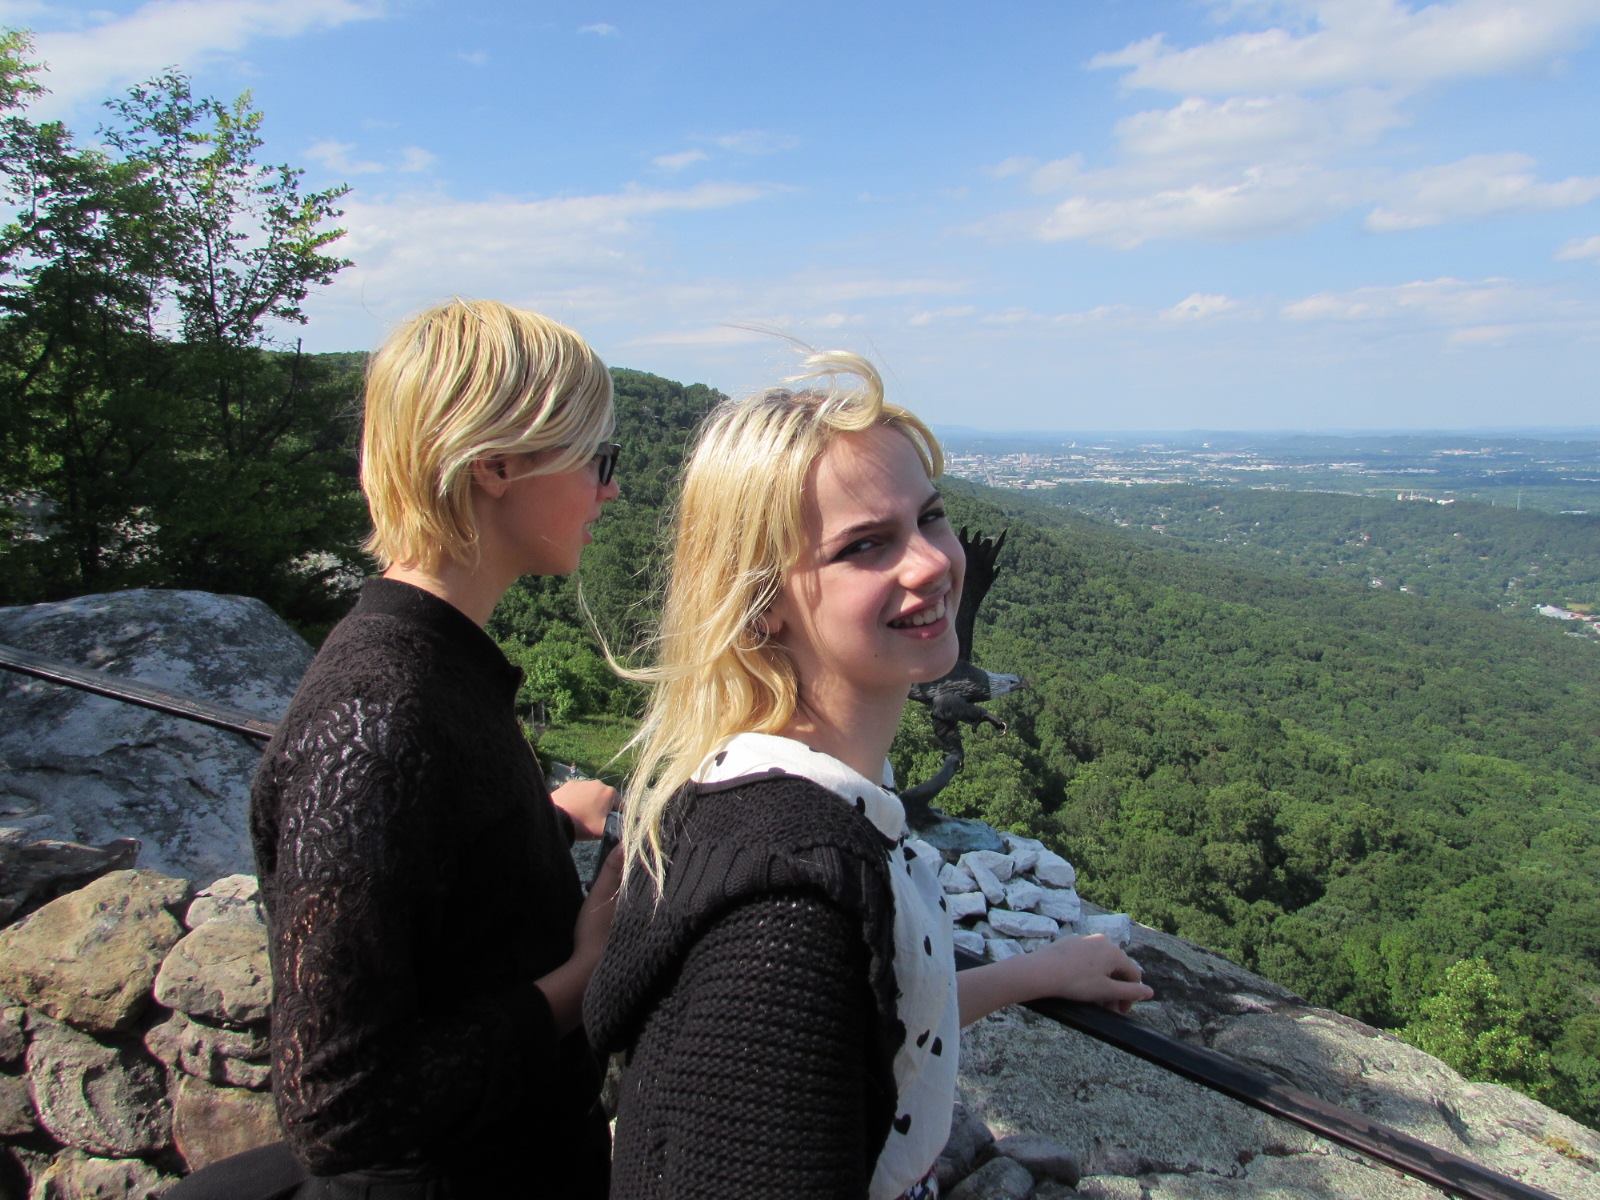
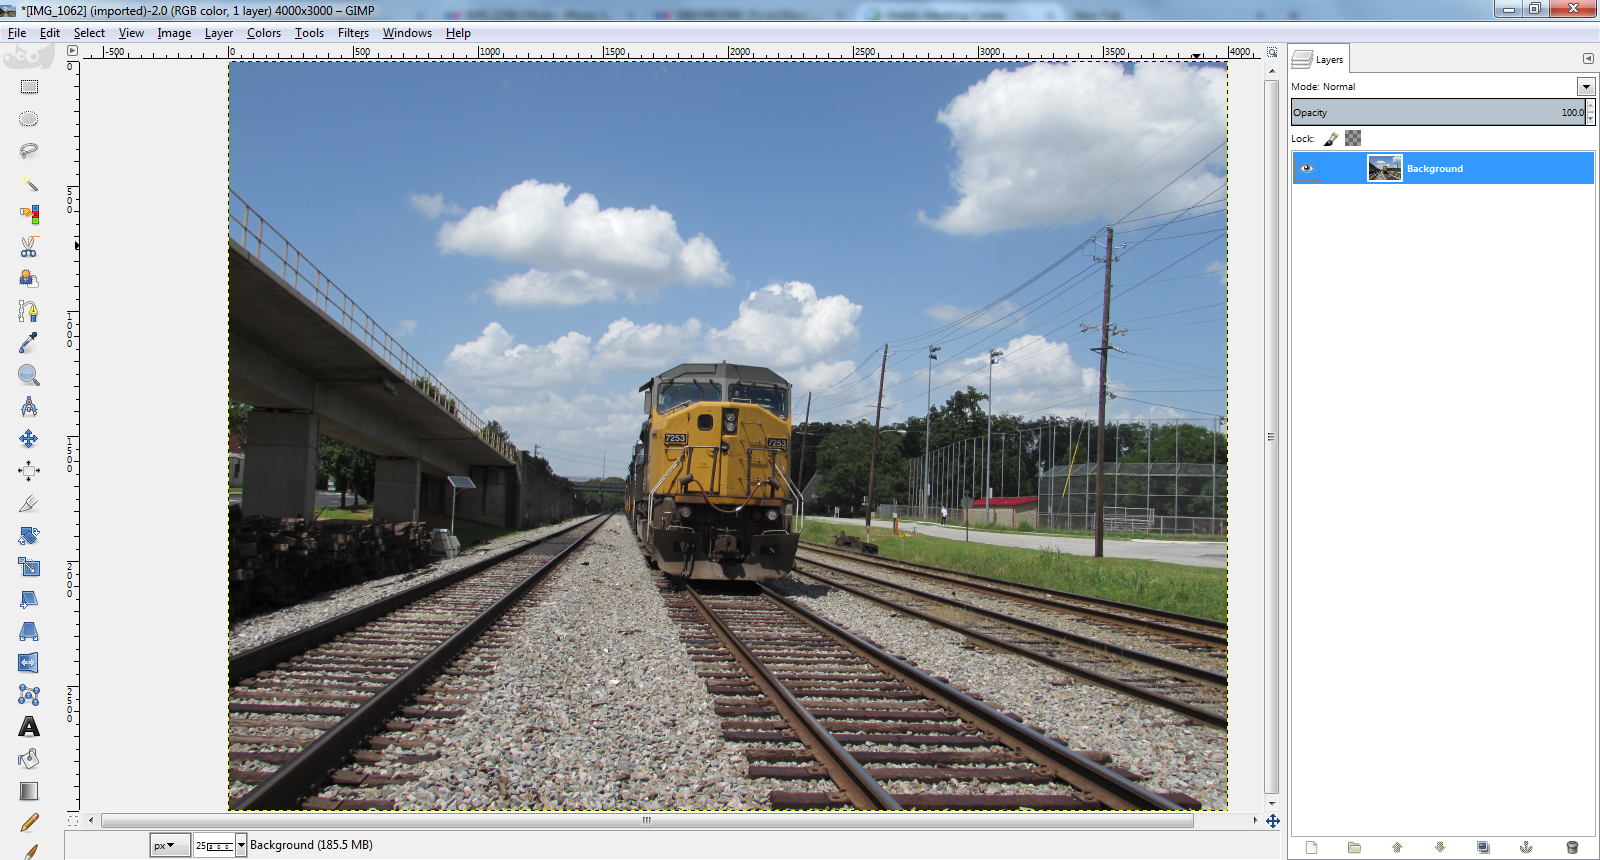
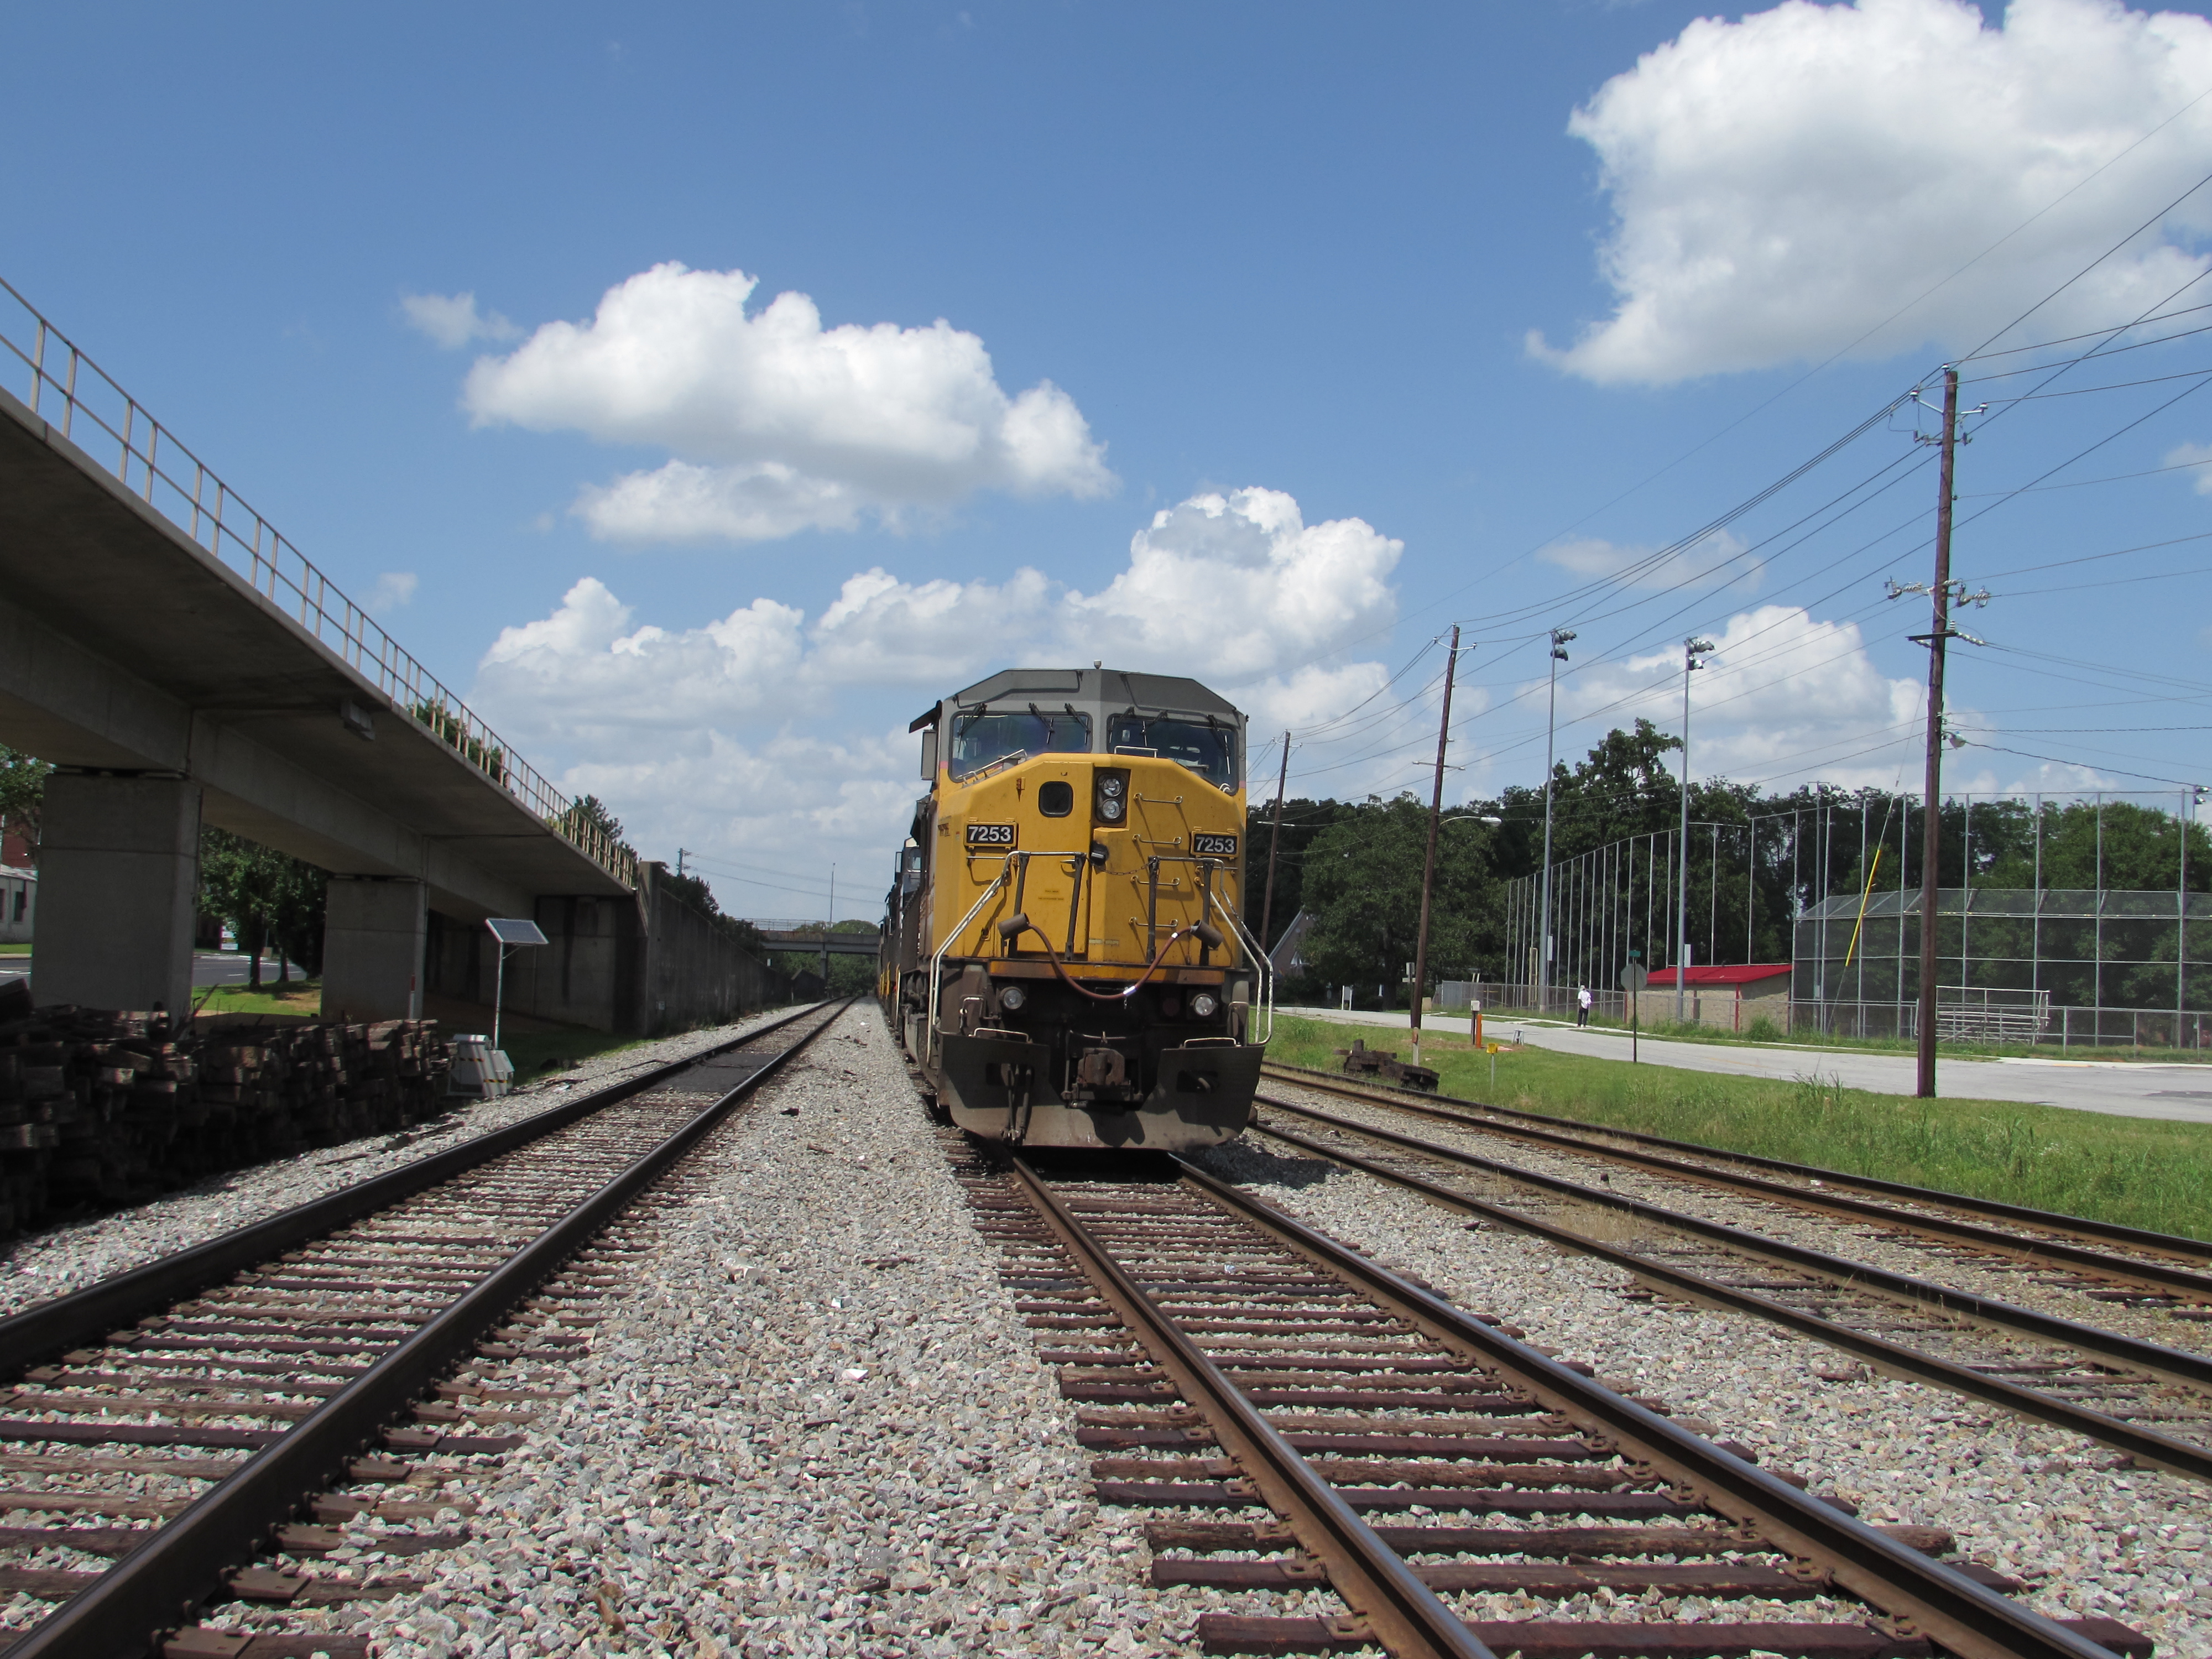
So this is how the image looks to start with:
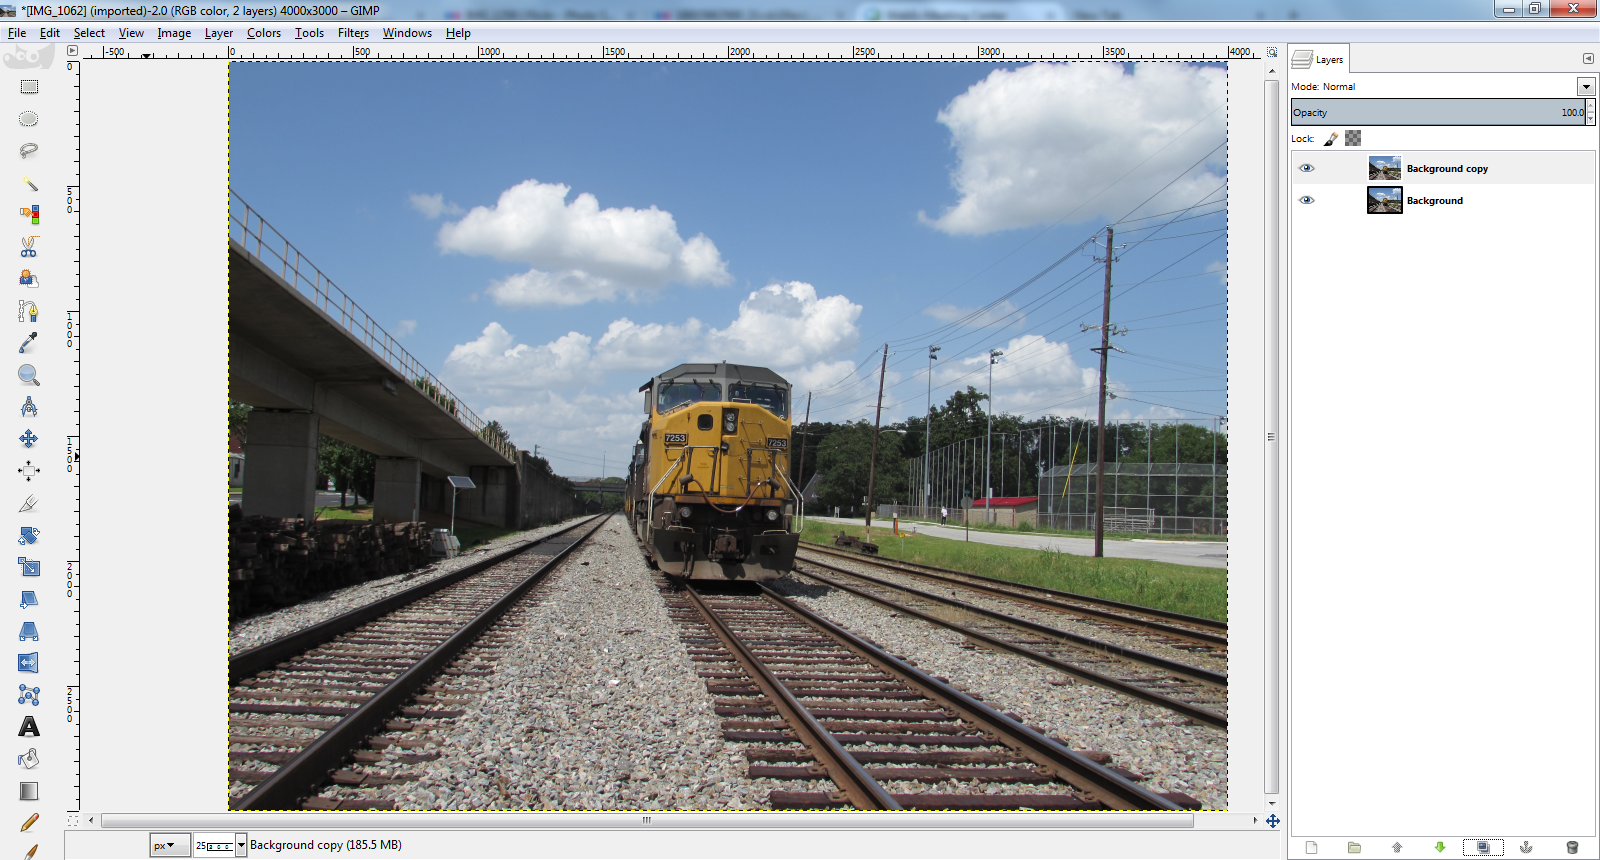
Duplicate the layer, because you are going to be doing stuff to it but still want the original:
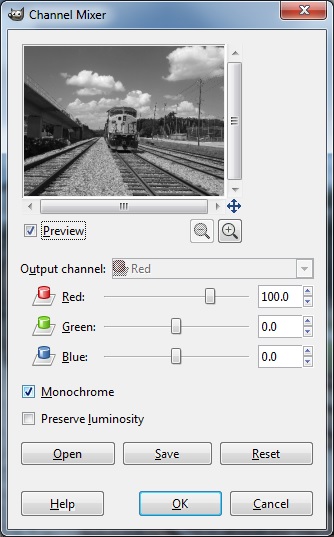
Now in the top, duplicate later, use the channel mixer to make a monochrome image that is different from what you would get from the desaturate tool. In this particular instance I like the red channel. The train is nice and bright and the background has unreal contrast between the clouds and the sky.
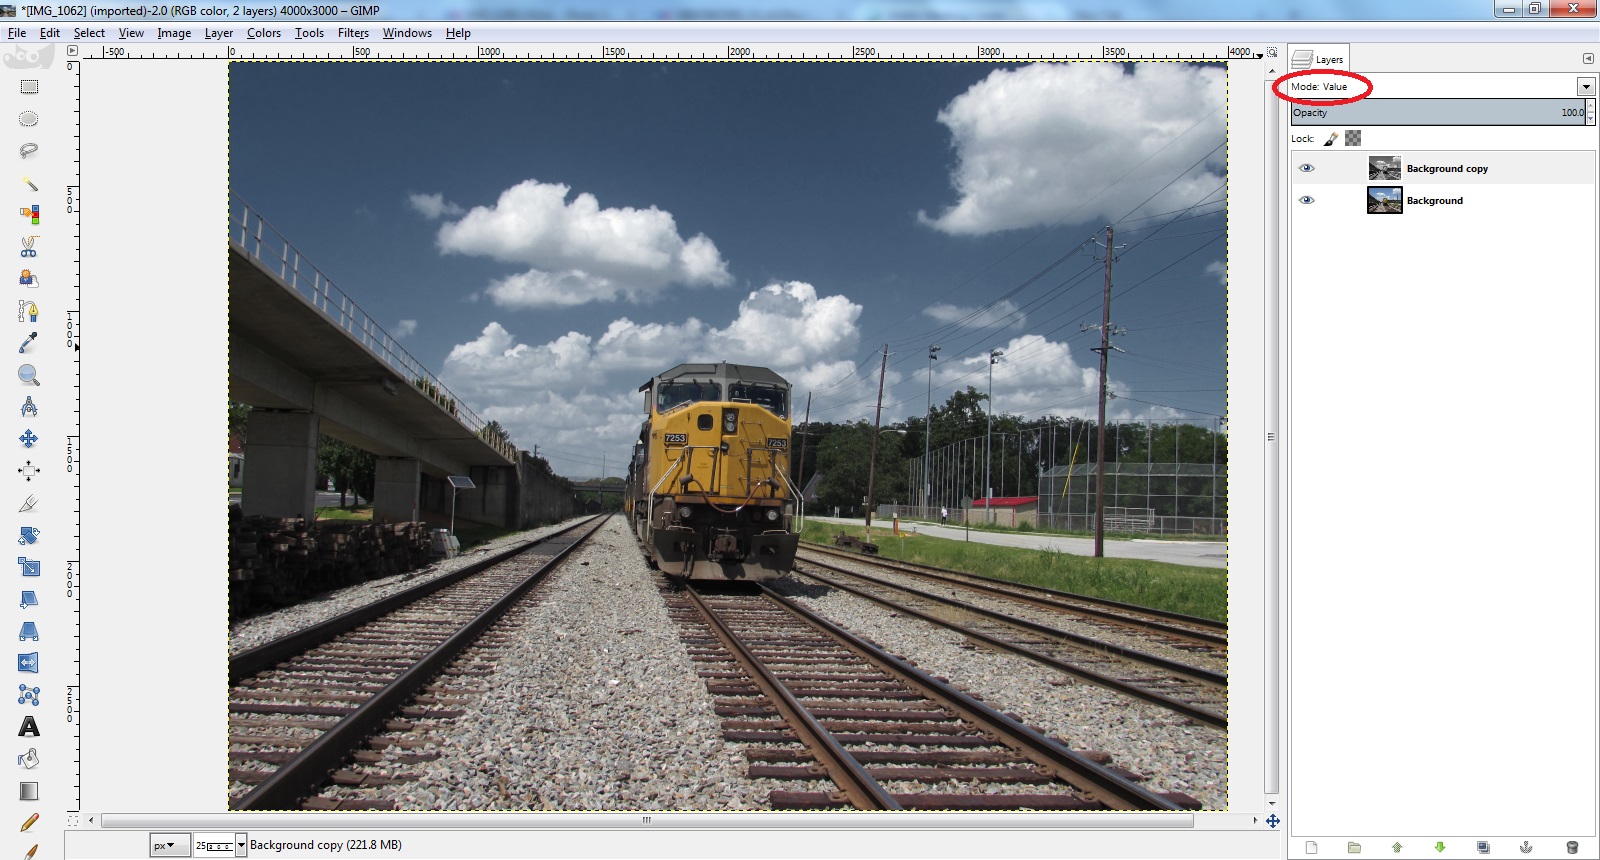
So now we have a black and white version, which is pretty nice in itself, but what else can we do with it?
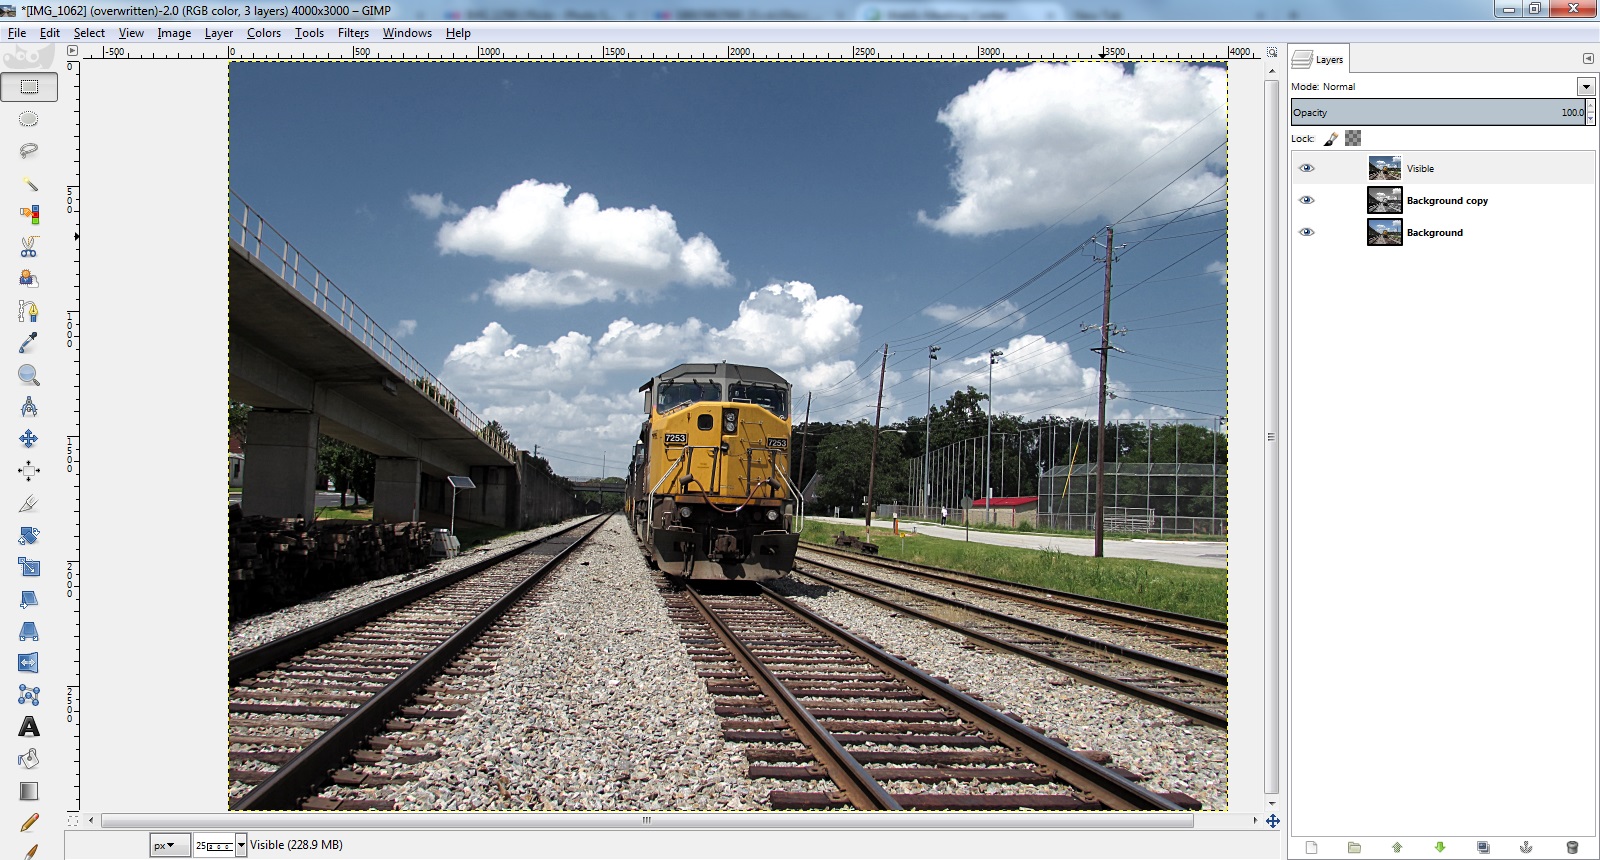
Change the layer mode to “Value” and now the light/dark contrasts of the black and white version are being combined with the color information of the original. Now we have those crazy clouds in the color version!
It kind of darkened everything a little bit too much though, mess around with Levels to brighten it.
It may also be a bit too extreme in general, in which case adjusting the Opacity of the black and white layer will blend it with the original and split the difference.
Make a new layer “from visible” to apply further effects to the combined image, such as levels/curves/etc, unsharp mask, whatever else you want to do.
This can produce a somewhat surreal looking image, and I imagine it would look pretty jarring with human or animal subjects, but maybe that’s what you want.
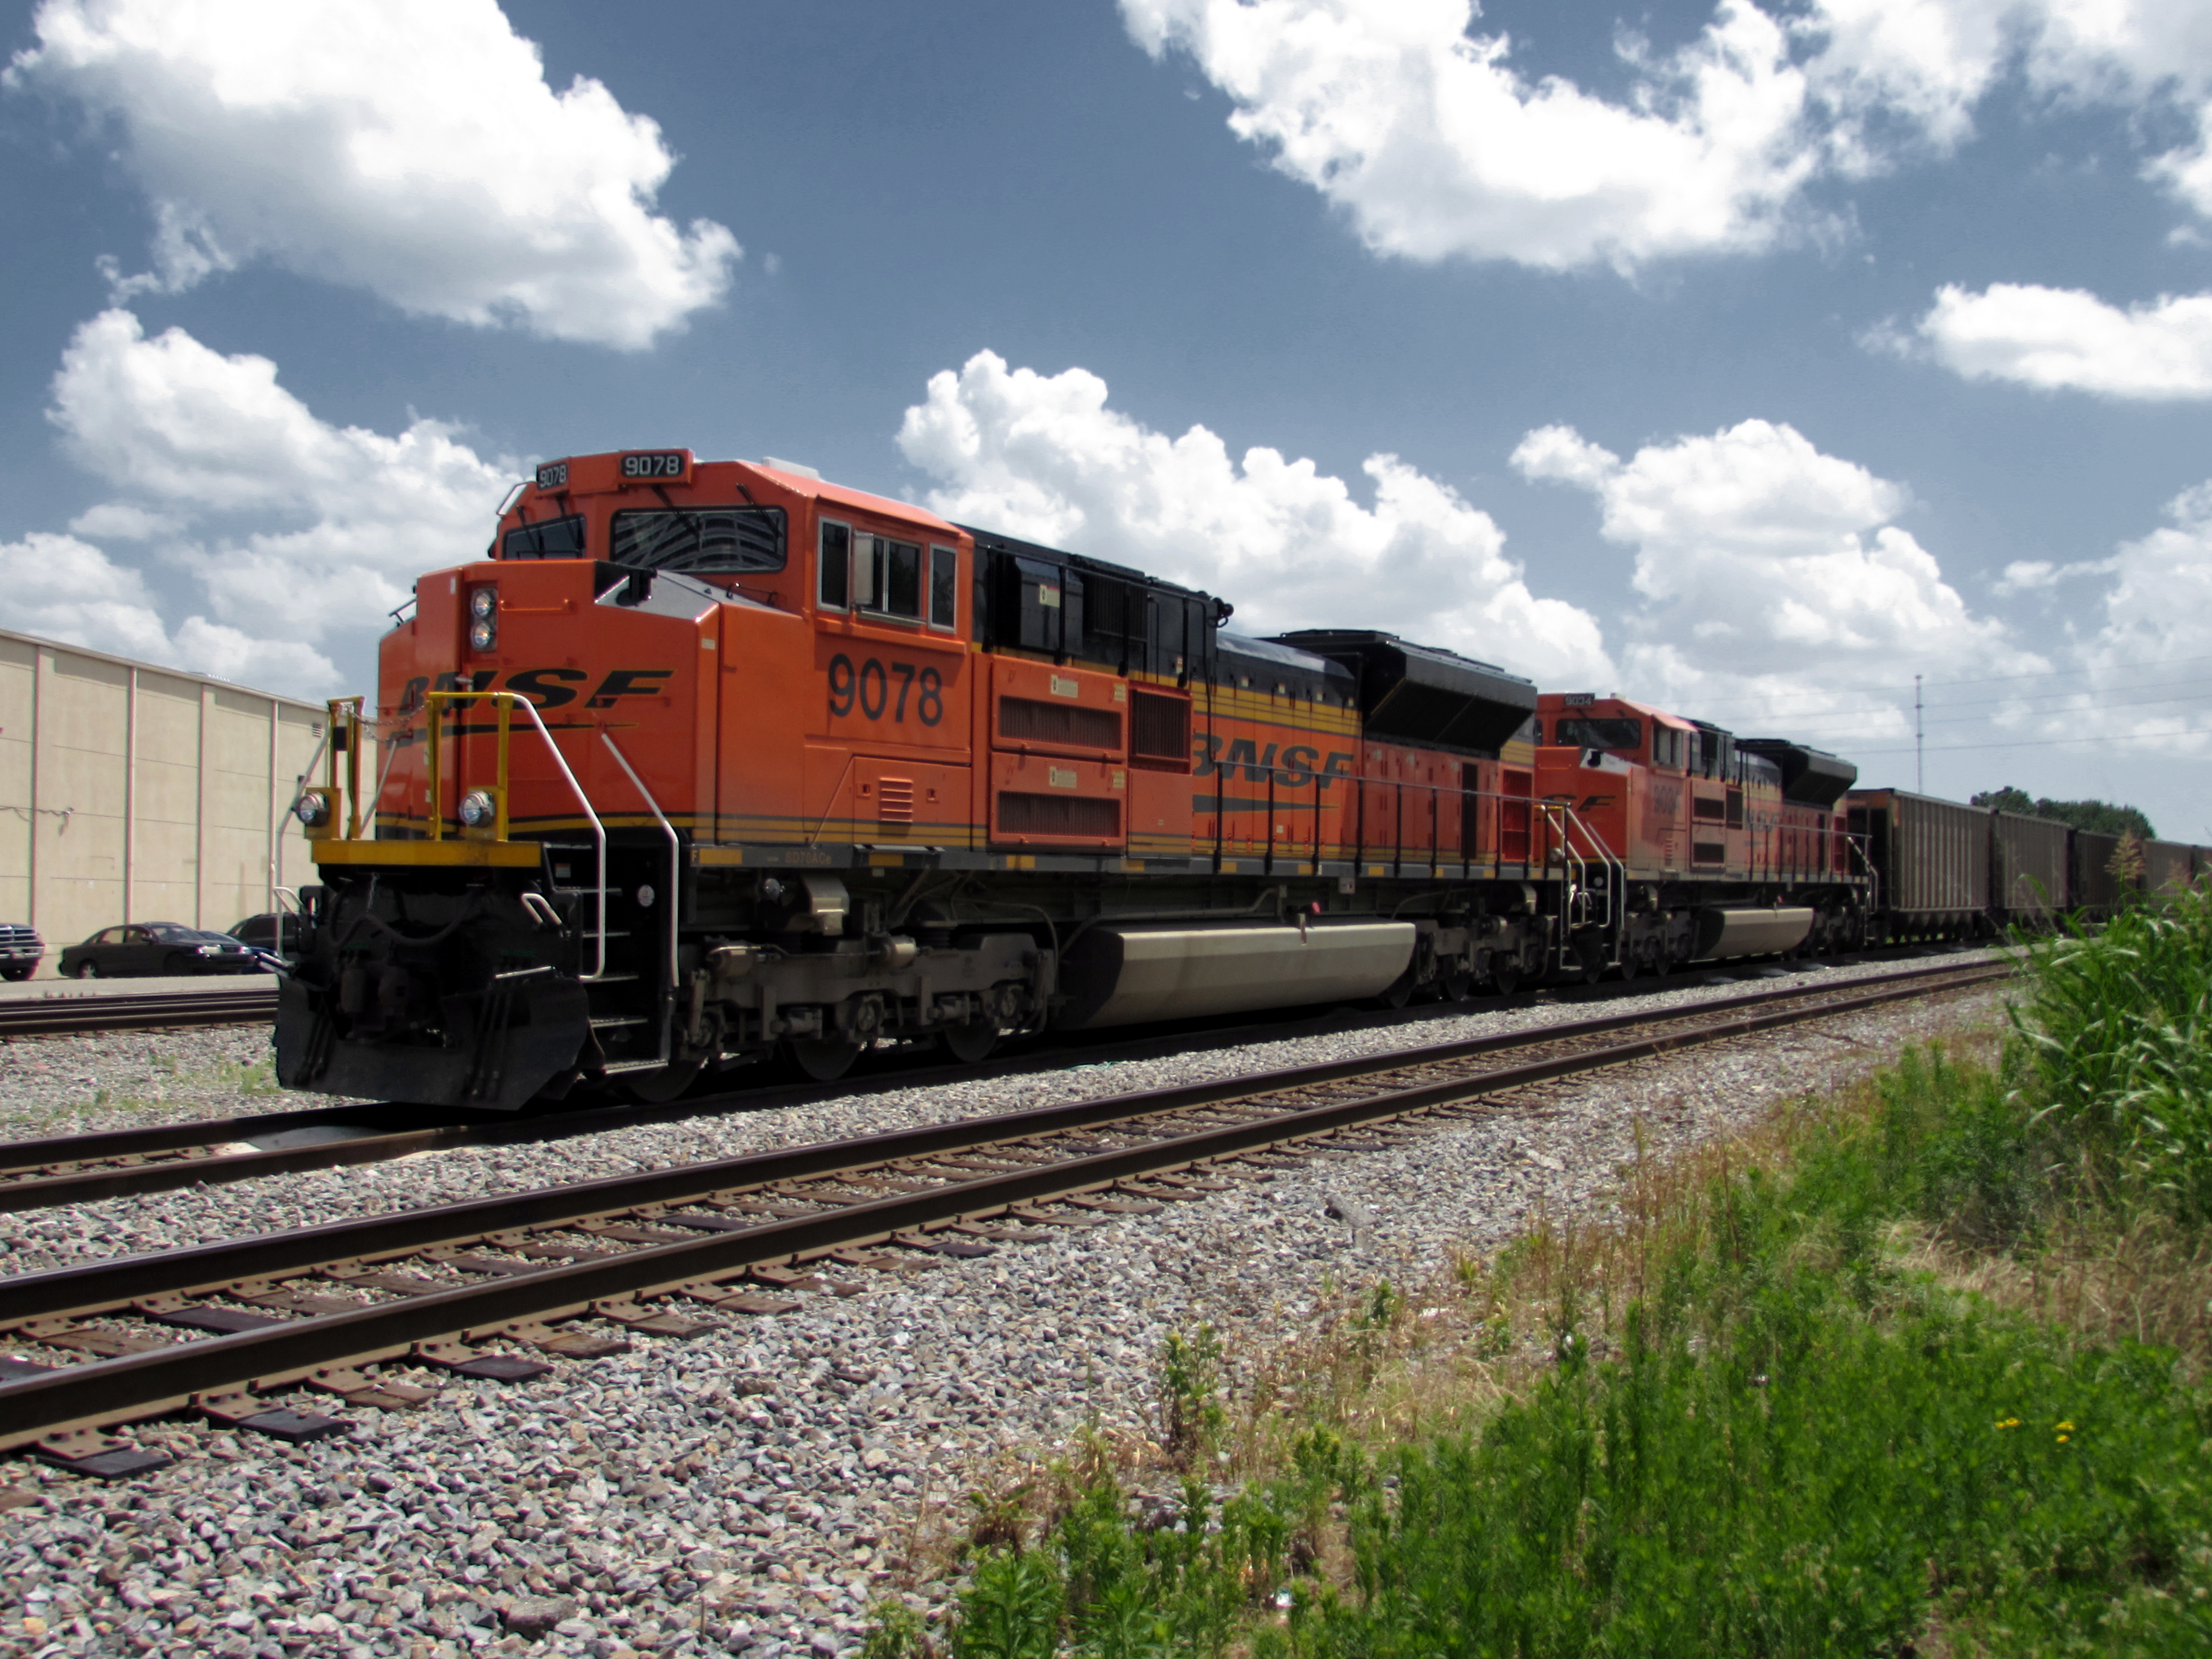
Full size before (click to enlarge):
After:
Another one done in a similar way, this time just letting it be as dark as it wants to be. Realistic it ain’t, but it’s kinda neat.


